Configuring Telos VX for use with Clearly IP's Clearly Cloud Hosted VoIP Platform
Updated
by
Robbie Green
Scope
This document covers configuration of Telos VX phone systems for use with Clearly Cloud, a hosted VoIP service from Clearly IP.
Introduction
Telos VX phone systems have traditionally been paired with an on-premise PBX registered to a SIP provider via a dedicated circuit, or interfaced to some form of legacy telco infrastructure like ISDN PRI. In recent years, as remote workforces have become more prevalent, communications providers have quickly evolved their offerings to provide the flexibility needed to support this style of work. This same flexibility is now being leveraged by broadcasters to route calls in ways never imagined before. Instead of maintaining your own PBX, you can now connect your VX system to a cloud-based hosted VoIP service, and reach it via any internet connection.
With any service delivered via the public internet, the quality of your internet connection can greatly impact performance. While any stable connection with sufficient bandwidth can be used for VoIP, we recommend SLA backed DIA (Dedicated Internet Access) circuits for critical voice applications.
Getting Started
If you haven't already, you will need to complete the steps outlined in the Quick Start Guide for VX Enterprise and VX Prime+ before moving on. If you're configuring Telos VX Duo, please follow the quick start guide that was in the box with your VX Duo before moving on.
Ordering Service from Clearly IP
You can obtain a quote for Clearly Cloud service via the order form on the Clearly IP's website. You will need one "user" account for each extension you plan to configure on your VX system. If you're configuring a new VX Duo system for two radio stations, and each station has the following - a listener line, a warmline, and a hotline, you would need three "user" accounts per station, for a grand total of 6.
This requires some new thinking if you've only used POTS based phone systems up to this point. In the past, you've paid analog phone providers an additional monthly fee for each copper pair that could carry a phone call into your facility. With VoIP, each extension (or "user" account) can carry multiple calls into your facility.
With Telos VX, each "user" account can host multiple rollover lines. If you're configuring a listener line that needs to appear 4 times on each of the Telos VSets in your studio, you need only 1 "user" account from Clearly IP. If you're configuring a VSet with 10 listener lines, you still only need 1 "user" account. If you are configuring a system for a station that will have 5 listener line extensions and 1 hotline extension in the studio, you need 2 "user" accounts.
This is one of the ways switching to VoIP can help bolster your station's bottom line!
Configuration
Log into your VX Enterprise or VX Prime+ using the IP address of the AoIP Interface that you configured using the Quick Start Guide. The default username is user and there is no password by default. Once inside, click Main from the menu at the left side of your screen. Ensure that all of your network information is correct.
You can test to see if your WAN connection has internet access and functioning DNS resolution by typing in the domain name of a public NTP server, then pressing Apply NTP Config. If your VX is able to communicate with the public NTP server, a green check mark will appear. If it cannot, a red X will appear instead.
Note: Some organizations choose to limit access to public DNS servers, preferring to utilize internal resources instead. If the public NTP server does not resolve, check with your network manager.
Using the credentials provided when you established service, log into the Clearly Cloud platform on another browser tab by visiting cloud.clearlyip.com/login.
Once inside, hover over Products and Services then select Locations from the drop-down menu.
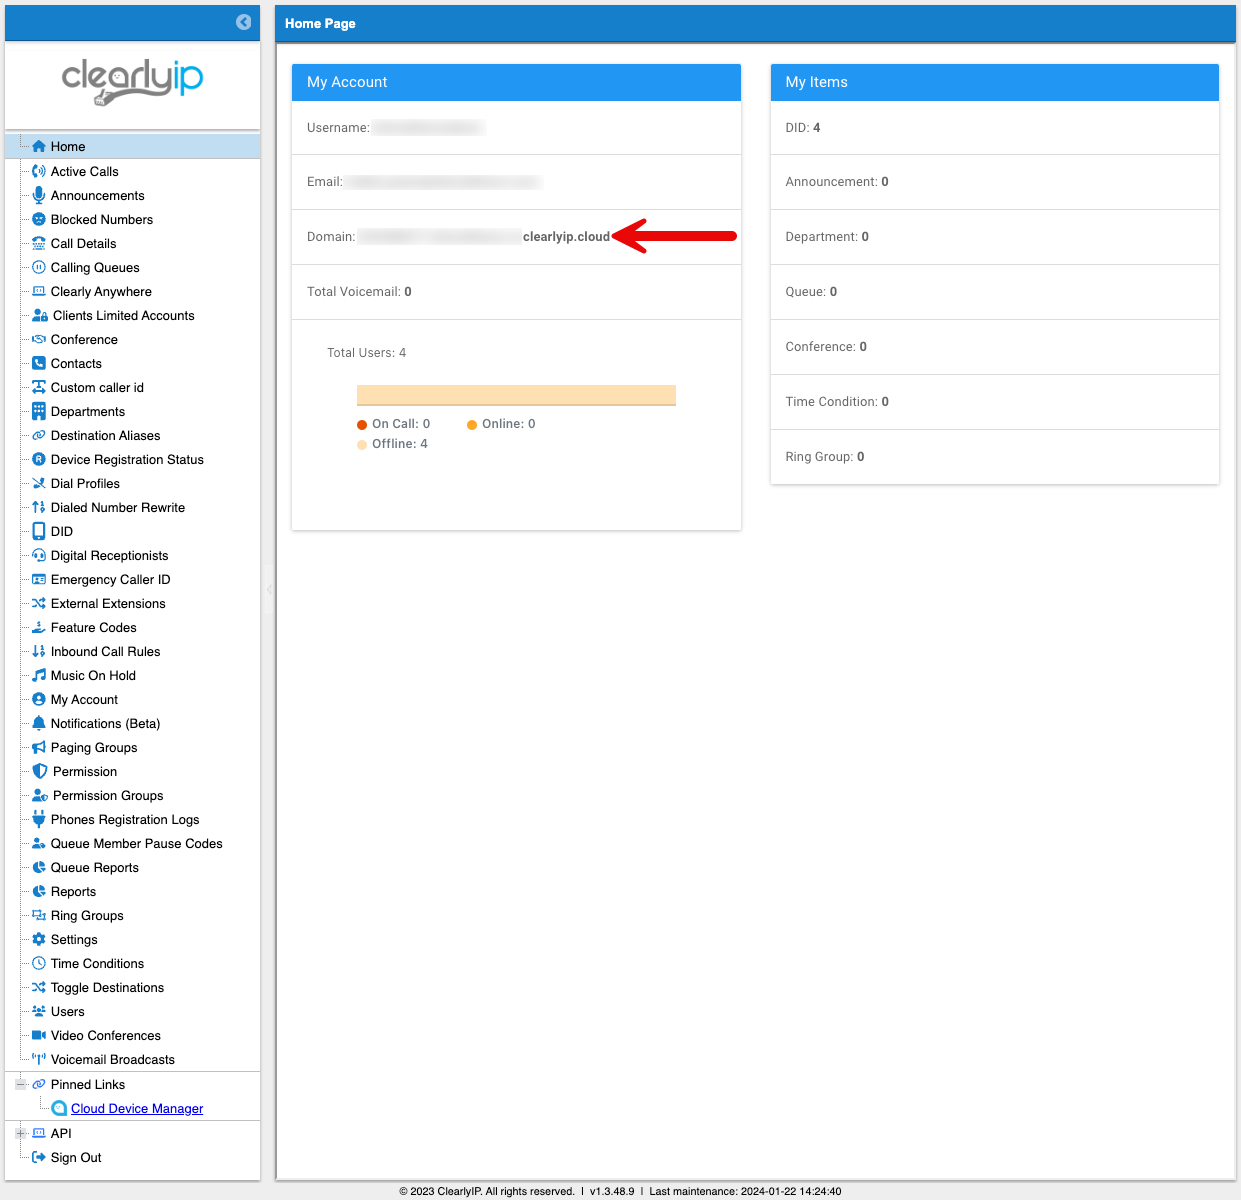
In the CloudPBX Information section, click on your Login URL.
The screen that appears will look similar to this. Highlight the Domain listed, and copy it to your clipboard.
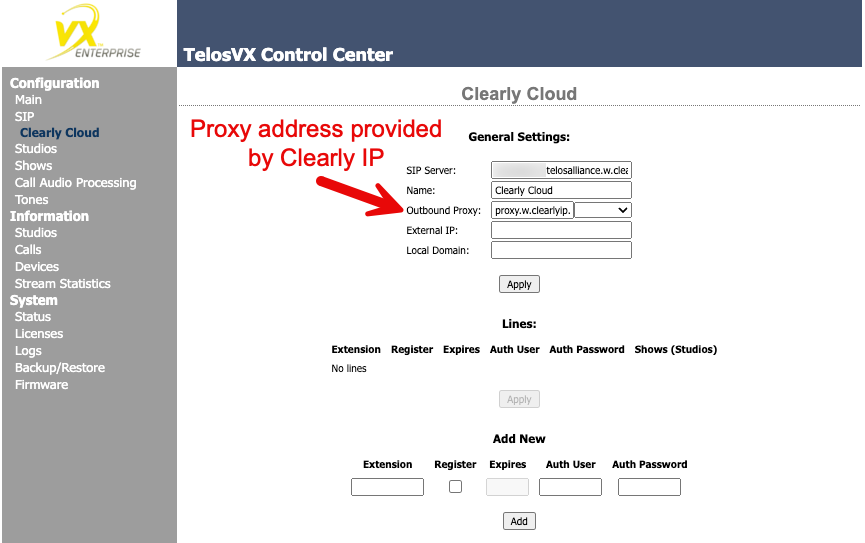
Go back to your VX tab, and click SIP from the menu at the left side of your screen.
On the screen that appears, you'll see an empty box next to the word Server. Paste the domain you copied in step 5 here and press Add.
When you press Add, a new screen will appear, with the domain you copied and pasted in the SIP Server field. Retrieve the proxy server address provided by Clearly IP when you established service and paste it into field labeled Outbound Proxy. If you desire, you can also assign a friendly name to this SIP connection by typing it in the Name field. In this example, we've labeled this server Clearly Cloud. The naming step is optional. If you leave the Name field blank, the server will be named whatever appears in the SIP Server field. You do not need to make any further adjustments on this page. When you are finished, press Apply.
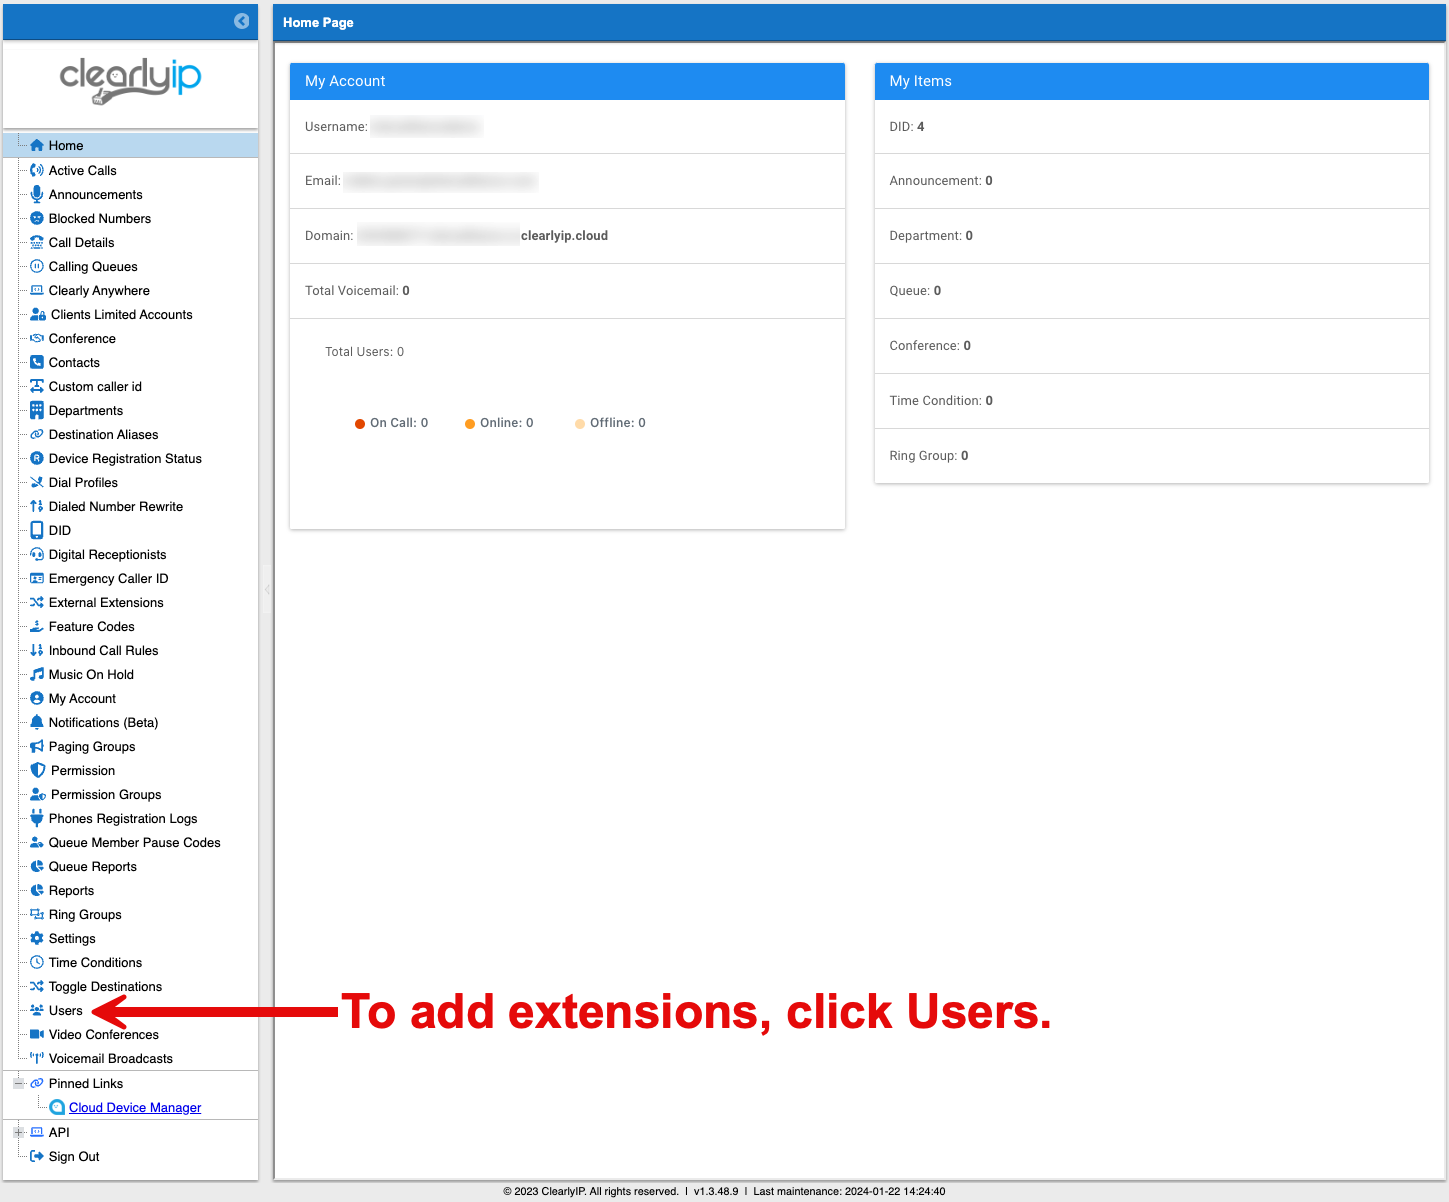
Next, you will need to add extensions to Clearly Cloud for your Telos VX to register to. To do this, go back to your Clearly Cloud browser tab, and click Users from the left hand menu.
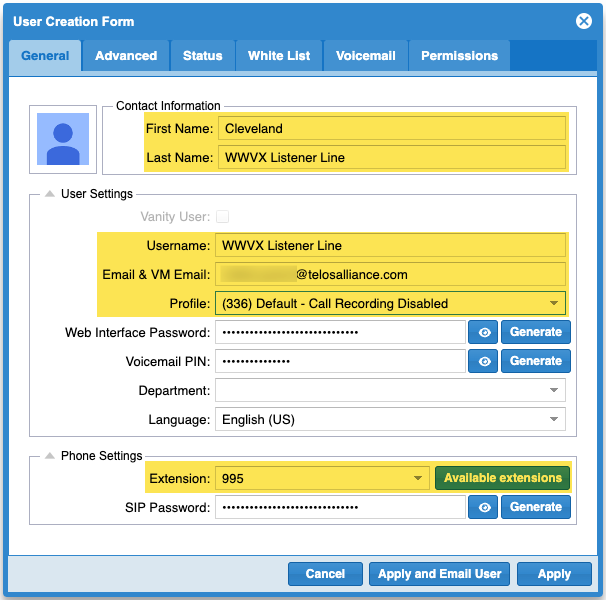
When the User Creation Form appears, you will need to fill in these highlighted fields on the General tab. You can select an extension number to assign by clicking the Available Extensions button.
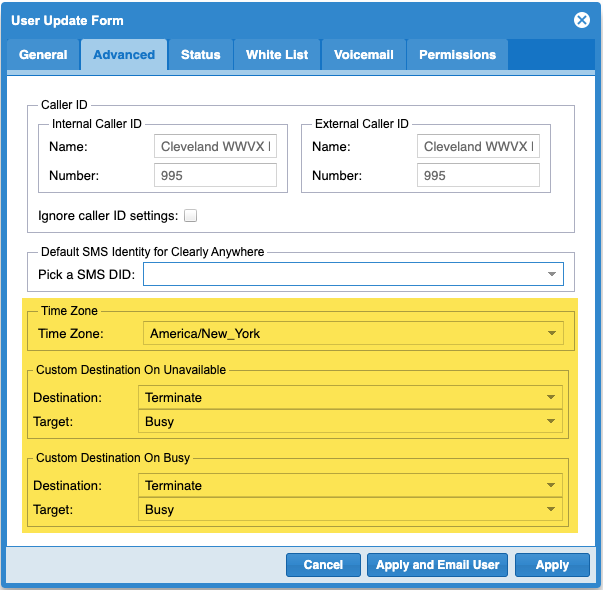
Then click the Advanced tab, and fill out the highlighted sections as shown. (Use your own time zone.) Clearly Cloud gives you a lot of call handling flexibility, and you can explore the options using the drop-down menus. The selections highlighted here, Destination: Terminate and Target: Busy will route callers to a busy signal any time your Telos VX system is offline, or if the show this extension is for isn't currently active on your VX system. If you would like to explore other options but don't fully understand them, please contact support at Clearly IP by visiting clearlyip.com/support. The support team at Telos cannot assist with Clearly IP configuration options. You will need to contact Clearly IP directly for support.
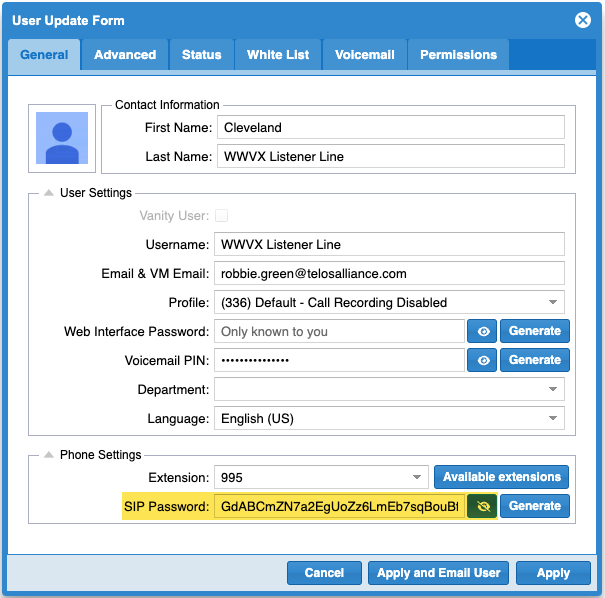
Go back to the General tab. Make a note of the extension number, then click the Eye Button next to the SIP Password box to reveal the SIP password for this extension. Using your cursor, highlight and copy the entire complex password in this field to your computer's clipboard, then press Apply. The password may extend beyond the right side of the box. Make sure you highlight the entire password before you copy it to your PC clipboard.
We highly recommend using the long, complex password automatically generated by Clearly IP, or utilizing a similarly complex password of your own. This password is your primary defense against bad actors utilizing your SIP account for their own purposes.
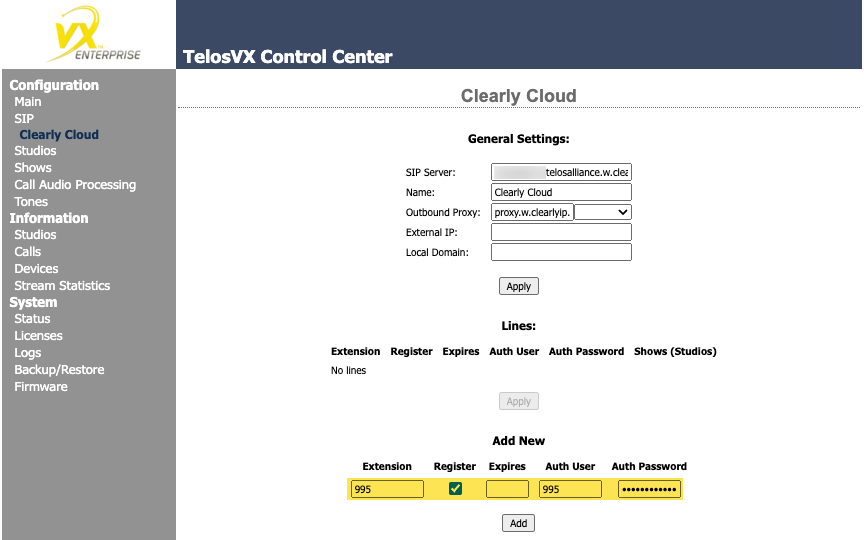
Go back to the browser tab for your Telos VX. In the Add New section, type the extension number for the extension you just created into both the Extension and Auth User fields. Check the Register box, and paste the password for the extension into the Auth Password field. When you're finished, press Add.
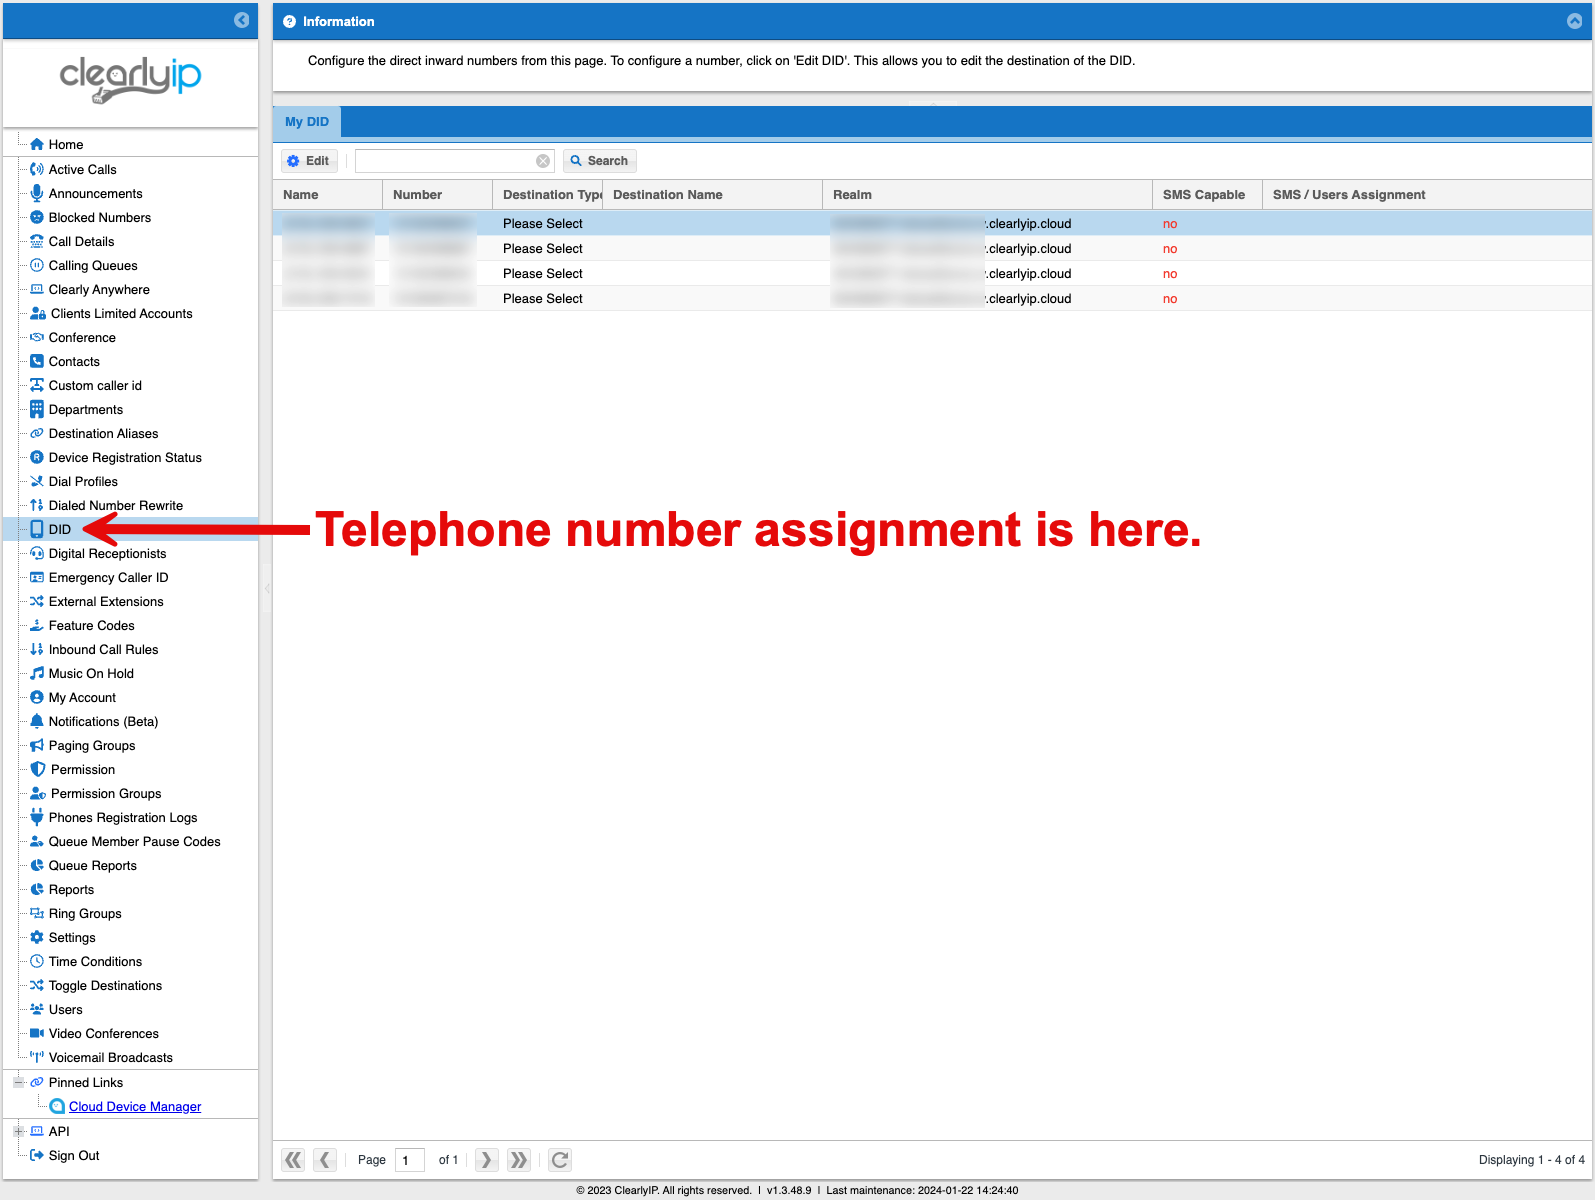
Next, you will need to assign a telephone number to the extension you just created. Go back to your Clearly Cloud browser tab, then select DID from the menu on the left side of the screen. All of the telephone numbers you've purchased and/or ported to Clearly IP should appear here. Click the number you want to assign to the newly created extension, then press the Edit button. The support team at Telos cannot assist if your numbers are missing from this screen. You will need to contact Clearly IP directly for support.
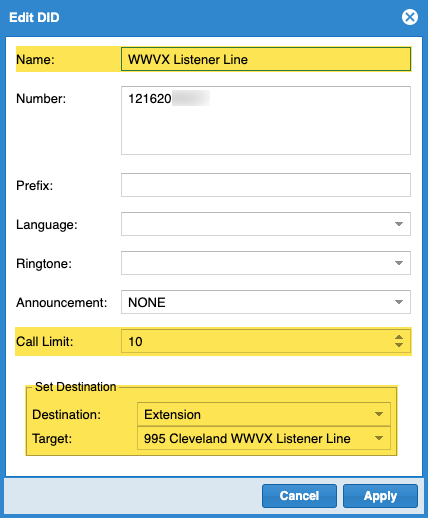
When the Edit DID form appears, type a descriptive name for this phone number in the Name field, then use the Set Destination dropdown menus to select Destination: Extension and the extension you just created. In this example, it's extension 995.
Pay special attention to the Call Limit field. This is where Clearly IP "chokes" the number of calls going to your VX system for each DID (phone number.) It should be set equal to the number of times you plan to assign each phone number to a line key on your Telos VSets.
Let's assume for a second that you're configuring a system with a Telos VSet 12 for a station that will have 10 appearances of the listener/contest line, plus one warmline for guests to call into, and a hotline just for the program director to use. You would set this number at 10 for the listener line, 1 for the warmline, and 1 for the hotline.
When you are finished, press Apply.
Repeat steps 9-15 to assign any additional numbers you have to your Telos VX system.
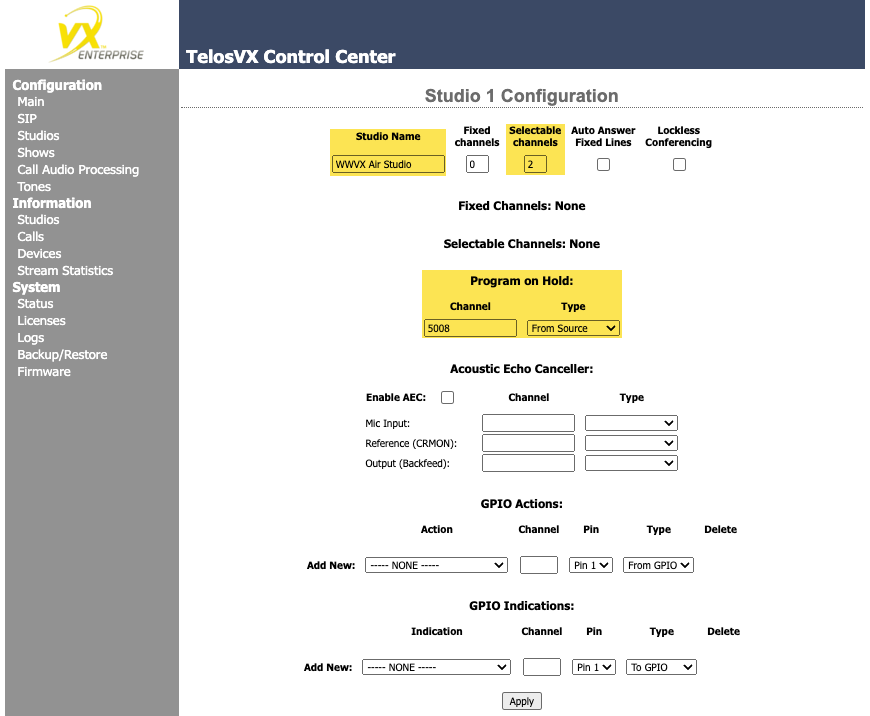
After creating any additional extensions, assigning phone numbers to them, then adding them to your Telos VX system, you are now ready to configure a studio in VX. Click Studios from the left hand menu on your Telos VX browser tab, then press the Add New button. On the screen that appears, type whatever term you use to describe this studio into the Studio Name field. Next, you will configure the number of audio channels this show uses. If you're coming from a legacy POTS based phone system, think of channels as the "from caller" audio output on an analog hybrid. Telos VX offers two different channel configurations - Fixed and Selectable. In a studio with Fixed channels, each extension on your VX system is tied to a single fader on the board. For example, line 1 would be tied to fader 1, line 2 would be tied to fader 2, line 3 would be tied to fader 3, and so on. In a studio with Selectable channels, each fader on a board can have multiple different lines routed to it. This setup allows you to put any caller on any fader, the same way POTS based systems like Telos 1X6, TWOx12, NX12, or Hx6 operated. Most users in territories covered by Clearly IP will use Selectable Channels, so that's what we're covering in this document. If you would like to configure Fixed channels instead, please refer to the Telos VX Enterprise & Telos VX Prime+ User Manual and make the necessary substitutions. In this example, we're configuring a studio with two "phone pots" on the board, so I've entered a 2 in the Selectable Channels field. Next, you will need to enter the Livewire channel or AES67 address of your Program on Hold source, typically the main program buss of your board. In this example, Livewire channel 5008 is the program buss of our board, so I've entered it here and left From Source selected as our Type. (Switch this to AES67 Multicast if utilizing an AES67 multicast source.) After you have typed in a Studio Name, the number of Fixed or Selectable Channels, and your Program on Hold channel, press Apply.
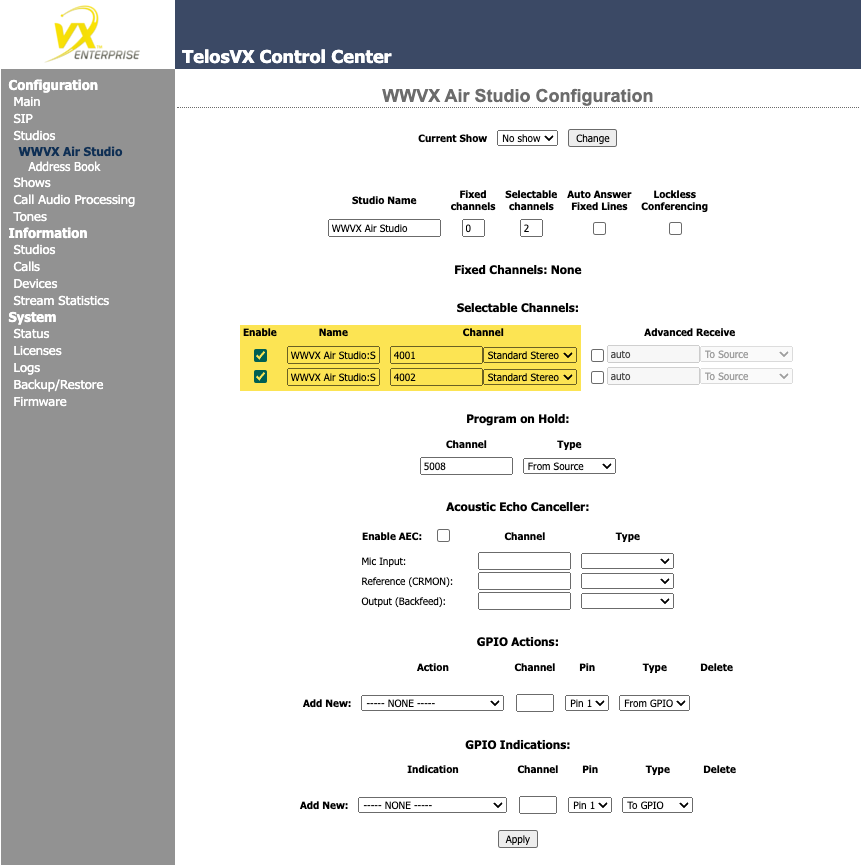
A new section labeled Selectable Channels will appear on your screen. This is where you define the caller outputs from this show on your Telos VX system. If this studio is equipped with an Axia console, this configuration is exceptionally easy. Just check the Enable box for each line, type in the Livewire channel number you wish to assign to each caller output, select either Standard Stereo or Live Stereo from the drop down menu, then press Apply. When you configure this input on your Axia console as a Phone type input, it will know to automatically generate a mix-minus and send audio from the appropriate console buss back to the caller.
We recommend Standard Stereo Livewire streams for phone calls. The difference in latency between Standard Stereo (5ms) and Live Stereo (0.25ms) may seem significant, but in the context of phone calls, it's not. 1ms is 1/1000th of a second, and most VoIP calls average 150ms of end to end latency.
Live Stereo streams push significantly more (but smaller) packets through your network infrastructure, and are best reserved for applications where the lowest possible latency is critical, such as mic inputs and headphone outputs. Some network switches can handle large numbers of Live Stereo streams better than others.
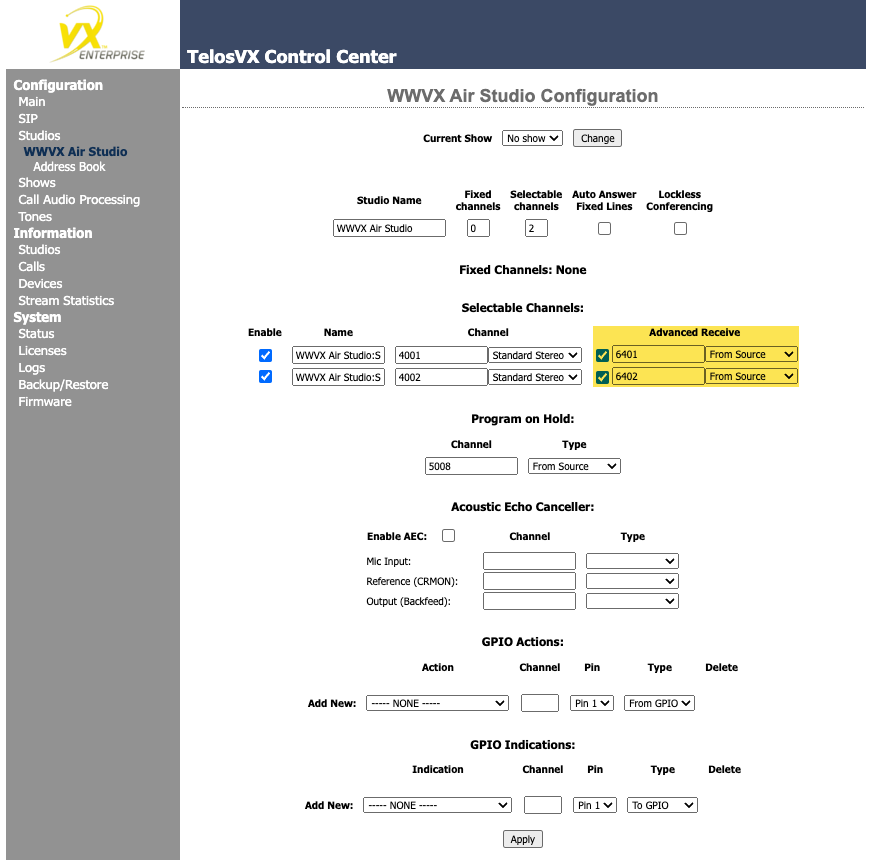
If this studio is equipped with some other brand of console, you will need to interface it to your Telos VX system using an Axia xNode, or some type of AES67 device. The caller output channels are configured the same way, but you will need to manually specify the receive channels. In this example, the two caller outputs of the telco module on the other brand console are fed into an Axia xNode. Those inputs on the xNode are assigned Livewire channel numbers 6401 and 6402. To configure this input on VX, check the box to the left of the Advanced Receive field and type in the appropriate Livewire channel numbers, in this case 6401 and 6402.If the audio device being used to interface your other brand console not an Axia xNode, select AES67 Multicast from the drop down boxes and enter the AES67 multicast IP addresses for send and receive in the fields where Livewire channels would go instead. When you are finished adding all of your audio I/O configuration, press Apply.
After configuring all audio I/O in the Studios section, it's time to create Shows. Shows are how the extensions created on the Clearly Cloud platform and added to your Telos VX system in steps 9-15 are laid out on call controllers like the Telos VSet, the one built into the Axia Quasar console, the expansion module for the Axia iQ console, or a virtual console like Axia Altus. To start, click Shows from the left hand menu then the Add New button. On the screen that appears, type a friendly name for the show, in this example, we've named the show "WWVX Air." Then enter the number of Lines you want to assign to this show. In this example, we've assigned 6 lines. After entering the number of lines you need for your application, click Apply.
Unlike traditional POTS phone systems, the number of lines assigned to a particular extension isn't limited by the number of physical lines you've purchased, though this can vary by VoIP provider. (With Clearly Cloud, this isn't a limitation.) Your main limitation is the number of physical line keys on the Telos call controller you're using in each studio.
VSet 6 offers up to 6 lines. VSet 12 offers up to 12 lines. Axia iQ 6-Fader Expansion Frame with call controller offers up to 6 lines. Axia Quasar offers up to 12 lines when running v3 software or later, or 8 lines running a software release prior to v3. Axia Altus offers up to 6 lines.
On the screen that appears, you will need to enter a friendly name for each line. This goes in the Name field. The text in the Name field will appear on your call controller as the label for each line. In this example, we've named the first four lines Request 1 through 4, line 5 has been named Warmline, and line 6 has been named Hotline. You can name each line anything that describes the function of each line adequately for your staff, and you can label multiple lines identically if you wish. For example, you could have two warmline slots on a phone, all labeled Warmline. After adding the Name labels for each line, you will need to type in the Extension for each line. In this example, extension 995 is our request line, and it is assigned to lines 1-4. Our warmline is extension 996, and the hotline is extension 997. Next, you will need to choose the SIP Server each line is connected to. In this example, I've chosen the SIP Server for Clearly Cloud for each line (the only one currently registered on this system) but with Telos VX, you can have multiple SIP providers registered simultaneously, and you would need to select the appropriate one for each line. Since we configured all lines as Selectable in step 17, we will leave the Fader dropdown menu at the default setting of Selectable for each line. Next, there's a check box by each line for Busy All. This function allows operators to busy out the listener lines for a studio. As you can see from the example, we've checked the box for each of the request lines, but left it unchecked for the warmline and hotline, so people calling the warmline or hotline could still get through, even if the busy all feature is enabled in a studio.After making all of your configuration changes for this show, press Apply.
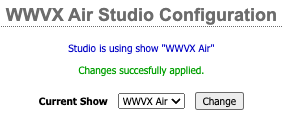
The final step in this provider configuration is to assign a show to your studio. This will register the extensions with Clearly IP, and you will be able to see that they registered successfully in the Clearly Cloud portal. To do this, go back to the Studios screen in Telos VX, and select the studio you wish to register. At the top of the screen, you'll see Current Show along with a dropdown menu and a button labeled Change. Select the show you just configured from the dropdown menu, then press Change. You will see something that looks like this:After selecting your show, you can verify that the lines have been registered in the Clearly Cloud portal. To do this, select Users from the left hand menu in the Clearly Cloud portal and look at the field labeled Status for each extension. If your Telos VX system has properly registered to the Clearly Cloud service, the icon in this field will be green for each registered extension.For unregistered extensions, the icon will be grey. If you were already at the Users page in the Clearly Cloud portal, you will need to refresh the page to see the current status after selecting your show on the studio screen in Telos VX.
If, after completing all these steps, you don't see a green status indication for your extensions in the Clearly Cloud portal, check to make sure there are no firewall rules blocking SIP traffic. Though less common, some organizations also block SIP at the switch level in their networks. If you are unable to register to the Clearly Cloud service successfully, please check your firewall and switch configuration.
Wrapping Up
After completing this telco provider setup for Clearly IP, you will want to connect any call controllers you might have to your Telos VX system and place a few real world test calls to ensure there are no other issues. Instructions for configuring the Telos VSet Call Conrollers can be found here. Please consult the instruction manual for your Axia console for help configuring in-console call controllers.
After your Telos VX system successfully registers to Clearly Cloud, we highly recommend making a 5 minute outbound call from your call controller, then placing an inbound call to that call controller as well. This should be a call where you speak with another person, to make sure you have bi-directional audio. In addition to blocking SIP traffic entirely, some firewalls will treat SIP traffic as a UDP attack, cutting off calls after some period of time (typically less than 1 minute.) This test will help you determine if your firewall is configured to do this or not.
 Updated
by
Robbie Green
Updated
by
Robbie Green


 If, after completing all these steps, you don't see a green status indication for your extensions in the Clearly Cloud portal, check to make sure there are no firewall rules blocking SIP traffic. Though less common, some organizations also block SIP at the switch level in their networks. If you are unable to register to the Clearly Cloud service successfully, please check your firewall and switch configuration.