Using a GPIO node to send iPort contact closures
 Updated
by
Bryan Jones
Updated
by
Bryan Jones
Scope
This document applies to the Zephyr iPort and uses a GPIO node with physical buttons to send relays to a remote location.
Description
The Telos Zephyr iPort has the ability to forward (send) relays to the remote end. There are many methods to accomplish this. In this example, we will use physical buttons wired to the GPI (inputs) of an Axia GPIO node. Any physical Axia GPIO port will work for this. You can use the GPIO on the original (often referred to as classic) nodes, xNodes, PowerStation, QOR, etc.
We will assume that you have already wired and tested the buttons wired to the GPIO Node for the purposes of this document.
Setup
Setting up the node
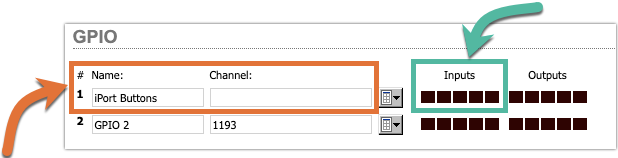
There is nothing to do in the GPIO node other than to test your wiring and possibly label the port for your informational purposes. For example, here we have a GPIO port configuration (highlighted in red). We have named it "iPort Buttons." There is no Livewire channel assigned. Use the Input indicators (highlighted in green) to confirm your buttons are working.
iPort Setup
- Using a Web Browser, connect to your iPort
- Click on Codec Configuration on the left-side menu
- Click on the Options button for the Codec sending the relays
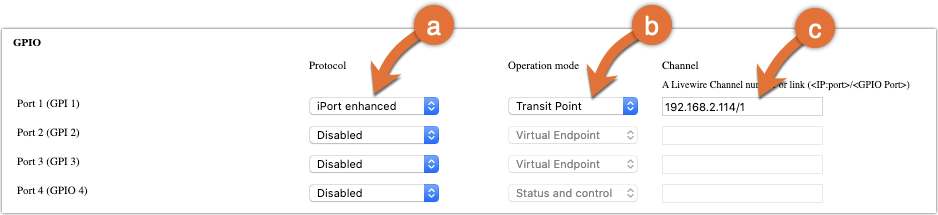
- Scroll down to the GPIO Section located under the Transmit heading. Note there are separate Transmit and Receive sections.
- Each Transmitter has four ports for GPIO configuration. Set the Protocol, Operation, and Channel configuration.
- For Protocol, select iPort Enhanced.
- For Operation mode, select Transit Point
- For Channel, put the IPAddress/PortNumber of the GPIO node. In this example, our GPIO node is a 192.168.2.114, and we have wired our buttons to port 1.
- Scroll to the bottom of the page and click Apply
Repeat this configuration, as needed, for other Codecs or, configure additional GPIO on this same Codec.
Let us know how we can help
If you have further questions on this topic or have ideas about how we can improve this document, please contact us.