Start/Stop iProfiler recordings with Pathfinder Core Pro
 Updated
by
Brett Patram
Updated
by
Brett Patram
- Scope
- Examples
Scope
Axia iProfiler archives can be configured to operate in Skimmer mode. Skimmer mode allows the archive recorder to be started or stopped, controlled by Livewire GPIO pin states. Axia Pathfinder Core Pro can set Livewire GPIO pin states. By using Pathfinder logic flows, the Archive skimming can started or stopped based on many different conditions
This helpdoc article will go over two popular example of using Pathfinder Core Pro to start/stop skimming in an iProfiler archive
Prerequisites
- Server/workstation with Axia iProfiler + Axia IP Audio Driver installed and licensed
- Pathfinder Core Pro appliance or VM installed and licensed
- Basic working knowledge of iProfiler Skimming
- Basic working knowledge of Pathfinder Core Pro Audio Alarms, Logic Flows and User Panels
Examples
Example #1: Audio Level starts/stops Skimmer
In this example, an Audio Alarm in Pathfinder will observe the level of a Phone hybrid from a Telos VX Hybrid. When there is audio level present, the skimmer will be turned on ON, when there is silence the skimmer will be turned OFF
Create an Audio Source in iProfiler Server
In iProfiler Server application, click on Audio Sources button 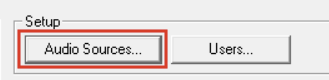 |
If you already have audio sources defined, then skip to step #2 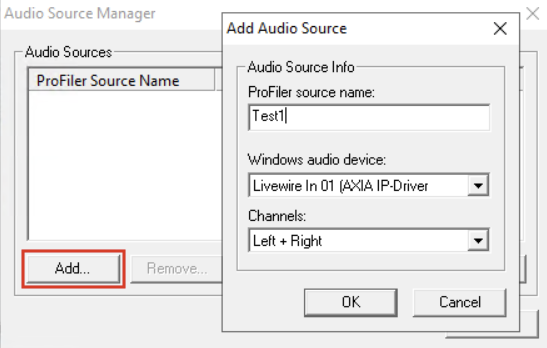 Click the Add button to add an Audio Source, then click OK. In this example I am using Livewire In 01 |
Configure Source Skim Input for that Audio Source
Highlight the Audio Source and select Configure Source Skim Inputs 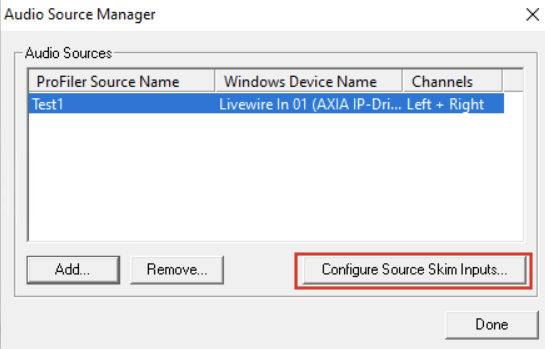 |
For Input 1: Set the Node drop down to IP-Audio Driver Set Port to GPO 1 Set Pin to 1 This means that GPIO Input 1 for the defined audio source "Test1" will be linked to the GPIO Port #1, Output Pin #1 of the installed Axia IP Driver that runs on the iProfiler server. 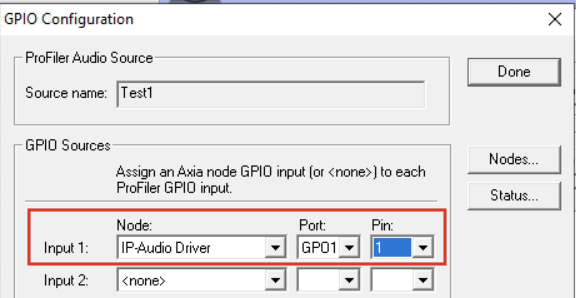 |
Create an Archive in iProfiler Server
If you already have an Archive created. Click on it, then click Stop. Then click Edit and skip ahead to the "Record" tab  In iProfiler server click the Add button to create a new archive |
Give the archive a name, and set it to Start automatically when iProfiler starts 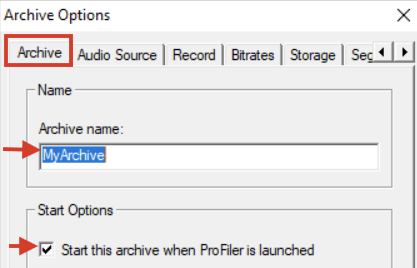 |
On the Audio Source tab, set the Audio Device to the one that was created/ edited earlier with the Skim Source Input config 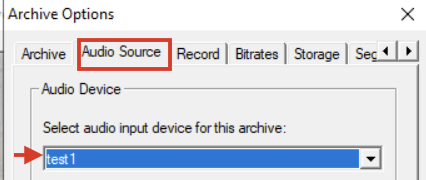 If this is a new Archive, you will then need to go to the Bitrates tab to set recording bitrate. Then go to the Storage tab to set the folder location where the recordings should be saved. By default, the location will be C:\Program Files (x86)\Archive\NameOfTheArchive |
Configure Archive for Skimming
On the Record tab: Set "Record Mode" to Skimming (allows archive to only record when skimming is active) Check 1 for "Skim Switches" (tells archive to use Input 1, this is what we configured on the Configure Source Skim Inputs for the Audio Source) Set "Activate when switch is:" to Closed 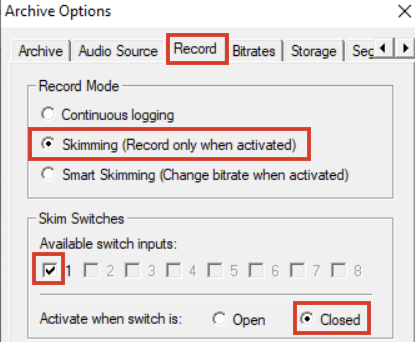 Click OK on the Archive Options. If this is a new Archive you will be asked if you want iProfiler to create the folder location for saving recordings. Click Yes. You will then be asked if you want to grant all users access to this archive. Click Yes. |
Create an Audio Alarm in Core Pro
Now that the iProfiler Audio Source and Archive have been configured to support skimming we can move on to configuring Pathfinder
Login to the Pathfinder Core Pro web ui and go to the Audio Alarms page 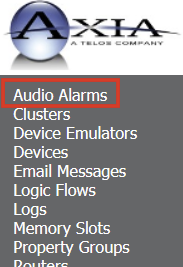 |
On the Audio Alarms page, on the right side of the page near the bottom of the list will be a + button. Click that to create a new audio alarm  |
Create and configure the Audio Alarm 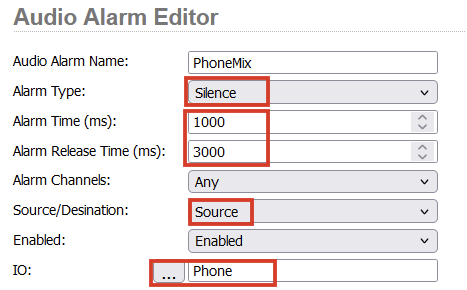 See Pathfinder CorePRO user manual for details on Audio Alarm settings |
Create a Logic Flow in Core Pro
The Logic flow will read the current state of the audio alarm to determine what state to set the GPO Pin of iProfiler's Switch Input (IP Driver GPIO Port 1, GPO Pin 1 is tied to iProfiler Audio Source Test1, Switch Input 1)
Go to the Logic flows page and create a new logic flow Double click on the Start Point to set its Property  Under Audio Alarms, find the Audio Alarm you just created Select the Alarm State Property 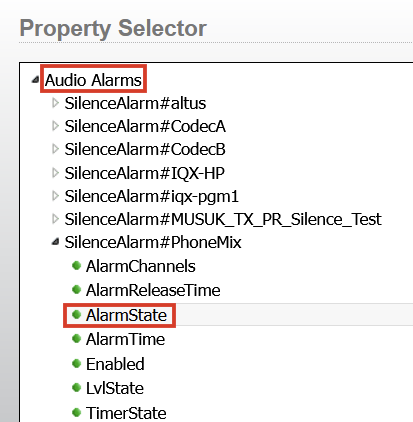 Click Select |
Double click on the End Point to set its property  Under GPIO, find the IP Address of the iProfiler server. These are the GPIO ports of the IP Driver that runs on the iProfiler Server Open 1 GPO (or the name of GPIO port 1 if its named) Open Pin 1 Select PinState  Click select |
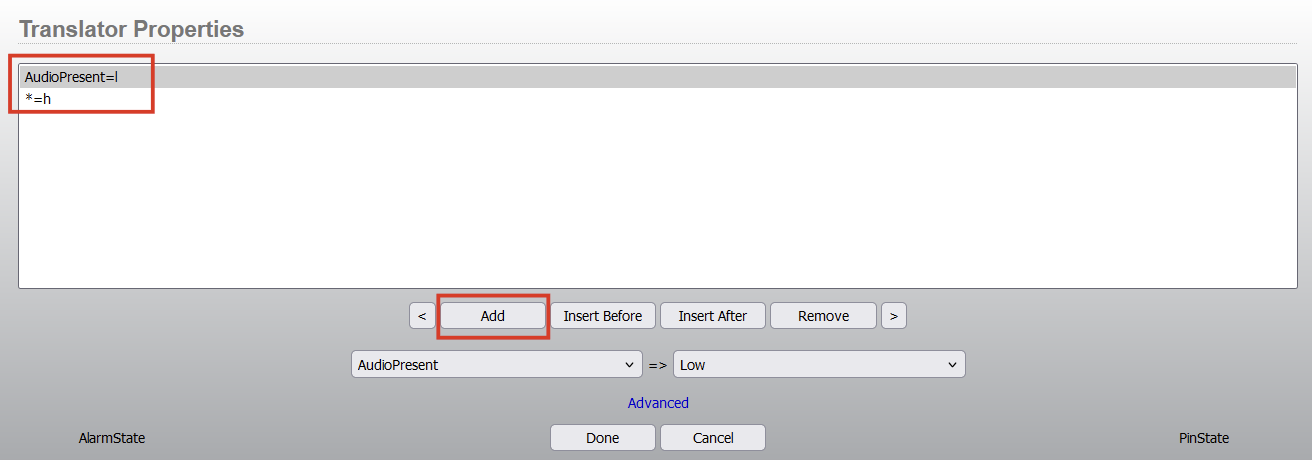
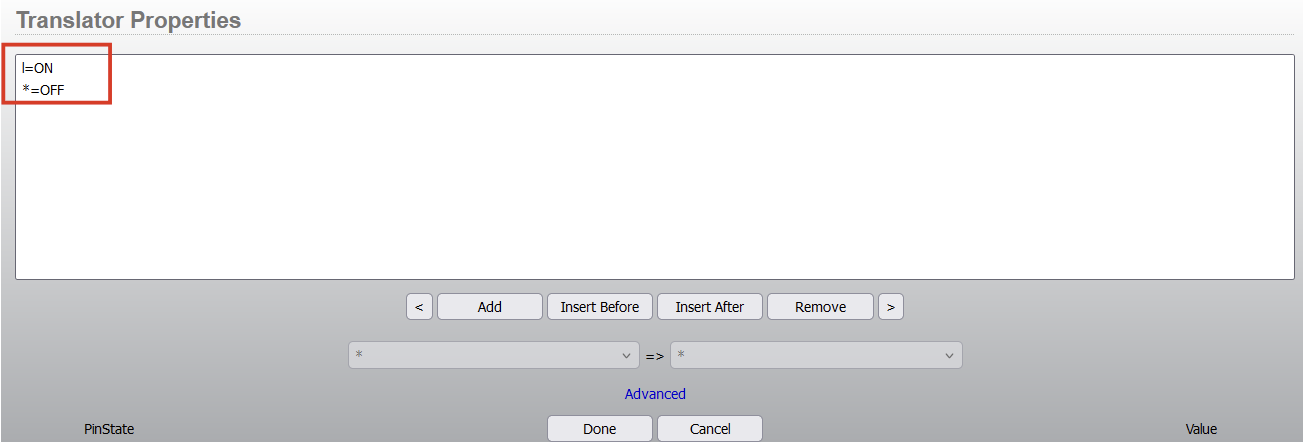
Double click on the Translator block to set translator values 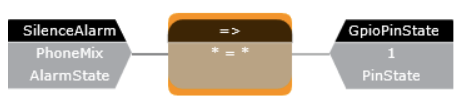 The translator only requires two lines:
 Click done and then click Apply to save the work  Logic flow should look similar to this 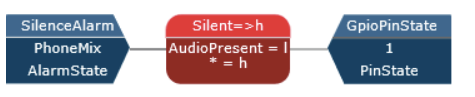 |
Try it out
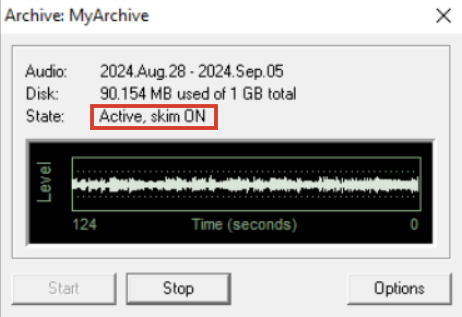
Ensure that the Audio Source used in the Silence Alarm has audio present The Logic Flow should indicate Audio Present like shown below: 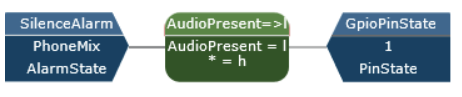 In iProfiler, select the Archive in the list and click the Show button to bring up its status window Look for skim ON -- this means that the skimmer is actively recording 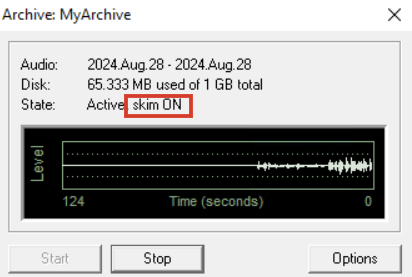 |
Remove audio from the Audio Source used in the Silence Alarm The Logic Flow should indicate Silent like shown below: 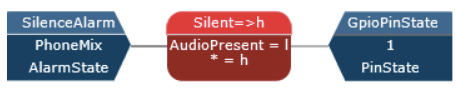 In iProfiler Archive status window, look for skim OFF -- this means that the skimmer is stopped, no longer recording 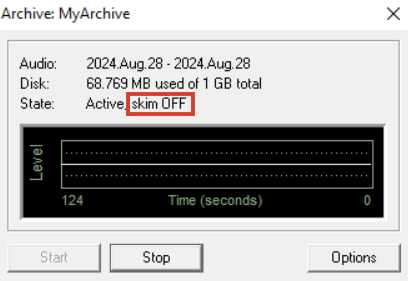 |
Example #2: User Panel button starts/stops Skimmer
Create a new user panel
In CorePro select User Panels from the left hand side navigation  |
If you have an existing user panel to add to, then click the Edit link for that user panel in the list On the User Panels page, on the right side of the page near the bottom of the list will be a + button. Click that to create a new User Panel  |
Add a button to user panel
Select the Button object and drag onto the panel 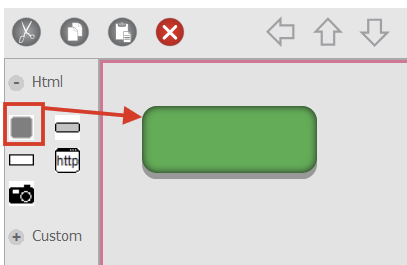 |
Configure button Action
Sets what will happen when the user presses the buttonClick on the button so that it is highlighted
On the right hand side of the panel editor, is the property tables for the selected object (the button)
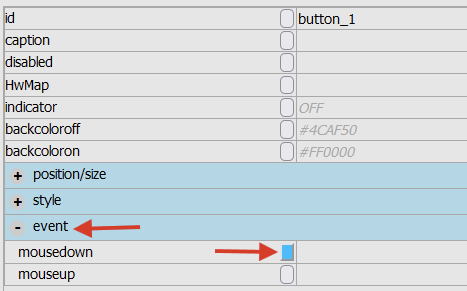
Expand the "event" section
For mousedown click on the button so that it turns blue
After clicking the button for mousedown, a logic flow will appear at the bottom of the page This is the logic flow that will set the GPO pin state when the button is clicked Click on the EndPoint of the Logic Flow  The Property Selector window will appear Just like in Example #1, step #6. We want to select the GPIO Port, and GPO Pin of the IP Driver that runs on the iProfiler server. This needs to be the same Port and GPO pin that we used to define the Skimmer Input for the iProfiler Audio Source Pick the correct GPIO port, pick the correct GPO Pin and select the PinState Property  The Translator Properties window will appear We only need to set one line, like in the screenshot below
This will allow us to use a single button to start and stop the skimmer. Each time the user button is pressed, it will "swap" the GPO pin state between L or H (On or Off) 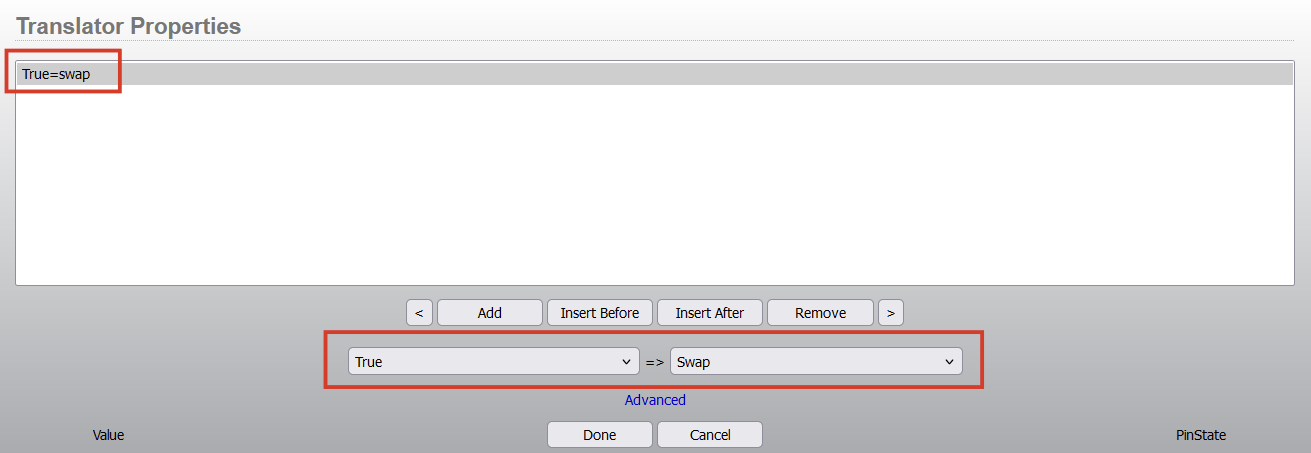 Click Done You will be prompted to set the button color binding, CLICK CANCEL  Save changes made to the panel  |
Configure button Indicator
Turns button indicator ON or OFF based on GPO pin state of Axia IP Driver
Click on the button again so that it is highlighted On the right hand side of the panel editor, is the property table for the selected object (the button) For indicator, click on the button so that it turns blue 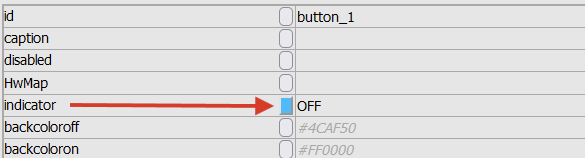 |
After clicking the button for indicator, a logic flow will appear at the bottom of the page This is the logic flow that will set the button's indicator ON or OFF depending on the GPO Pin state Click on the Start Point of the Logic Flow  The Property Selector window will appear Pick the correct GPIO port, pick the correct GPO Pin and select the PinState Property This is going to be the same GPIO Port and GPO Pin that you used in the previous step for the mouse down action. However, in this case, instead of setting the pin state we are reading what the current pin state it. We use it to control if the button indicator will be ON or OFF. 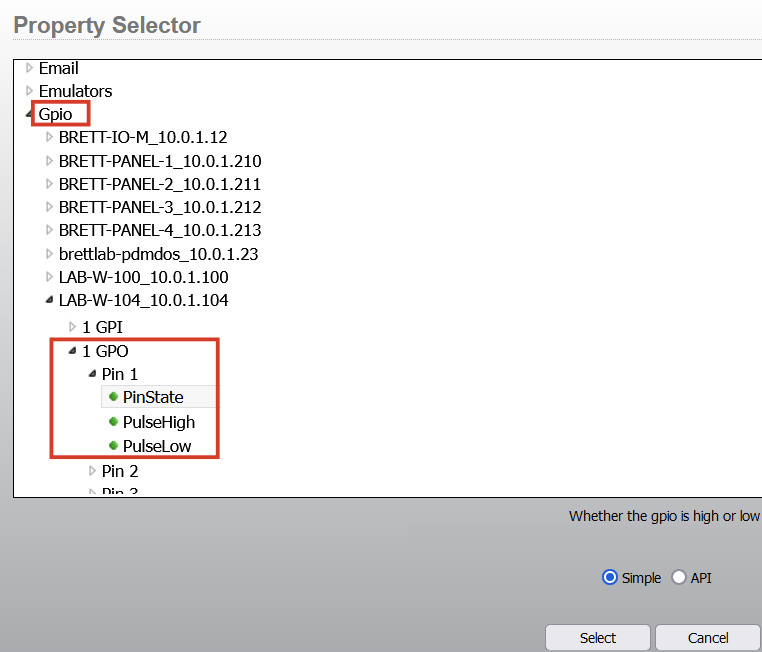 The Translator Properties window will appear We only need to set two lines, like in the screenshot below
 Click Done You will be prompted to set the mouse down action, CLICK CANCEL (we already set this)  Save changes made to the panel  |
Configure button Caption
Sets the button text based on GPO pin state of Axia IP Driver
Click on the button again so that it is highlighted On the right hand side of the panel editor, is the property table for the selected object (the button) For caption, click on the button so that it turns blue 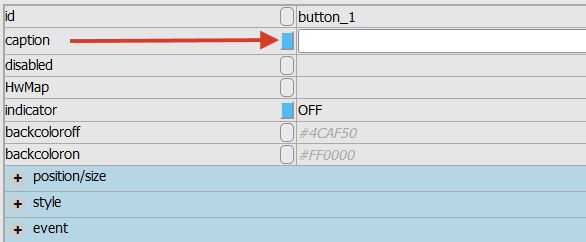 |
After clicking the button for indicator, a logic flow will appear at the bottom of the page This is the logic flow that will set the button's indicator ON or OFF depending on the GPO Pin state Click on the Start Point of the Logic Flow  The Property Selector window will appear Pick the correct GPIO port, pick the correct GPO Pin and select the PinState Property This is going to be the same GPIO Port and GPO Pin that you used in the previous step for the mouse down action. However, in this case, instead of setting the pin state we are reading what the current pin state it. We use it to control if the button indicator will be ON or OFF.  The Translator Properties window will appear We only need to set two lines, like in the screenshot below:
You can use any text, as this will dynamically set the button caption when the skimmer is activated or stopped  Click Done Save changes made to the panel |
Try it out
Launch the user panel you just created
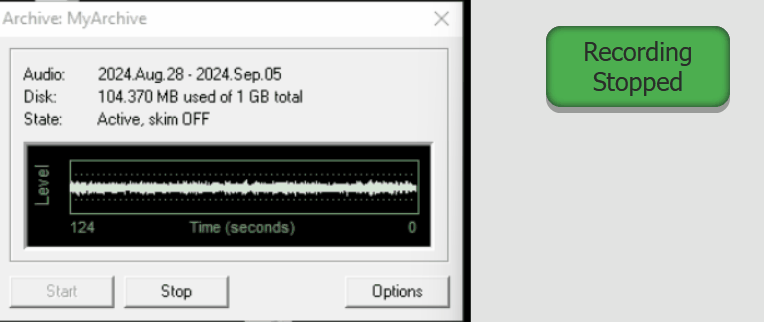
You should initially see that the button shows the text "Recording Stopped" (or whatever you set it to), as well the button color should be green (or whatever color you set for the backcoloroff property)

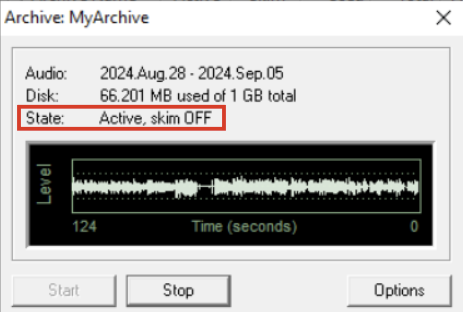
As well, in iProfiler for the Archive you configured the skimming for. That should indicate the state as: "Active, skim OFF"
Now, click on the button
It should now show the text "Recording Stopped" (or whatever you set it to), as well the button color should be red(or whatever color you set for the backcoloron property)

The Archive in iProfiler should also indicate the state as: "Active, skim ON"