Creating Talkback between two studios using iQx consoles
 Updated
by
Bryan Jones
Updated
by
Bryan Jones
Scope
This document covers the creation of some simple talkback logic between two studios using iQx consoles. The requirements for this to work are;
- Talk to Studio must not already be used. Meaning, If you have a Control Room where a dedicated Talk Studio already exists this will not work as it would interrupt the audio feed to that Studio.
- GPIO (of some kind) is required. Either Pathfinder Core Pro, legacy Windows Pathfinder PC (discontinued), or physical GPIO ports will be required. In this example, we will use Pathfinder Core Pro to control the logic needed.
Description
First, allow me to say that this is no substitute for a proper Intercom system. This solution is very specific to two iQx consoles with some simple talkback only between those two studios.
First, some definitions
You will see two terms referenced here; Control Room and Studio.
Control Room - This is the room where the physical console resides and is generally considered the Operator position
Studio - This is a dedicated room where there are microphones but no console. Studios are mostly like a dedicated talk studio and are ALWAYS paired with a Control Room. If you have a talk studio that also has a console installed then, by definition, it's a control room.
How it works
The basics are to define the operator microphone as the External Preview source on the remote console. Studio A operator mic is defined as the External Preview source on Studio B. Studio B operator mic is defined as External Preview on Studio A.
External Preview requires GPIO in order to activate, allowing the audio to be inserted into the preview channel of the console as well as the headphones if desired.
External Preview is activated by a GPI on the Control Room Monitor Logic Port. The Talk to Studio Active is indicated by a GPO on the Studio Monitor Logic Port. We'll use the Talk to Studio GPO to trigger the External Preview GPI.
Setup
Configure the source profiles
A source profile is required for each microphone on the opposite console. Meaning Studio A operator mic needs to be a Line Source in Studio B and vice versa.
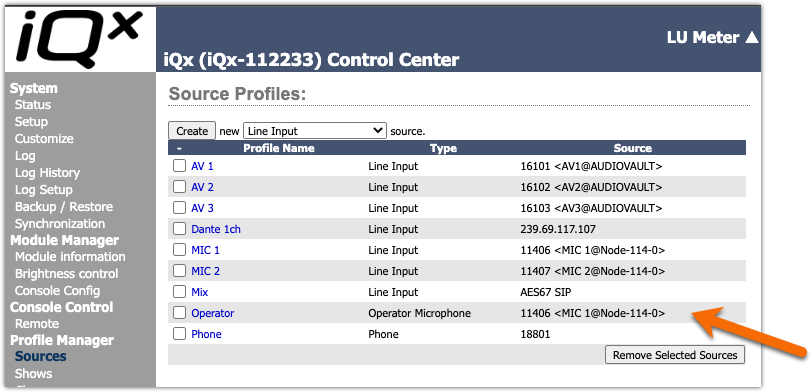
- In the Sources list for the first studio locate the Livewire channel for the microphone. In this case, it's 11406.
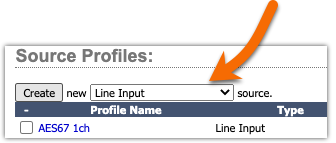
- On the opposite console choose the sources link, select Line Input, then click Create.
- In the new source profile, enter the Primary source (the Livewire channel).
- Ensure that no channels are selected but External and V-Mixer are.
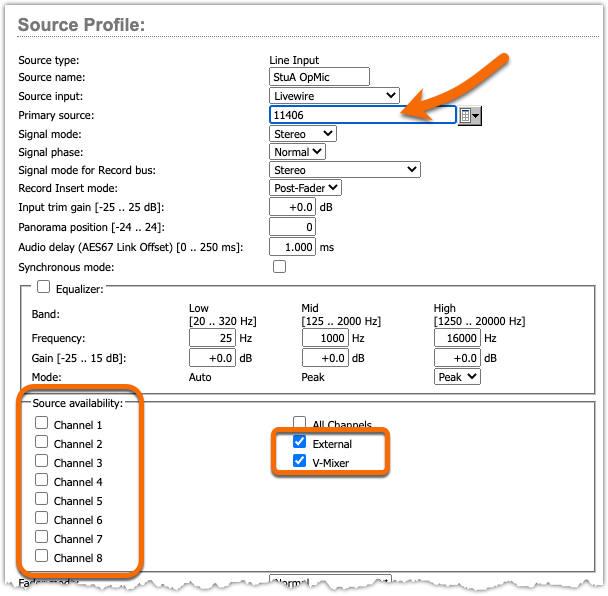
- Click Ok.
- Repeat this step for the other console.
Define this new source as External Preview
- Click the Shows link from the left side menu.
- For each Show where talkback will be used, click Edit next to the show name.
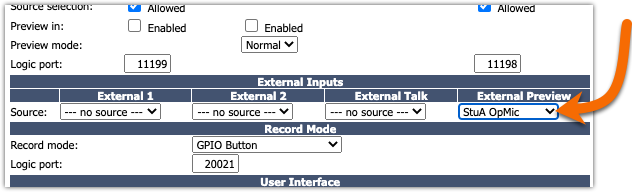
- Locate the External Preview setting under the External Inputs section and select the new source as the External Preview.
- Click OK.
- Repeat for any other shows.
- Repeat these steps on the other console.
Configure the Logic
Pathfinder Core Pro
We need to create the logic so that when the Talk to Studio button on the iQx in Studio A is pressed, it triggers External Preview in Studio B. Recall that the External Preview source in Studio B is the microphone from Studio A.
- Using your Web Browser, log in to Pathfinder Core Pro
- Click the Logic Flow menu on the left side.
- Select a folder from the right side Logic Flow folder tree, then click the Add New button.

Set the Logic Flow input block
- Double-click on the input block of the translator (the left-most box of the three)
- Locate and expand your iQx console under the Consoles
- Expand the mon object
- Locate and Select the tt_st property. (This is the abbreviation for Talk to Studio)
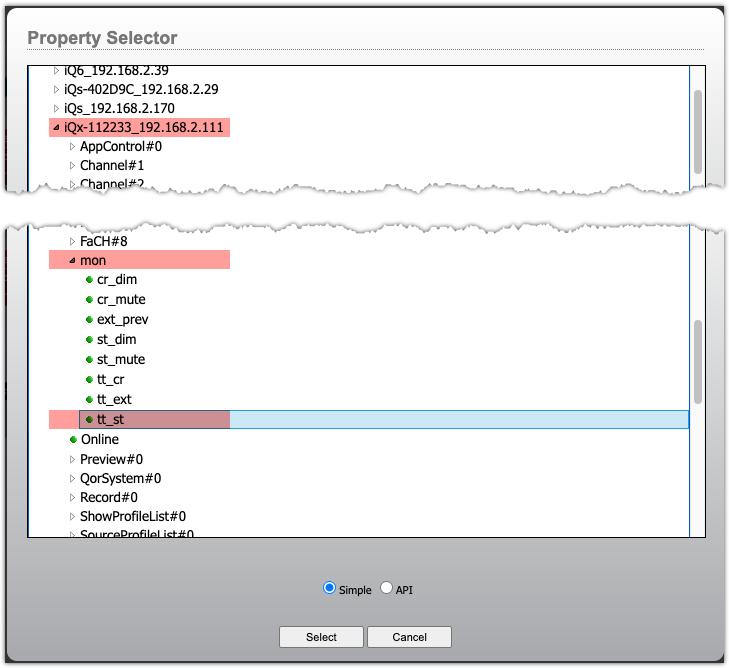
- Click the Select button
Set the Logic flow output block
- Double-click on the output block of the translator (the right-most of the three)
- When the Property Selector window opens, select the API option at the bottom of the window.
- Locate the Studio B console.
- Expand the Devices group
- Locate and expand the Studio B console.This is the console that is remote to the one configured in the previous step.
- Locate and expand LwcpSsInterpreter#0 (note there is also a LwcpInterpreter#0, make sure to expand the Ss named one)
- Locate and expand Preview#0
- Select External State
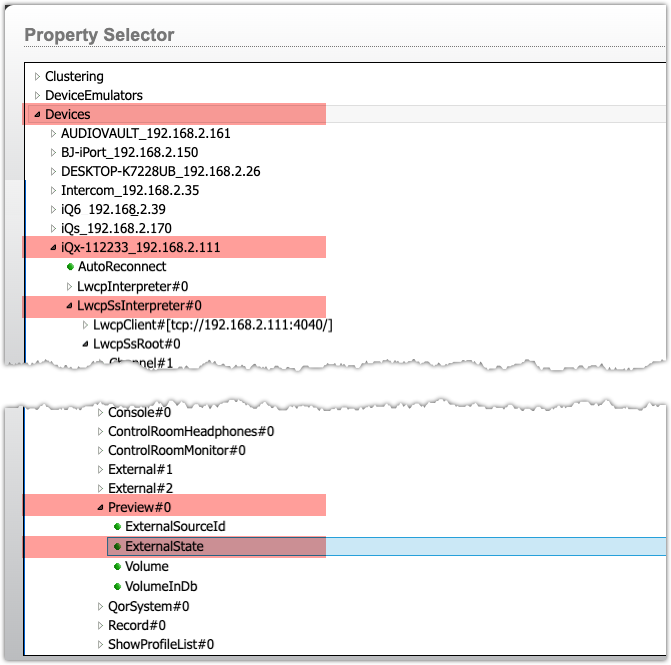
- Click Select
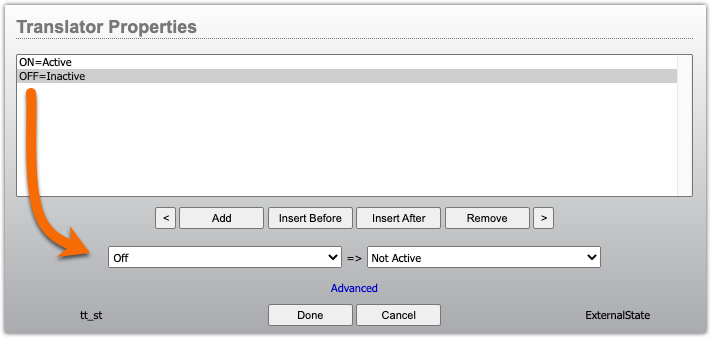
Set Translator block options
- Double-click on the translator block (the middle block of the three)
- Click to select the
*=*entry that is added for you by default. - Using the drop-down list
- Select On for the left side of the equal sign
- Select Active for the right side of the equalThis "translates" the ON status that comes from tt_st (Talk to Studio) to the Active command that is required by the ExternalState of the Preview.
- Click the Add button to add a second condition,
- Using the drop-down list
- Select Off for the left side of the equal sign
- Select Not Active for the right side of the equal signThis "translates" the OFF status that comes from tt_st (Talk to Studio) to the Inactive command that is required by the ExternalState of the Preview.
- Click Done to complete the translator block
- Click to select the
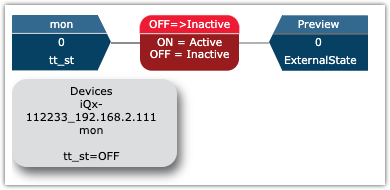
Here is what the finished translator block should look like.
Save your work
- Click the green flashing Apply button at the top of the Logic Flows window.
- Check your work.
The finished Logic Flow looks like this.
Repeat this for talkback in the other direction
These steps only created talkback from Studio A to Studio B. You need to repeat these steps to configure talkback from Studio B to Studio A.
Let us know how we can help
If you have further questions on this topic or have ideas about improving this document, please contact us.