Adding Extensions in VX
 Updated
by
Bryan Jones
Updated
by
Bryan Jones
Scope
This document covers some simple steps for adding a SIP server and a single extension to your VX System. While the screenshots shown here are from a VX Enterprise and may look slightly different on some systems (VXs for example), the steps and procedures are the same.
Description
There are several steps to adding an extension to your VX System;
- Add a SIP Server
- Add Extensions in the SIP Server configuration
- Add those Extensions to a Show
- Apply that Show to your Studio
All configuration is done using the VX web browser interface.
Add a SIP Server
This is the most basic example of a SIP server (phone system) that resides locally and we know the IP Address.
- From the main VX web page, click on the SIP heading on the left side menu. The SIP Configuration screen is shown.
- In the Server: box under the Add New heading, enter the IP Address of your SIP Server and click Add. In this example, our SIP Server is 10.1.100.70
The General Setting page for this new SIP server looks like this;
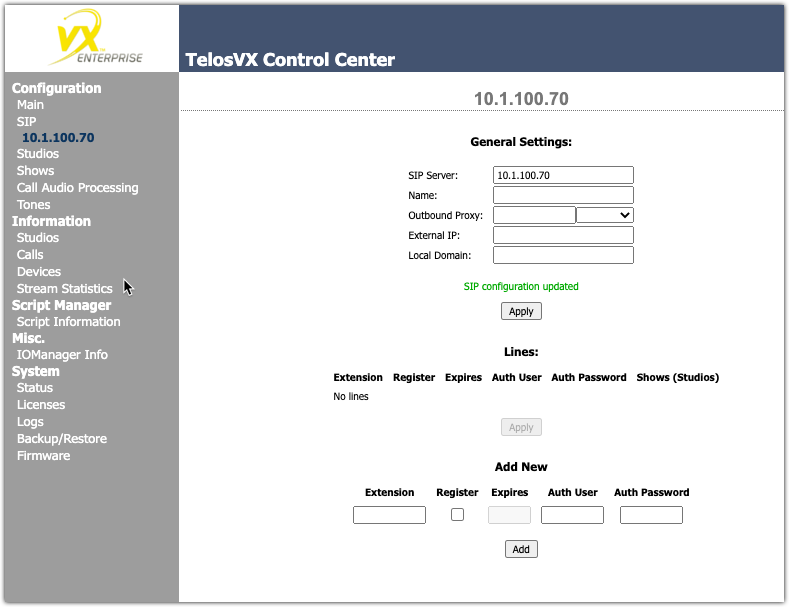
- Add a friendly Name: for this server. In this example, we'll call it "My FreePBX"
- Click the Apply button (stay on this page for the next step)
Add Lines to your SIP Configuration
You will need the Extension, User (normally the same as the extension), and Password for the next steps.
- While still on the page from the previous step;
- Enter the extension in the Extension box
- Click the Register checkbox
- Leave the Expires box blank
- Enter the Auth User (for FreePBX the extension and user are normally the same)
- Enter the Auth Password ("secret" property in FreePBX)

- Click ADD.
Repeat these steps if you have other extensions to add.
Adding Extensions to a Show
A show is a collection of lines (extensions) used for a configuration. It's possible to have only one STUDIO (where the mixing console is) but have different shows with different phone numbers for different dayparts. For this example, we're only going to make ONE show.
- Click on the Shows link in the left side menu of the VX web page
- Since this is a new configuration, there are no shows. Click Add New.
- Give the show a friendly name using the Show Name field.
- Assign the number of Lines for this show. This setting generally follows the number of lines on your VSet; either six or twelve. For this example, we'll use six.
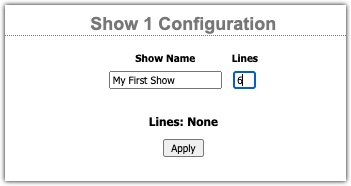
- Click Apply.
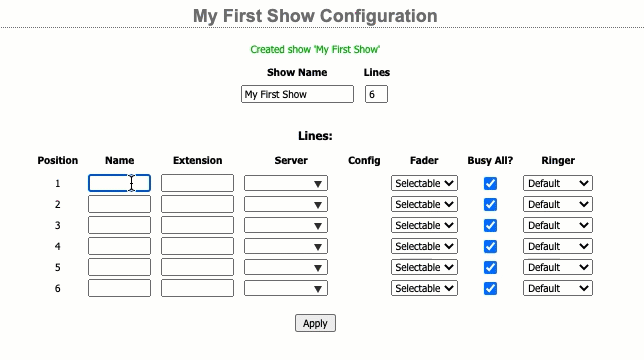
- Complete the Name, Extension, and pick the Server for each of the six lines. In our example, they are all the same. This way the VX can accept six calls to extension 7225.
Apply the Show to a Studio
Studios are the "audio" that comes in and out of your mixing console. For purposes of this example, we assume you have already created a Studio.
- Click the Studios link on the left side menu of the VX configuration web page. In our example, we have only configured one Studio, called Studio 1.
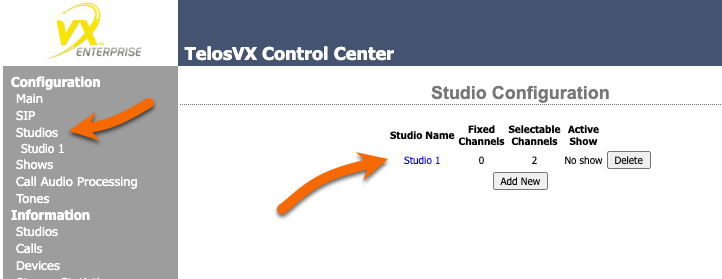
- Click the Studio 1 link shown by the red arrow to open that studio's configuration. The Current Show at the top of the page will show "No Show"
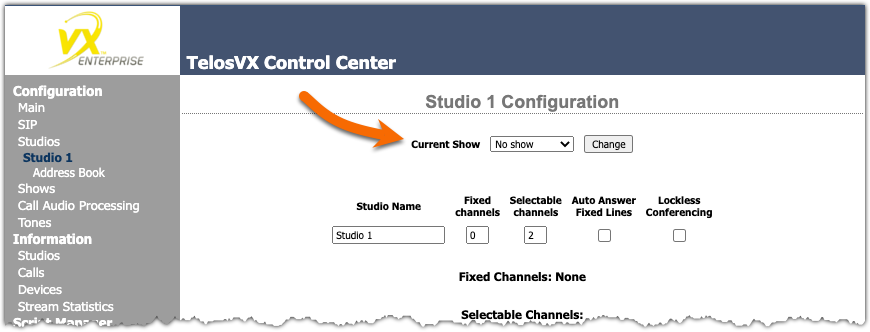
- Click the drop-down list for Current Show and pick the My First Show we created in the previous step.
- Click Change. Current Show now displays "My First Show"
Check to see if the lines are registered
If we have done everything right, once we change the show, the extensions will register with the FreePBX system. To verify this;
- Click on Studios under the Information link on the VX Web Page. Note, that this is different than the Studios under the Configuration heading.
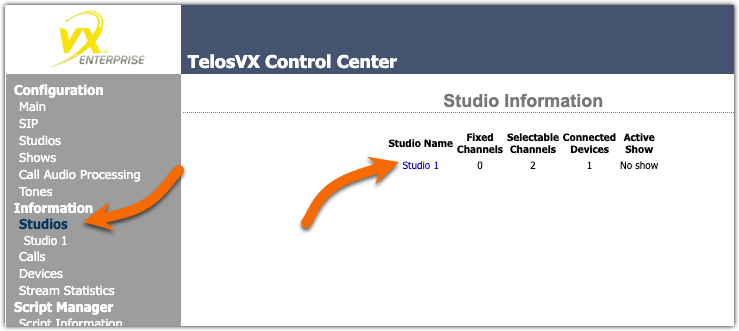
- Click the Studio 1 link
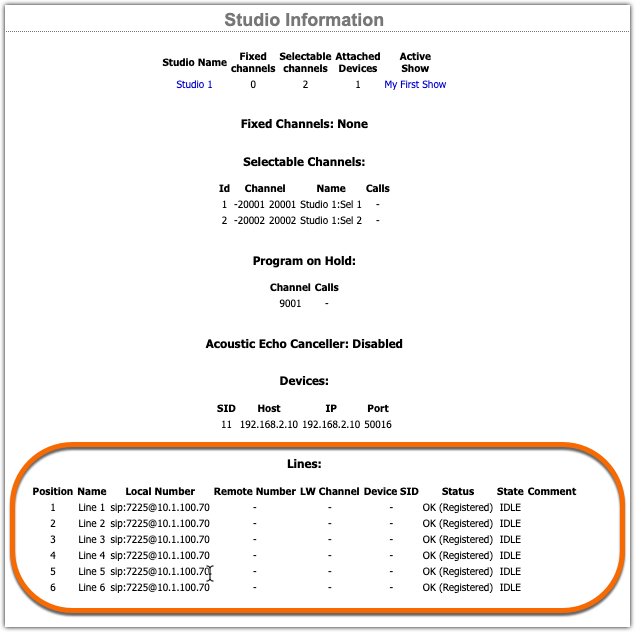
If everything is correct, you will see all six lines at the bottom of that page and they will say OK (Registered) as shown here.
If the lines do not say registered, then you need to check your work. Pay attention to the error message if there is one. A couple of common errors are;
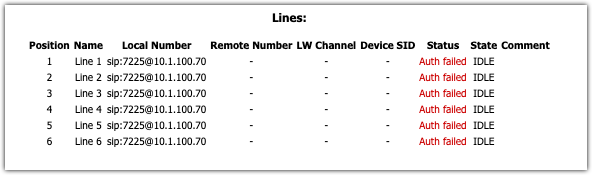
Auth failed means that it got to the server (in our case 10.1.100.70) but our user or password is likely not correct.
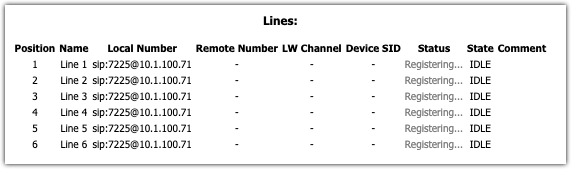
If you see Registering....
Or, Network Timeout
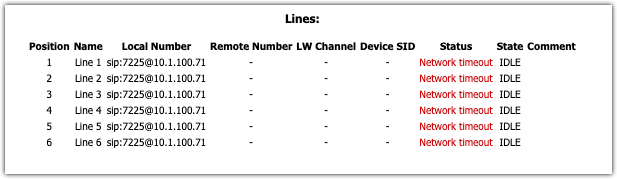
It's very likely that your VX cannot connect to the SIP server at all. Check the Network Settings of your VX and SIP server and ensure they are in the same network and have access.
Let us know how we can help
If you have further questions on this topic or have ideas about improving this document, please contact us.