Adding a multicast filter in your Cisco switch
Scope
When connecting Cisco switches used for Livewire to other network switches sometimes it is useful to be able to create a filter that specifically blocks certain address ranges. This document will provide you guidance for creating filters.
Description
Make sure you know what you are blocking. The entire multicast range goes from 224.0.0.0 all the way to 239.255.255.255. If you block the entire range, you could block certain multicast addresses that are used for things other than Livewire. As one example, mDNS (or multicast dns) which is used by Apply Bonjour could block the discovery of other things (like printers).
In this example, we're only going to block addresses used by Livewire that are in the Organization-Local Scope range as defined by the IANA Multicast Address Space Registry.
Specifically the range of addresses 239.192.0.0 to 239.193.255.255
Configuration
Adding a Filter
- Using PuTTy or another terminal program make a connection to the CLI (Command Line Interface) of your Cisco switch.
- Enter privileged mode using the
enablecommand followed by your enable password. The prompt will change from>to a#sign when in privileged mode.
BryansCiscoSw>enable
Password:
BryansCiscoSw#
- Enter terminal config mode using the
config tcommand. The hostname will be appended with (config) mode when you are in this mode.
BryansCiscoSw#config t
Enter configuration commands, one per line.  End with CNTL/Z.
BryansCiscoSw(config)#
- Enter the following commands
BryansCiscoSw(config)#ip igmp profile 10
BryansCiscoSw(config-igmp-profile)#
BryansCiscoSw(config-igmp-profile)#range 239.192.0.0 239.193.255.255
BryansCiscoSw(config-igmp-profile)#
BryansCiscoSw(config-igmp-profile)#deny
BryansCiscoSw(config-igmp-profile)#
BryansCiscoSw(config-igmp-profile)#exit
BryansCiscoSw(config)#
BryansCiscoSw(config)#end
BryansCiscoSw#
Check your filter
- From the command prompt, enter the command
show runto show the current configuration. The configuration will be displayed one page at a time. Use the spacebar to display the next page. - Near the top of the page, in the IGMP section, look for the appearance of your new filter and confirm the range setting is correct.

If you have made a mistake, re-enter the terminal configuration mode (conf t). You can remove filter profiles by using the no command in front of the command. For example, to remove the filter profile we just created, enter the command;
BryansCiscoSw(config)#no ip igmp profile 10
BryansCiscoSw(config)#
When you send the show run command you will see that the profile is gone.
Apply the filter to your network ports
Once you have created the filter it must be applied to the ports where filtering is required. In our example, we're going to apply this filter to a port that connects to an Office network where we do not want any Multicast traffic.
- Enter the terminal config mode by using the
config tcommand. You will know you are in this mode by the (config) indication next to the hostname.
BryansCiscoSw#config t
Enter configuration commands, one per line.  End with CNTL/Z.
BryansCiscoSw(config)#
- Specify the port you want to configure by using the
intcommand. This will vary from switch to switch. In our example, we're configuring gigabit ethernet port 4. This is referred to by cisco asgi0/4
BryansCiscoSw(config)#int gi0/4
BryansCiscoSw(config-if)#
 Interface GigabitEthernet0/4 is abbreviated by gi0/4 in this case
- Apply the filter profile to this port
BryansCiscoSw(config-if)#ip igmp filter 10
BryansCiscoSw(config-if)#
- Exit port configuration mode
BryansCiscoSw(config-if)#exit
BryansCiscoSw(config)#
- Exit global config mode
BryansCiscoSw(config)#exit
BryansCiscoSw#
Check your port configuration
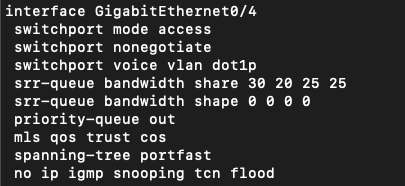
Send the show run command again. Make sure that your filter is shown in the port configuration as shown here.

Finally, save your work
Once everything is configured, you must write the configuration back to the switch so that if it ever reboots it has this same configuration after the restart. If you do not save your work the configuration will revert when you restart.
- From the command prompt, send the
wrcommand (wr is short for write).
BryansCiscoSw#wr
Building configuration...
[OK]
BryansCiscoSw#
Let us know how we can help
If you have further questions on this topic or have ideas about improving this document, please contact us.

