Setting up a VX Studio (without an Axia Console)
Scope
This article applies to all Telos VX Series systems. It describes how to configure a VX Studio for use with an xNode.
Create a new VX Studio
- Log in to your VX's web configuration interface and navigate to the Configuration -> Studios page.
- Click Add New:
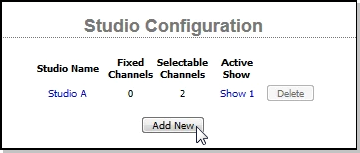
- Name the Studio, specify how many hybrids (channels) the studio needs, and click Apply:

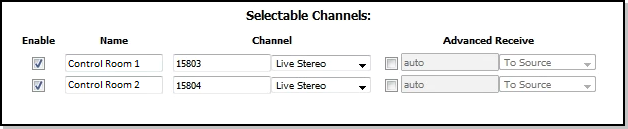
Once you click Apply, the Selectable Channels configuration section will appear.
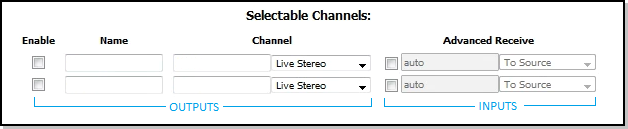
The Enable checkbox and three fields to the left configure the hybrid's output. The Advanced Receive portion configures the hybrid's input.
Set up the Hybrid Outputs
- Check the Enable check boxes.
- Name the Hybrid outputs appropriately
- Enter new Livewire Channel numbers
- Set the Channel mode to Live Stereo
- Click Apply.
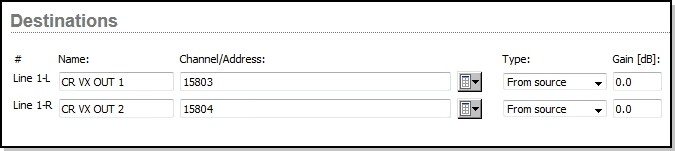
Configure xNode I/O
- Open a new tab in your browser and log in to the xNode's web interface.
- Navigate to the Destinations page
- Name the outputs appropriately
- Enter the channel numbers we configured in the previous section above into the appropriate Channel fields
- Set Type to From Source
- Set Gain to unity (0.0).
- Click Apply.
In this example, the xNode is set up for 8x8 Mono Mode as configured in the xNode's Simple Setup page. Here, output 1 will appear on the left connector of the StudioHub adapter while output 2 appears on the right connector of the StudioHub adapter connected to the xNode's Line Output 1 RJ-45 jack.
Now that the xNode's outputs are set up, let's configure the inputs.
- Navigate to the xNode's Sources page.
- Name the inputs appropriately
- Enter new Livewire Channel numbers (see note below)
- Set Stream Mode to Live Stereo.
- Click Apply
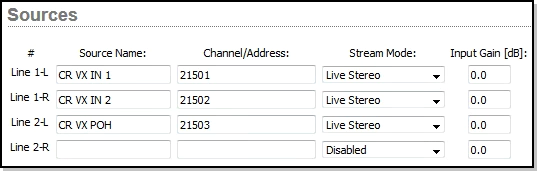
Notice that we've designated one of the inputs as POH for "Program on Hold," this is required and is discussed in the next step.
Set up the Hybrid Inputs
- Go back to the VX Studio configuration
- Check the checkboxes under Advanced Receive
- Enter the channel numbers we configured in the xNode sources in the adjacent fields.
- Set the mode to From Source

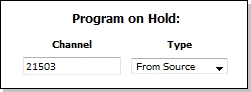
- Enter the third channel number we configured above into the Program On Hold - Channel field
- Set Type to From Source
- Click Apply.
The Program on Hold audio is generally the program output from the console. This is the audio all callers placed on hold in this studio will hear, so it should be pre-delay.
Program on Hold audio is required in VX or else the system providing SIP will drop calls after being placed on hold with silence for 30 seconds.