Forcing iProbe to use a specific network interface
 Updated
by
Bryan Jones
Updated
by
Bryan Jones
SCOPE
This document applies to the Windows version of Axia iProbe and covers all versions currently available.
DESCRIPTION
iProbe can use any number of network cards that are installed on a computer. Sometimes this is desirable, and sometimes it is not. By default, when you install the program, iProbe binds to ALL network interfaces.
CONFIGURATION
You can set iProbe to connect through a specific network interface by setting its binding on the settings page.
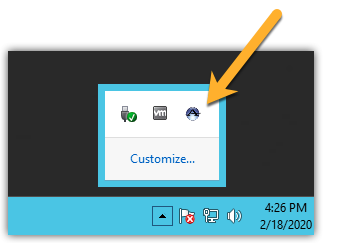
- Launch iProbe.
iProbe may already be running on your system. If you try to run iProbe and it appears not to start, check the hidden icons section of your task-bar. You may find it's already running there.
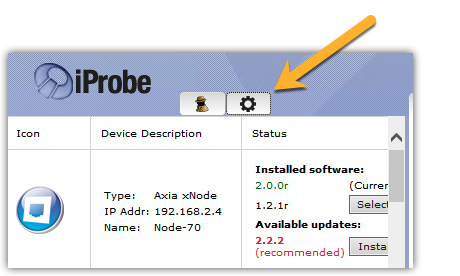
- In the upper left corner of the iProbe application, click on the "gear" configuration icon.
- In the Configuration window that appears, click on the Miscellaneous tab.
- Click the drop-down list next to the "Bind to interface" option (shown here by the Yellow arrow) and select the IP Address associated with the network card for your Livewire network.
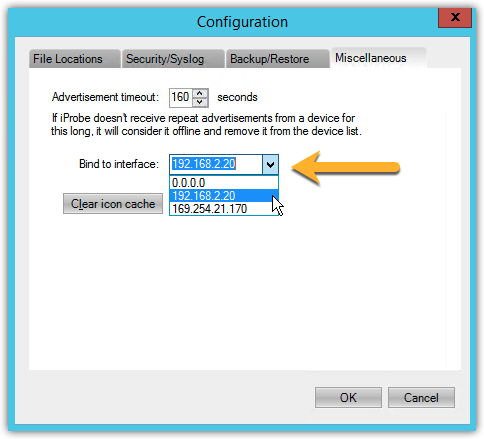
- Click OK to close the Configuration window.
- Close and re-start the program.
To fully close the program, you must locate the icon in the task-bar (typically next to the clock), right-click, then chose Exit. Clicking the Red X in the top right corner leaves the program running and minimizes it to the task-bar.

- iProbe should now only be discovering devices that are on the same network you chose on the configuration page.