Configuring your Infinity intercom system to talk with your Axia IP Intercom
 Updated
by
Tim Chimes
Updated
by
Tim Chimes
Although the Axia IP Intercom devices do not show up in Dashboard with your Infinity devices, you can still configure your Infinity and IP Intercom systems to talk with each other.
Preparing the Infinity device
Start by going into the web interface for the MP-16 that you want to use to communicate with your Axia IP Intercom device. Navigate to the Setup page, and find the Livewire+/AES67 section. You will need to assign a Livewire channel number to the intercom microphone. In our example, we chose 23703, but you can you whichever channel number you wish--just make sure that it is unique to other channel numbers on your network.

Preparing the Axia IP Intercom device
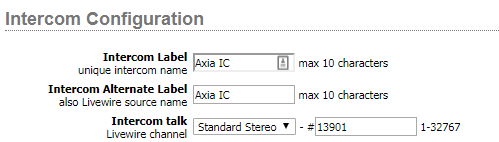
Navigate to the web interface for your Axia IP Intercom device, and click on Intercom. There is where we need to assign the Intercom Label and Livewire channel number, if you haven't already done so on this device. We used Axia IC for the label to keep it simple, and our chosen channel number is 13901.
You should also change the Host Name. This can be done from the System page. We will need the Host Name when we configure the GPIO in Dashboard. To make it simple, we named ours Axia-IC (note the use of the hyphen).
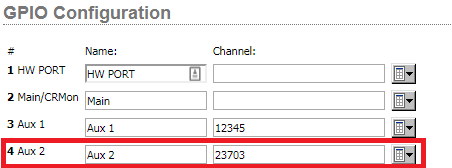
Next, go to the Livewire GPIO page. When these two devices talk with each other, we want to be able to remotely trigger the listen function on the other device. To do this, we have to setup GPIO. Once in the Livewire GPIO page, find an unused Aux port, and enter the channel number from the Infinity's Intercom Mic LW Channel. In our example, this was 23703. This was entered in Aux 2.
Now we need to create an external source in the Axia IP Intercom for the Infinity device. Creating an external source will allow us to assign the Infinity device to a key on the Axia IP Intercom. Here's how ours is set up:

Here are the important parts of this, working from left to right:
- Label: This is the friendly name for the Infinity device that we want to talk with.
- Livewire Channel and Stream type: Here we enter the Livewire channel number from the Infinity's Intercom Mic LW Channel. In our example, this was 23703. For our purposes, Stream Type will be From source.
- Trg Level: the default value of 4 is fine. See the IP Intercom manual for more information.
- GPIO Port: Because we are using Aux 2 for our GPIO Configuration, we set this to Aux 2.
- Talk Pin: To keep it simple, we are using pin 1. This is a GPI (remember this for Dashboard).
- Lstn Pin: To keep it simple, we are using pin 1. This is a GPO (remember this for Dashboard).
Once this is done, click Apply on the bottom of the page to save your setting.
Once the external source is made, go to the Key Assignment page, you and you will be able to add the Infinity device to a key on your Axia IP Intercom device. However, this will not work yet. We still need to add the Axia IP Intercom device and GPIO to the Infinity system.
Tying it all together with Dashboard
Create a new Virtual Port in Dashboard. The Virtual Port will be our way of adding the Axia IP Intercom device as a key to our Infinity panel. To create a Virtual Port, under the Devices quadrant, click Add, and select Virtual Port. Once added, click on your new Virtual port. Near the bottom of Dashboard, you will see that you can configure the Input and Output for the Virtual Port. In this instance, we only need to assign an Input. Search for the Axia Intercom source under Inputs, and assign it to the Input of the Virtual Port.
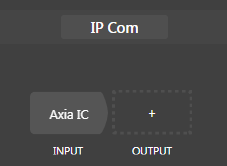
You can then simply drag this Virtual Port to a key on your Infinity panel.
The last thing that we need to do is configure the GPIO in Dashboard. This will allow us to remotely trigger the listen functions on both devices, so each device will go into an Auto-Listen mode when talked to.
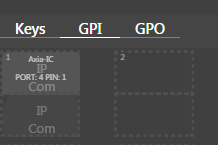
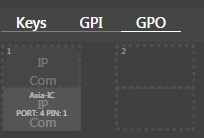
Select the Infinity panel you assigned the Axia IP Intercom Virtual Port to. On the bottom of the page, you will see 3 tabs for the device: Keys, GPI, and GPO. Select GPI. On the top right of Dashboard, search for the Axia IP Intercom device's Host Name under GPI. For our unit, we used Axia-IC. A list of GPI's will show up from the Axia IP Intercom device. As a refresher, we used Port 4, and we used Pin 1 for GPI. For our example, we find the GPI labeled as:
PORT 4: PIN: 1
Click and drag this to the top rectangle on the GPI configuration for IP Intercom Virtual Port key on your device:
Now click on GPO. We are going to do the same thing with the GPO, except we are going to add it to the bottom rectangle. like we did for GPI, search for the Axia IP Intercom device's Host Name under GPO. A list of GPO's will show up from the Axia IP Intercom device. Again, we used Port 4, and we used Pin 1 for GPO. Once you find the GPO, drag it to the bottom rectangle on the GPO configuration for IP Intercom Virtual Port key on your device:
You will now be able to talk and listen between your intercom devices.
Let us know how we can help
If you have further questions on this topic or have ideas about how we can improve this document, please contact us.