Connecting an iPort and Z/IP ONE using RTP Push
 Updated
by
Bryan Jones
Updated
by
Bryan Jones
Requirements
As of this writing, the released versions of the Telos iPort and Z/IP are compatible with this mode of operation. Version 2.1.1f of the iPort and version 4.0.0r of the Z/IP ONE was used.
Current Limitations
In this connection method, the Z/IP Server is not used as in more traditional Z/IP to Z/IP communication and the RTSP protocol is not supported. Connections are made from the iPort using reciprocal RTP from the Z/IP ONE. This is a method where the Z/IP ONE will establish the reciprocal connection back to the iPort based on the stream type used. For example, if the AAC-LD is used to connect from the iPort to the Z/IP One, the Z/IP ONE will respond to the iPort with a return connection that is also AAC-LD.
Notice: Calls that originate from the Z/IP ONE (to iPort) must use the MP2-AAC codec mode. GPIO between Z/IP and iPort is not supported. Metadata between Z/IP ONE and iPort is also not supported.
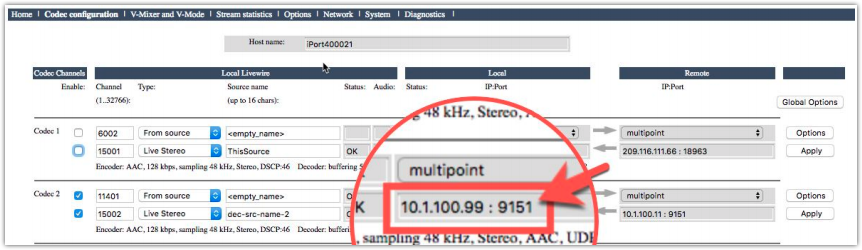
Determine which Codec will be used on the iPort.
In this example, we will be using Codec 2 of the iPort. It’s important to know which codec will be used because the return audio port is pre-determined by the base TCP Port setting in the iPort Global Option. By default the TCP receive ports start at 9150 and are assigned sequentially to each codec. Therefore, since we are using Codec 2, our receive audio port will be 9151 as shown here.
Once we have this information we can proceed with configuring the Z/IP One
Configure the Z/IP One
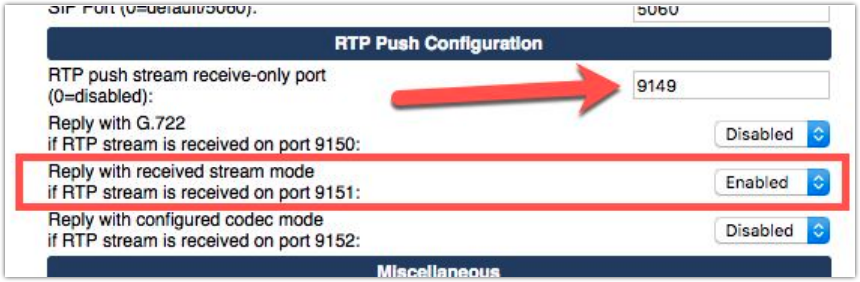
Once you have the receive port, we can configure the Z/IP. On the Z/IP ONE, navigate to the web configuration page and click on the Streaming link in the left-hand column. On this page, you will see a heading labeled RTP Push Configuration as shown below. The receive ports are all automatically assigned sequentially, from the receive-only port. As you can see, we have set the “RTP push stream receive-only port” to 9149, which has automatically assigned the “Reply with received stream mode” port to 9151 so that it matches up with our iPort configuration. You also need to set the Reply with the received stream mode option to Enabled.
This should be the only configuration needed for the Z/IP One.
If other ports are used on your iPort, you will need to set the base port differently. As an example, Codec 6 of the iPort uses receive port 9155, so instead of 9149, we would use 9153 which would automatically assign 9155 to our Reply with the received stream mode option.
Configure and enable the iPort
To configure your iPort, click on the options button associated with Codec 2. The option buttons for each codec are to the far right of the page.

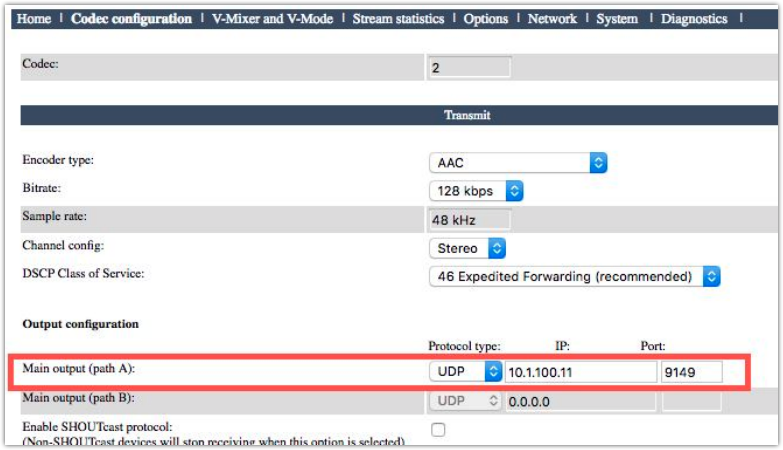
In the options page, configure the Main output (Path A): with the IP Address of your Z/IP One and the desired port number. In this example, the IP Address of the Z/IP one is 10.1.100.11 and we are using port 9151 to send to the Z/IP One.
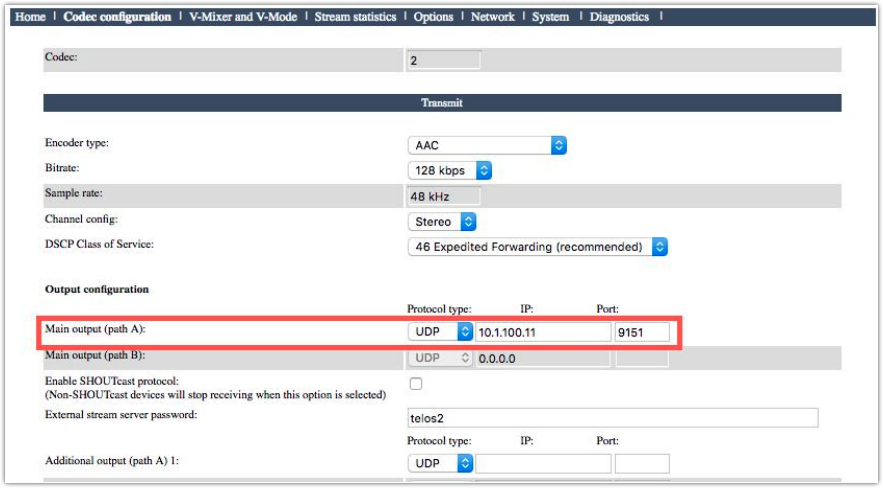
Scroll to the bottom of the page and SAVE your settings.
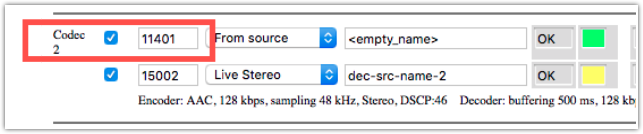
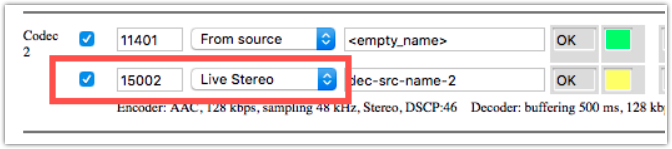
On the main codec page, place a checkmark in the enable box for Codec 2 and specify the Livewire channel for the transmit audio to be sent to the Z/IP ONE. Shown here, the audio being sent to the Z/IP one is Livewire channel 11401. Then click the Apply button to the far right of Codec 2. It is important to click the Apply button that is associated specifically with Codec 2 and not one of the others.
Once the Apply button is pressed, the iPort will initiate the connection to the Z/IP ONE. Connecting on one of the reciprocal ports will cause the Z/IP ONE to automatically make the connection to the iPort. The iPort first connects to the Z/IP ONE, which causes the Z/IP ONE to initiate a connection to the iPort.
In order to enable reception of the audio from the Z/IP ONE, you need to enable the receiver of the Codec and then specify what channel the received audio will be on your Livewire network. As shown here, the receiver is checked and the received audio will be Livewire channel 15002.
Confirming Proper Operation
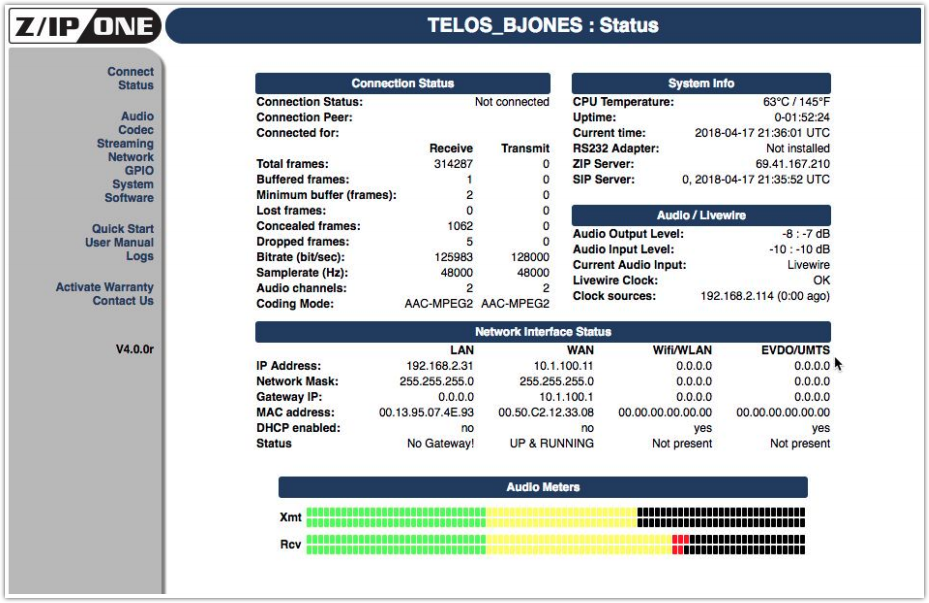
Looking at the Status page of the Z/IP ONE, note that Connection Status: will show Not Connected. This is normal. Since this is simply a push of RTP audio from the iPort there is no information about who is connected. You can see from the Total frames received that we are receiving data and the Rcv meters of the Z/IP ONE are showing audio.
On the iPort, you can confirm the proper connection by looking at the Codec page. For Codec 2, you can see the IP Address of the connected Z/IP one. Shown here as 10.1.100.11 transmitting on port 9151. Also, the Green dot indicates the presence of audio from the Z/IP One. Note that this page on the iPort does not update in real-time so you may need to refresh it to see the connection and audio status.
Calling the iPort from the Z/IP ONE (one direction)
Since the iPort does not have the same symmetrical RTP functions as the Z/IP ONE, only a one-directional stream can be sent from the Z/IP ONE to the iPort.
- Codec Mode: The codec mode to use for this is MP2-AAC (XStream). This is the payload type the iPort recognizes for incoming (non-symmetric) RTP streams from non-iPort devices.
- Enable auto-redial in the Z/IP ONE (Streaming page of the web Interface). This will help ensure that if there is power loss or some other event that causes an interruption, the Z/IP ONE will continue streaming as soon as it can reconnect.
- Send a stream to the iPort. On the Z/IP ONE, dial the appropriate iPort decoder port. On the connect page, set the Protocol to RTP and enter the address and port of the iPort’s decoder. Click connect and verify that the audio is flowing as intended.

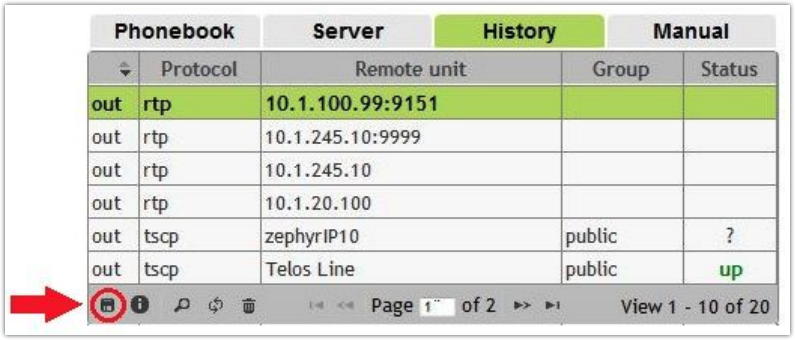
- Save the connection info. Once you verify the stream is working, go to the History tab and save the call to your phonebook. This way, if you need to manually start and restart the stream, you can do it from the autodial/phonebook menu.
Other considerations
If you do not need the reciprocal configuration, in other words, you do not want the Z/IP ONE to automatically connect back to the iPort then you can use port 9149 to connect to the Z/IP ONE which is the receive-only port that we defined in the previous steps. Do this when configuring your codec in the iPort as shown here.
One of the things we did not address here is the need for proper configurations of any firewalls and routers that may be in use. It is possible to use many kinds of networks, even the internet, for this. In situations where you are using a public-facing IP Address, it is your responsibility to configure your firewalls and routers to forward any incoming connections to the private connections inside your network. It is NOT recommended that you place either of these devices DIRECTLY on a public address, therefore, exposing them fully to the public internet. Considerations of network security, router and firewall connections, etc, are outside the scope of this document. We suggest contacting your IT department before you start this process.
It should also go without saying that the quality of this connection will only be as good as the network it is connected to. In other words, connecting to the public internet can be dicey and unreliable and is oftentimes out of your control, so proceed with caution.