Sending metadata to the Z/IPStream R/2 integrated Triton encoder
 Updated
by
Bryan Jones
Updated
by
Bryan Jones
The Z/IPStream R/2 includes facilities for managing and sending metadata from your automation system to the Triton Station Manager included in your Z/IPStream R/2. The metadata server in the R/2 (called Metadata2) is controlled by a separate Windows application, named "metadata2ui.exe". Download the Metadata2 application that matches your version of the R/2 here:
Download and then double-click the metadata2ui.exe icon to run it. The following window appears:

Follow these steps to create connections to one or more Z/IPStream R/2 devices. Next time you return to this app, the previously defined connections will be remembered and displayed.
- From the File menu, select “New connection…”.
- Enter a display name and the IP address for the R/2 you wish to control.
- Press OK when done.
The newly defined connection will be displayed in the main window:

Click the “Connect…” link to establish a connection to this R/2. The metadata server management window is displayed:

We’re now ready to configure the Metadata2 server.
Metadata2 Concepts
Before we jump into configuring the Metadata2 server, let’s take a moment to understand how the server handles metadata. A signal flow diagram best describes how metadata passes through the server:

Sources
“Sources” accept metadata from external systems like your automation system. They use Lua “filters” to parse the incoming metadata messages into separate fields, which are sent together as a metadata packet.
Aggregators
“Aggregators” can combine metadata packets from different signal paths into one path. Aggregators may not be needed if you use only one Source.
Translators
“Translator” blocks can add new metadata fields or change field values according to user-specified rules.
Control
“Control” blocks use advanced matching rules to take action when specific metadata messages arrive. Control blocks can enable/disable other blocks, according to user-specified rules. Control blocks only pass metadata packets downstream when the rules match; non-matching packets get discarded.
Output
“Output” blocks take metadata packets and use “templates” to format them as needed by an external system. They then send the formatted metadata message to the external system.
Sources - Ingesting Metadata
Adding a new filter
If a filter for your system does not already exist, you can add filters by connecting the Metadata2 application and following these steps.
- From the File menu, select Filters. A list of filters that already exist in your system will be displayed. Click the Add button to add a new one.
- A blank Text Editor window is displayed like this:

- Supply a Name for your new filter. In this example we will use a filter for Dalet that parses XML data, so we will call this filter Dalet - XML
- In the large window below the name, copy and paste the entire contents of your filter as shown here:

- Finally, click the Save button.
Adding a new source
There are three methods for obtaining incoming metadata.
- Accept Incoming TCP Connections (TCP Server Source)
- Accept incoming UDP Connections (UDP Source)
- Connect to remote system over TCP (TCP Client Source)
The capability of your automation system determines the method used. In this example, we will “Accept an incoming TCP connection” from our Dalet system.
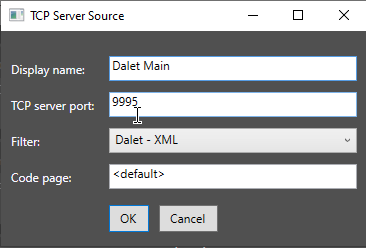
- From the “Sources” menu, select “Accept incoming TCP Connections.” The following dialog is displayed:
- Enter a Display name, for example, “Dalet Main.”
- Enter a TCP server port that the R2 uses to listen for data from your automation system. It can be any valid TCP port; however, it must be unique. You can not define two sources with the same TCP Server port. We'll use 9995 for this example.

- In the "Filter" field, select your newly created "Dalet - XML" filter or whatever filter is needed for your automation system.
- Leave the "Code page" field as "<default>" then click the "OK" button.
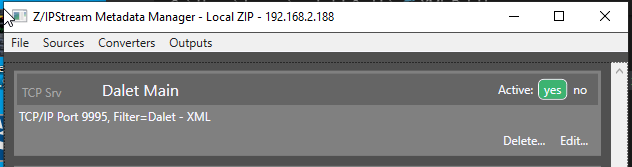
The completed information looks like this.
We now have a metadata source that accepts metadata from the Dalet system you just defined. The main window shows the newly created metadata source.
You may repeat the steps above to define additional sources.
Adding a Translator block
Most installations require translation of some data, and so a Translator block will almost always be required. At a minimum, it is needed to insert a station name if used with the Triton encoder. Follow these steps to add a translator block:
- From the “Converters” menu, select “Translator.” The following dialog is displayed:
- Enter a short, descriptive display name for this translator. Make sure that the name is unique and not previously used. In this example, “Dalet Translator” is used.
- From the "Source" drop-down list, select the entry that serves as the metadata source for this block. In this example, it is the "Dalet Main" source block created in the previous step.
- Click the “Add Field” button. The “Add Field” dialog is displayed:
- Enter the name of the field you wish to add. This field is case-sensitive, so make sure it matches exactly to what the system expects. In this example, we need to add the mount name for the stream.
- Enter the field value. In this example the mount name is WZIPFM.
- In the "Behavior" field, you must select whether to overwrite or keep the previous value if the field already exists. For this example, select Overwrite.


- Click OK when done.
Transforming field values of existing data
A “translator” block also allows you to change field values according to the rules you specify.
- Create a “translator” block, as described above.
- Click the “Change Field” button. The following dialog is displayed:
- Enter the name of the field, making sure that it uses the same case conventions as expected by the system. In this case, we are modifying the "cue_type" field. The cue_type field is used by Triton to determine if an event is a song, commercial, liner, or others.
- In the "Match value" field, enter a value or a pattern to match. The value matching is not case-sensitive. You may use DOS-style pattern matching where '?' matches any one character and '*' matches the remainder of the string. For example, to match any value that starts with "abc", use "abc*." If you want to match any value, use '*' alone. For this example, we want to match the value COMMERCIALS, as this is what is sent by Dalet.
- In the "New value" field, enter the replacement value. In this example, enter "ad" (note lower case) as this is the value Triton uses to determine this is a commercial.

The completed dialog will look like this:

- Click “OK” when done.
- Repeat steps 2-6 for each field value you wish to match, changing the values to either ad, track, or sweeper. In this example, commercials translate to "ad," songs translate to "track," and everything else translates to "sweeper."
- When done, click the “OK” button to save the translator. Here is a completed Translator block.

A few notes about translations regarding Triton
- “track” - are generally songs or any metadata where you want the Title and Artist displayed on your player.
- "ad" - are generally events that instruct Triton that you are playing an advertisement. Use "ad" to trigger an ad insertion on your stream.
- "sweeper" - generally everything else. These are events like liners or jingles. They STOP any commercial insertion happening on the stream and do NOT update the Title and Artist information.
Sending your metadata - Output
An "output" block accepts metadata packets (made up of individual metadata fields) and uses "templates" to generate a message in the format expected by the external system. The output block then sends the metadata message to the target system. In this example, we are sending our Dalet data to Triton.
Use these steps to create an output block:
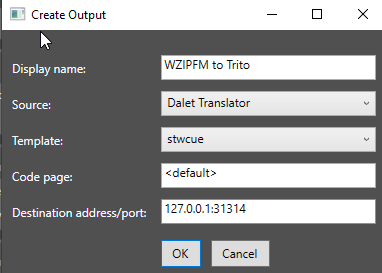
- From the “Outputs” menu, select “Send output over TCP.” The following dialog is displayed:
- Enter a display name and then select the source block from the "Source" drop-down list. In this example, we'll use "WZIPFM to Triton" for a Display Name, and select our Dalet translator created in the previous step.
- Select a template from the "Template" drop-down list. In this case, please select the "stwcue" template as this is the template used for sending data to Triton.
- Leave the “Code page” as <default>.
- Enter a destination IP address and port in the "Destination" field using a ":" as the separator between the address and port. For example, if the IP address is "192.168.1.25," and the port is "1234," you would enter "192.168.1.25:1234". Since we are sending data to another port on the R/2, use "127.0.0.1" as the address (this is the loopback interface address). For this example, use 127.0.0.1 with a TCP port of 31314.
- Click “OK” to save the output block.

Your completed block should look like this:
Final notes regarding metadta
The Sources and Translators will be unique to each station that you configure on the Z/IP Stream R2. The outputs, even though they will have a different name, will almost always be configured using the “stwcue” template and will always be output to 127.0.0.1:31314