Axia Quasar Family Software v2.2.3 and Firmware v4.0.3 Release Notes & Update Instructions
 Updated
by
Bryan Jones
Updated
by
Bryan Jones

Update Components
- NEW IN THIS VERSION - Quasar Master Module (MTS-MON), software v2.2.3 Field Update.
- NEW IN THIS VERSION - Quasar XR 4-Fader Module (XR-4FAD motorized), software v2.2.2 Field Update
- NEW IN THIS VERSION - Quasar Accessory Modules (MF1-ACC and MPC-ACC), software v2.2.2 Field Update
- NEW IN THIS VERSION - Firmware v4.0.3 Field Update for ALL Surface Modules.
- NEW IN THIS VERSION - Quasar Engine, software v.2.0.3 Field Update
Updating Quasar Software
Updating the MTS-MON Master Module's Software
Details
- Connect a PC to your Quasar's network.
- Open the MTS-MON Web UI at the unit's base IP address (standard HTTP port 80). For example, http://192.168.2.90
- Under the System heading, select Software. You may be asked to log in with the name user and your password.
- Click on “Choose File." Navigate to the location where you saved the update file and select it.
- Press the "Upload Software" button. The new version will load into the inactive software bank and overwrite its content.
- Select the new bank and press the “Switch to Selected Bank” button.
Updating XR-4FAD Fader Module's Software
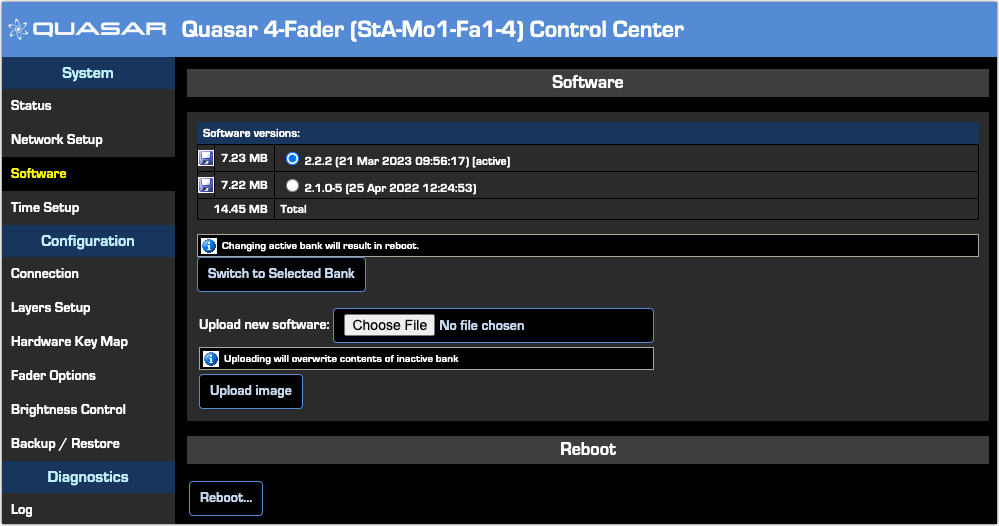
- Connect a PC to your Quasar's network.
- Open the XR-4FAD Web UI at the unit's base IP address (standard HTTP port 80). For example, http://192.168.2.91
- Under the System heading, select Software.
- Click on “Choose File." Navigate to the location where you saved the update file and select it.
- Press the "Upload Software" button. The new version will load into the inactive software bank and overwrite its content.
- Select the new bank and press the “Switch to Selected Bank” button
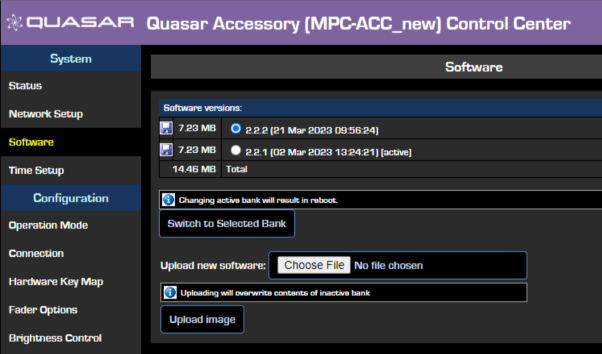
Updating MF1-ACC and MPC-ACC Accessory Module's Software
- Connect a PC to your Quasar's network.
- Open the Accessory Module Web UI at the unit's base IP address (standard HTTP port 80). For example, http://192.168.2.91
- Under the System heading, select Software.
- Click on “Choose File." Navigate to the location where you saved the update file and select it.
- Press the "Upload Software" button. The new version will load into the inactive software bank and overwrite its content.
- Select the new bank and press the “Switch to Selected Bank” button
Updating Quasar Module Firmware
Updating Firmware on the MTS-MON Module:
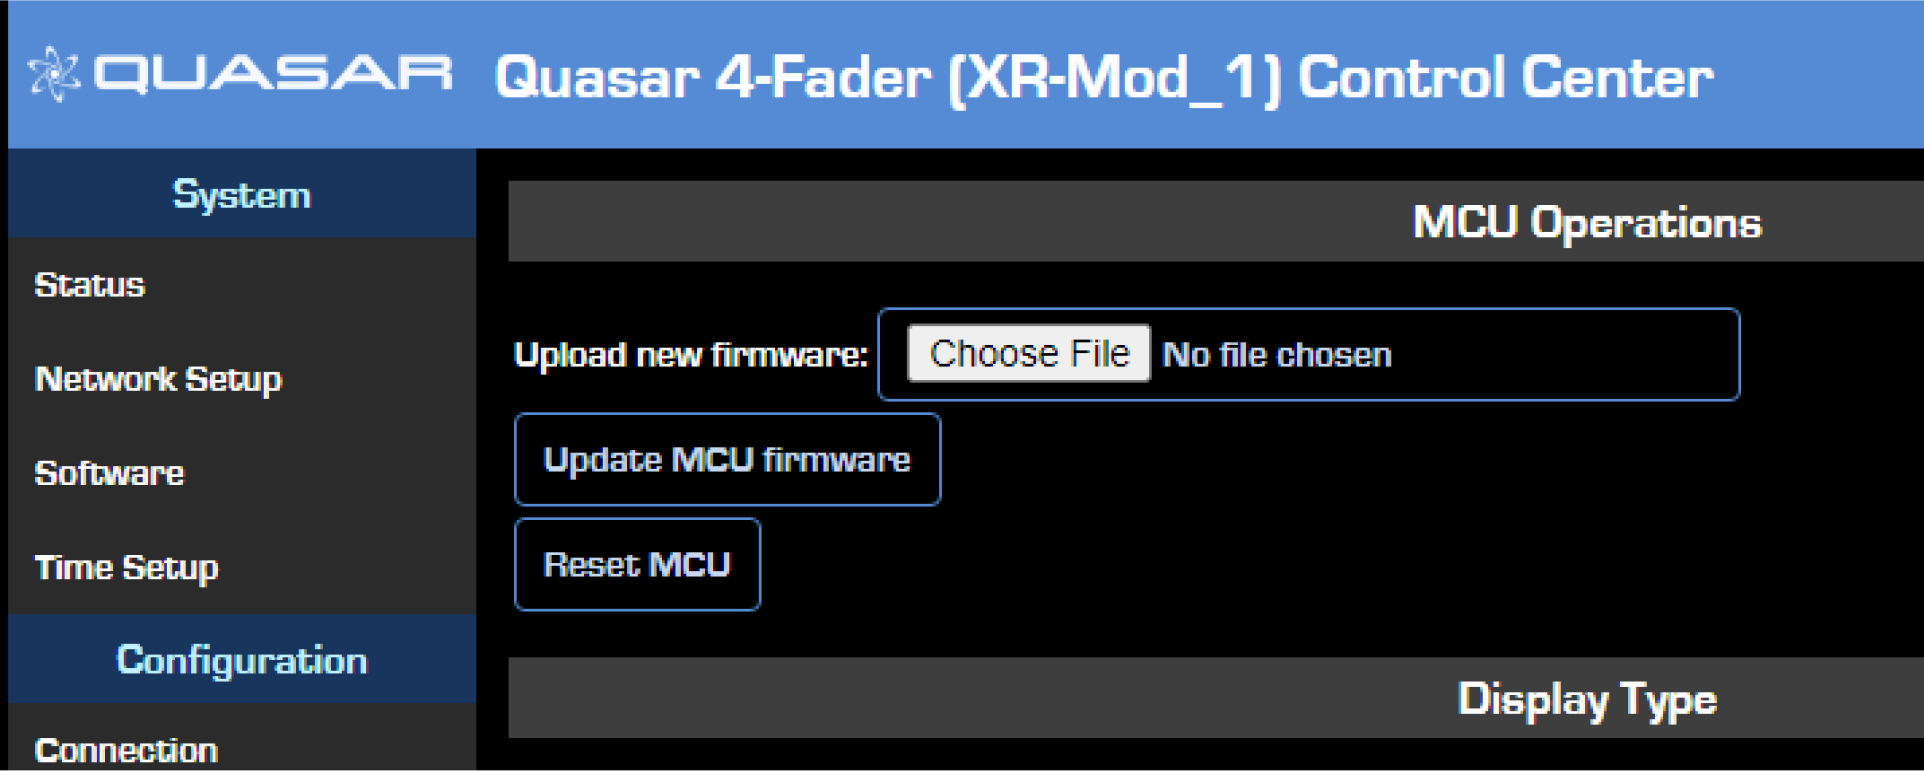
- Open the MTS Web UI at the following address: IP address/debug/mcu. For example http://192.168.2.90/debug/mcu
The MCU Operations page will appear
- Click on “Choose File.” Navigate to the location where you saved the update file and select it
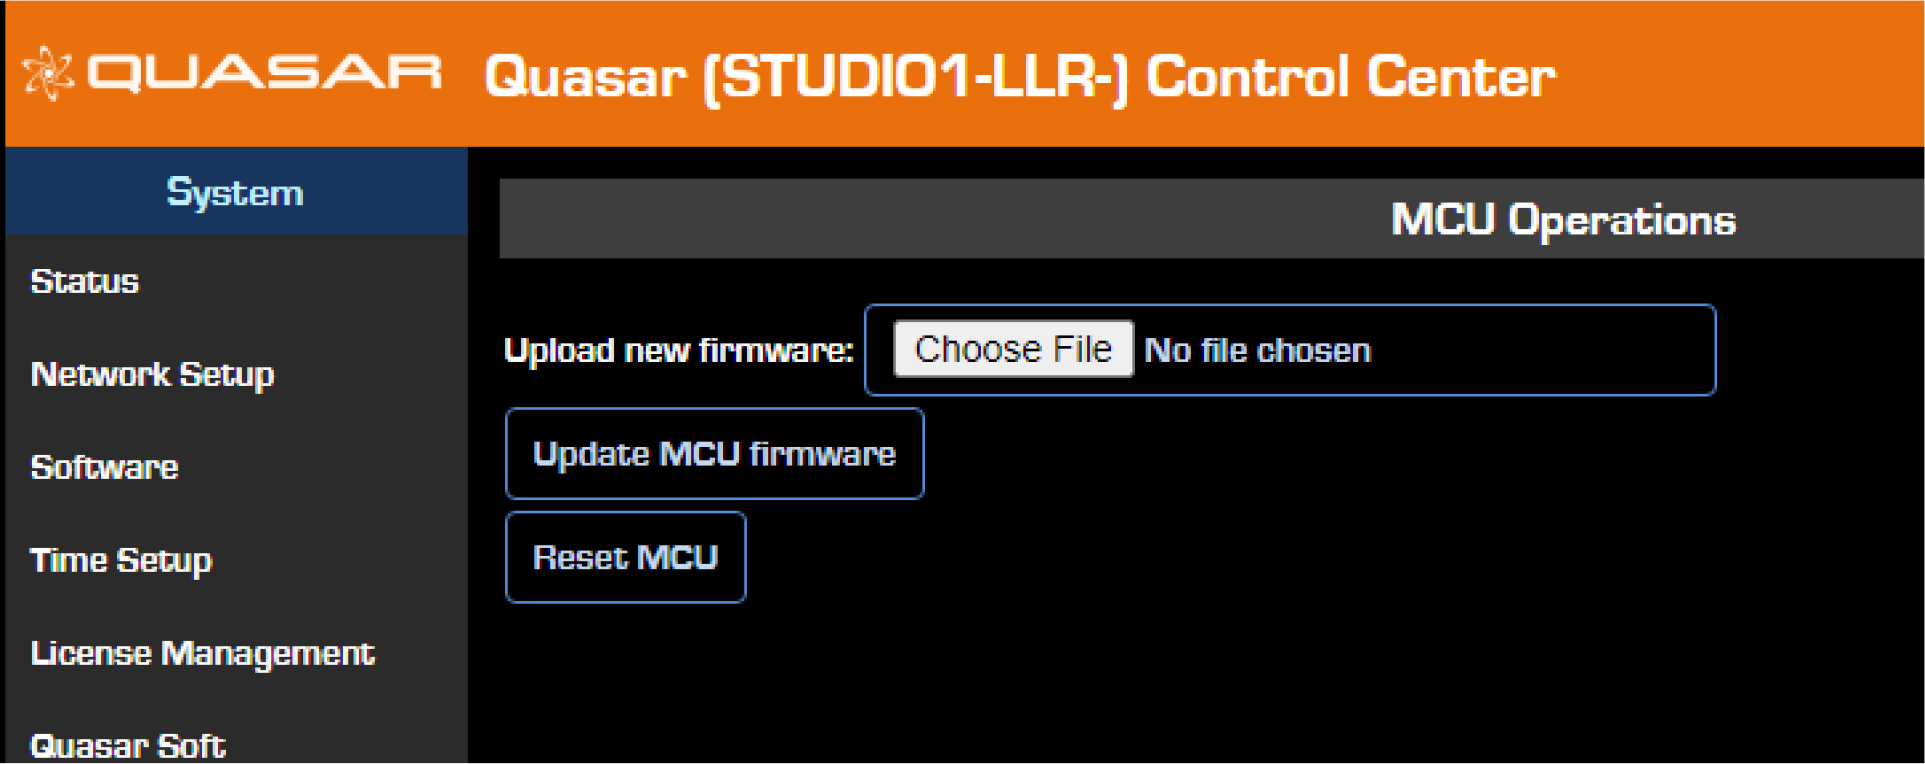
- Press the "Update MCU firmware" button. The new version will load into the firmware bank and overwrite its content.
Verifying the MTS-MON firmware update
- From the main menu, select the Module Information link. The following page will appear:
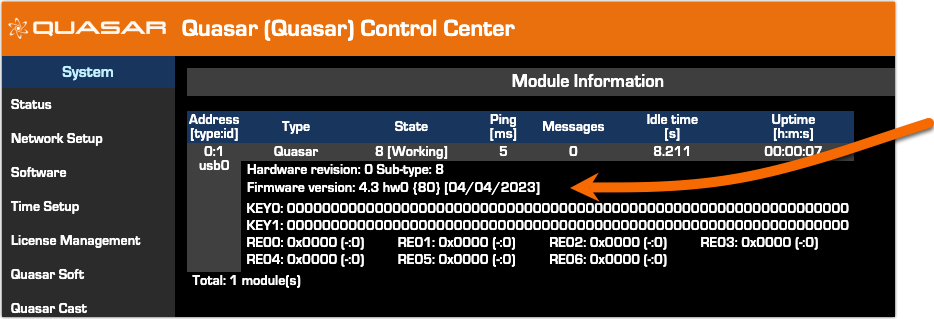
- Double-check that the new Firmware version is correctly reported as 4.3 hw0.
Updating Firmware on the XR-4FAD Module:
MTS-MON and XR-4FDR Modules use the same firmware update file. Firmware on all modules can be updated before or after the software update.
- Open the XR-4FAD Web UI at the following address: IP address/debug/mcu. For example http://192.168.2.90/debug/mcu
The MCU Operations page will appear.
- Click on “Choose File.” Navigate to the location where you saved the update file and select it.
- Press the "Update MCU firmware" button. The new version will load into the firmware bank and overwrite its content.
Verify the XR-4FAD Firmware update
- From the main menu, select the Module Information link. The following page will appear:
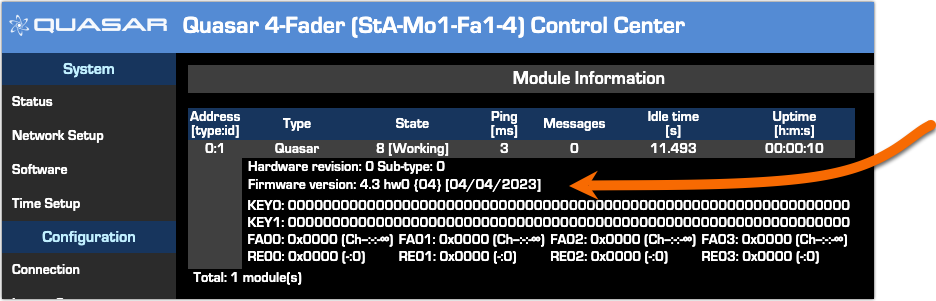
- Double-check that the new Firmware version is correctly reported as 4.3 hw0.
Updating Firmware on the SR-4FAD Modules
- Connect a PC to your console network.
- Open the MTS-MON Control Center web page at the unit's base IP address. (standard HTTP port 80).
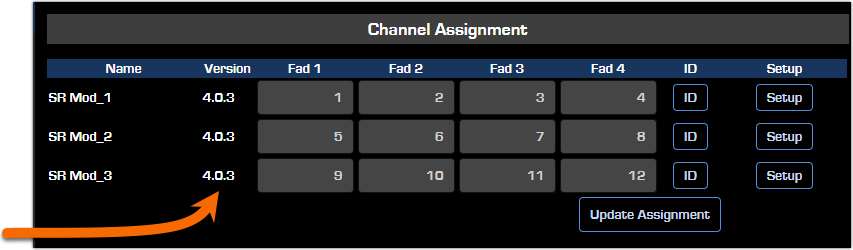
- Select the SR Modules menu.
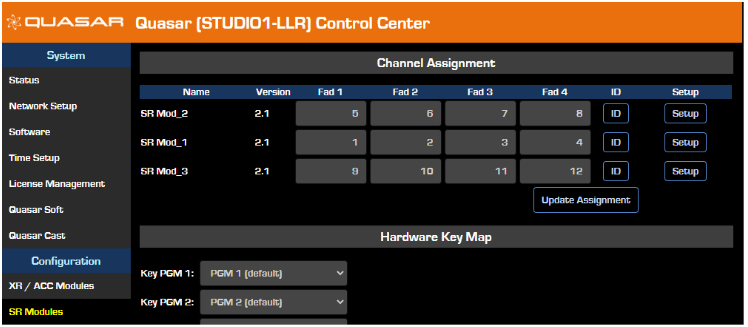
- Press the Setup button for the first module

A new page will open for the configuration of the selected SR module. At the bottom of the page, you will find the Firmware Update section.
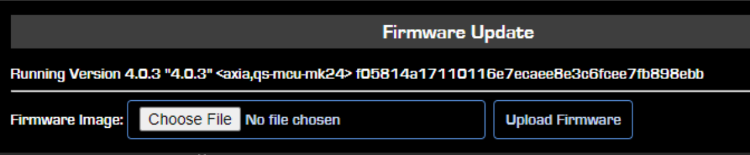
- Click on 'Choose File", navigate to the location where you saved the update file, and select it.
- Press the "Upload Firmware" button. The new version will be applied to the current firmware bank, and its content is overwritten.
After the update is applied, the web page will give no confirmation that the new firmware has been uploaded. Please check that the new firmware is correctly loaded and version 4.0.3 is displayed:
If the version number is lower, please double-check you downloaded the correct file version and repeat this procedure from Step 3.
If the UI should report that the Firmware Update is failed, please make sure that you are uploading the correct file: it must be p/n 1621-00597-003 and must have an .itb extension. If you have the incorrect file, please redownload it from the link above.

Updating the Quasar Engine Software
- Connect a PC to your console network.
- Open the Quasar Engine Web UI at the unit's base IP address (standard HTTP port 80).
- Under the System heading, select Software.

- Click on “Choose File.” Navigate to the location where you saved the update file and select it
Wait while the software uploads and the package name appears in the field next to the button.
- Click on the Upload button. A message will appear to inform you that the file is being uploaded. Once complete, you will receive a confirmation message.
- After you receive the confirmation message, refresh the page.
- Select the new software bank by clicking on the radio button.
- Click the Apply Selected Bank button.
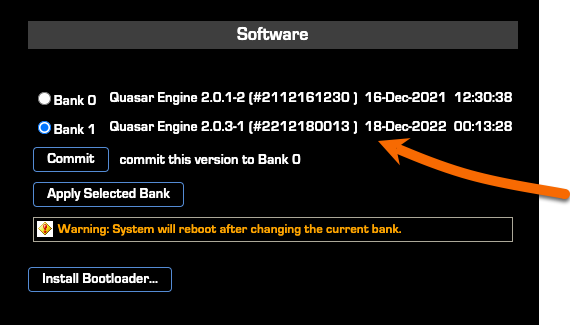
- A dialog will appear asking for confirmation, and the system will be restarted.
Release notes
Software release notes for all versions are moved to their own document. Click here for that document.
Let us know how we can help
If you have further questions on this topic or have ideas about improving this document please contact us