Flashing an xNode using a serial cable
 Updated
by
Bryan Jones
Updated
by
Bryan Jones
Scope
This applies to all Telos or Axia branded xNodes;
- 2001-00357-000: xSwitch Zero-Configuration Ethernet Switch for Livewire
- 2001-00298-000: Telos Alliance Analog xNode
- 2001-00299-000: Telos Alliance AES/EBU xNode
- 2001-00300-000: Telos Alliance Mixed Signal xNode
- 2001-00297-000: Telos Alliance Microphone xNode
- 2001-00301-000: Telos Alliance GPIO xNode
Description
A serial cable can be used for updating and programming an xNode by connecting to the internal serial port in the unit.
Connecting the Serial Cable
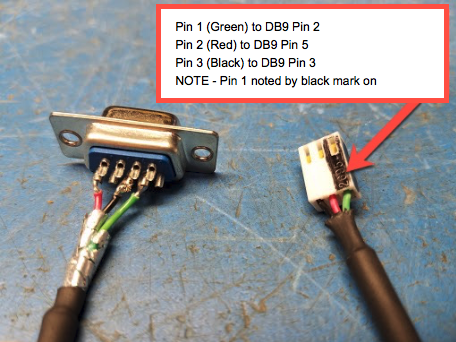
A custom serial cable that can connect to a small 3-pin header inside the xNode is required. To access you will need to The cable you will need looks like this;
- Remove the cover from the xNode
- Connect the serial cable to the serial header (labeled CT4) inside the xNode and to an available serial port on your computer.
This picture shows the proper connection to the xNode.

- Using a Terminal Program (like Putty), connect to your serial port using the settings;
- baud - 19200
- parity - none
- bits - 8
- stop - 1
- no flow control
- Power on the xNode
- Upon applying power, immediately start tapping the ESC key on your keyboard to obtain the "uMon>" micro monitor boot loader prompt.
Gather software needed for flashing the xNode
You will need a couple of pieces of software;
- A TFTP program. For example TFTPD from jounin.net http://tftpd32.jounin.net/tftpd32_download.html (Using this program, you need to define the location where your bin file is kept)
- The bin file to flash to the device https://telos-support.s3.amazonaws.com/Axia/Axia/xNode/image/1621-00096-014_xnodes_2_4_7.pkg.bin (this is the link to 2.4.7 and you can update normally after installation)
Upload files to the xNode
Once connected by putty or other terminal program type the following commands.
uMON>set IPADD 192.168.2.224;ether off;ether on
uMON>flash erase 4-130
uMON>tftp 192.168.2.155 get flash.bin 0x20000
uMON>flash write 0xff040000 0x20000 0x003e0000
uMON>reset
This will reboot the node. This time, let it boot and do not press ESC.
Set the MAC Address
- With the serial cable still connected and after reboot, from the prompt, type the command;
setmac aabbccddeeff
Perform any software updates and restore your configuration.
If there are no other hardware problems, you should be done. If you get a menu back on the front of the node you know you are good.
You can use the normal procedures for updating beyond version 1.6.4e if so desired.