Configuring a monitor (SPAN) port on a Cisco SG350
 Updated
by
Bryan Jones
Updated
by
Bryan Jones
Scope
In this document, we cover creating a SPAN port (monitor or mirror port) on a Cisco SG350 switch. These settings may or may not work on other Cisco SG series switches. This document is not intended to be a full guide or fully detail these settings. Please refer to your Cisco documentation for any questions.
Description
SPAN stands for Switched Port ANalyzer. SPAN is used to monitor or mirror network traffic that is sent or received by another device. These mirror ports are used in conjunction with a PC or other network monitoring device. A PC will often use free WireShark software to capture and evaluate network traffic. Wireshark and the "fin" logo are registered trademarks of the Wireshark Foundation
Setup
Let's assume for this example, that you want to monitor network traffic to and from your Axia IQx console.
- iQx connected to Gig Port 5
- WireShark is installed on a computer connected to Gig Port 15
- Log in to the Web UI of your Cisco SG350

- After enabling Advanced Display Mode, expand the Status and Statistics menu option, then SPAN & RSPAN
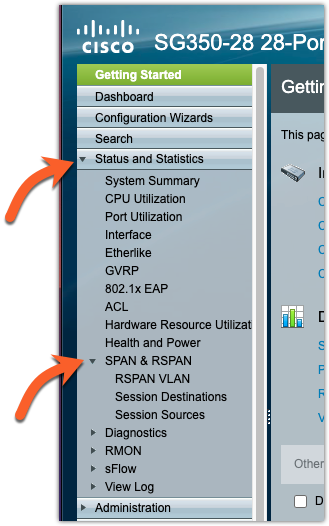
Adding a Session Destination
The Session Destination is the port where the computer running your monitoring software is connected.
- Click on the Session Destinations link under the SPAN & RSPAN menu. Any currently configured destinations are displayed.
- Click the Add... button.
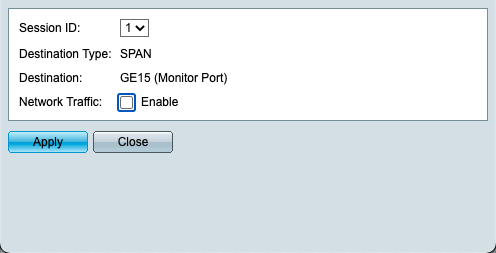
When the Add Session Destination window appears, complete the information as shown here in our example.
- Session ID: Session ID must match the session IDs of the source ports added in the next section
- Destination Type: Select one of the following options (Local Interface used in this example)
- Local Interface: The destination port is on the same device as the source ports (relevant to SPAN).
- Remote VLAN: Is the destination port on a different device than the source port (relevant to RSPAN)
- If the Destination Type is Remote VLAN, configure the following field
- Reflector Port—Select a unit/port that functions as a target port on the first device.
- If the Destination Type is Local Interface, configure the following field
- Port—Select a unit/port that functions as the analyzer port on the device.
- Network Traffic (not enabled for this example)—Select to enable monitoring of traffic other than monitored traffic.
Adding a Session Source
Configuring the source ports to be mirrored.
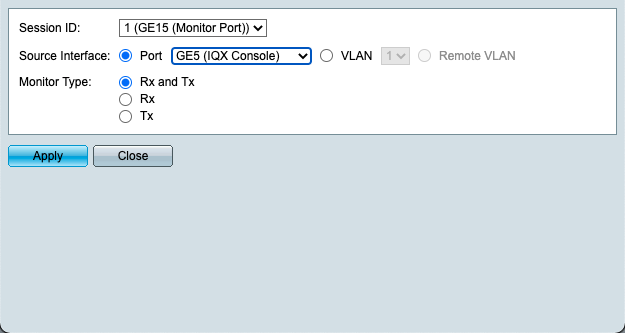
- Click on the Session Sources link under the SPAN & RSPAN menu.
- Click Add.
- Session ID: Select the session number from Session ID. This must be the same for all source ports and the destination port and is usually the Destination just created in the previous step.
- Source Interface: Select the unit and port or VLAN from which traffic is monitored. (Port is used in this example)
- Monitor Type: - Select whether incoming, outgoing, or both types of traffic are mirrored.
- Rx and Tx—Port mirroring on both incoming and outgoing packets.
- Rx—Port mirroring on incoming packets FROM the source.
- Tx—Port mirroring on outgoing packets sent TO the source.
- Click Apply.
The source interface for the mirroring is configured and the mirroring of the traffic has started.
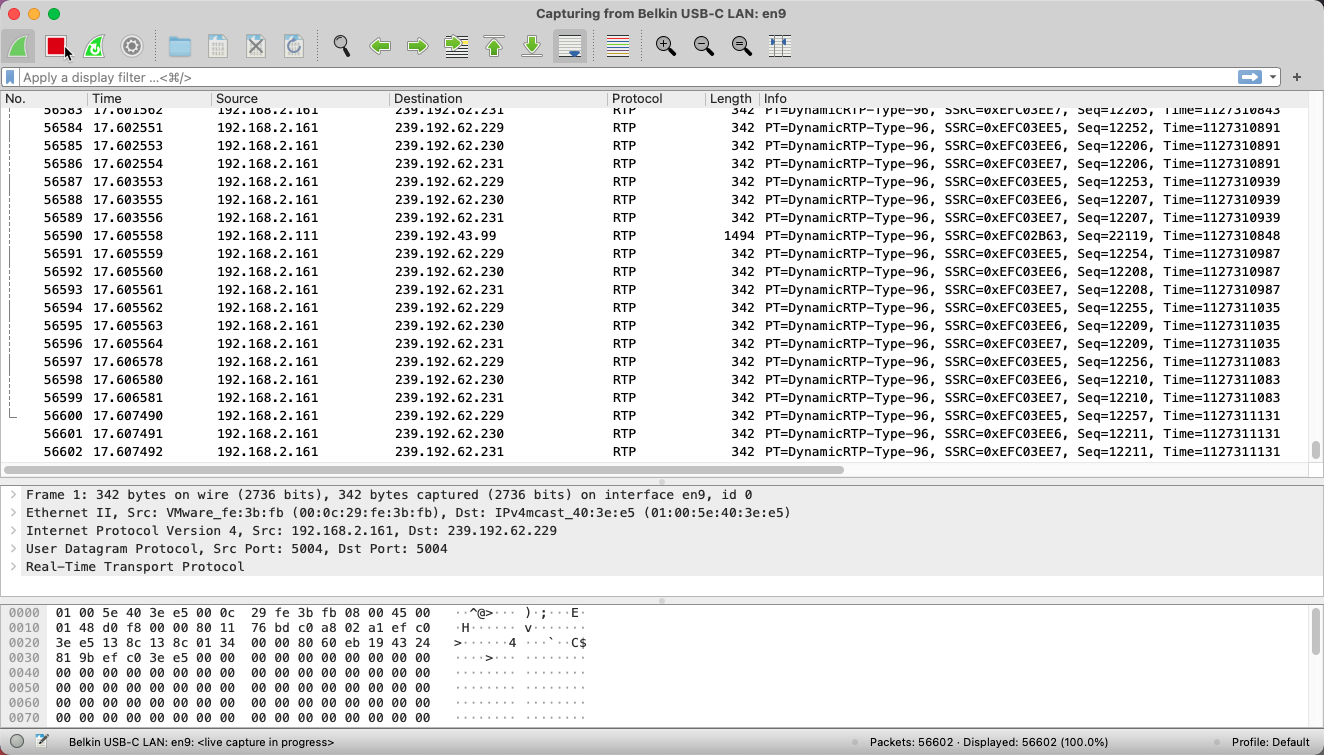
Start your monitoring software
The use of capturing software is out of the scope of this document. However, once you have connected the port designated as your destination port to your computer, you can begin capturing your data.
Here you can see the data in WireShark that is sent both to and from the iQx console.
Stopping the monitor port
To stop the mirroring of network traffic you must return to the Session Source configuration and remove the source entry. If you want to return the Destination port to regular use, you must also remove the Session Destination.
Let us know how we can help
If you have further questions on this topic or have ideas about how we can improve this document, please contact us.