Best practice guide to set IP addresses on Axia Router Control Panels and more with bootps.exe

Updated by Brett Patram

Scope

Several Axia products made over the years use an alternative method to set or change the IP address.

These products are: 17-button LCD SmartSwitch, 9-button LCD SmartSwitch, 8-button OLED SmartSwitch, and Axia GPIO Node (not xNode)

This helpdoc assists the reader in using the bootps.exe tool to assign the IP address to the device.

Description

Bootps stands for Bootstrap Protocol, and is a method that allows devices to get IP assignment. Only a few Axia devices actually require the use of bootps for IP assignment. Mainly it is the LCD button panel router products that users find themselves needing to use bootps for initial setup or IP address modification. The LCD button panels don't have any form of web gui, bootps is the only way for IP assignment to occur

Legacy GPIO nodes, also use bootps for initial IP assignment. However, once the IP address is known - further changes can be made from the web ui instead of bootps.

Prerequisites

  • A Windows laptop or PC with at least Windows XP or higher
  • Administrative Rights on the PC
  • An available Ethernet interface on the PC
  • The bootps.exe binary application (provided below)
  • The MAC address of the device

Follow these steps:

Part 1 - Connect to device over Ethernet

  1. Best way: A direct ethernet connection between the Device and your Laptop/PC
  • If the device requires POE, use a POE injector between your Laptop/PC and the device
  • If the device has an AC power option, you can skip use of POE injector
  • After, unit can be placed onto the desired network
  1. Alternative: The device and your Laptop/PC connected to the same ethernet switch
  • Connect to the device over an existing network.
  • Make sure the device is on the same VLAN as your laptop/PC.
  • Make sure there are no additional routing layers between your laptop/PC and the device.
  • If the device requires POE, use an ethernet switch that has POE
  1. Connect the device and the laptop/PC together with ethernet

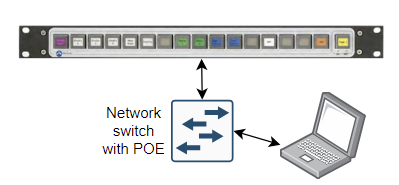
Leave the device powered offline, but connect up the ethernet cable(s) between the device and laptop/PC

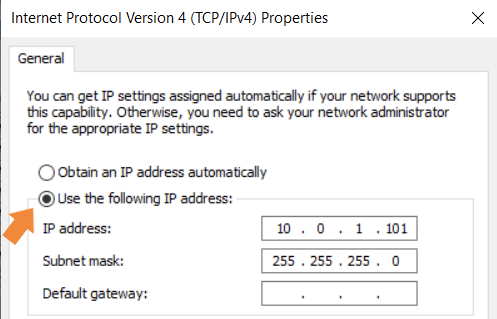
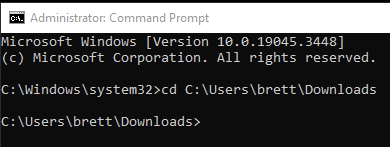
Part 2 - Prepare to use bootps.exe on the PC/Laptop

  1. Download the BootPS.exe application
  1. In Windows File Explorer right click on bootps.exe and select Properties.

On the General tab, if you see an "Unblock" checkbox please check it and click OK

If you don't see the "Unblock" checkbox, proceed to step 3

  1. Set a static IP on your laptop/PC's ethernet interface

The IP address needs to be in the same subnet of the IP address you want to assign to the device.

Doing this will allow you to ping the device to confirm the IP was successfully set to it

  1. Run Command Prompt as Administrator.

On Windows 10/11, click on the Start Menu and start typing CMD. The "Best match" search result

  1. Change into the directory where bootps.exe was saved to

When starting Command Prompt, it will start in a different folder than where the bootps.exe file is stored

Example:

When I started command prompt, it showed that it was current in the system32 directory

Using the CD command, I changed into the directory where the saved bootps.exe exists

cd C:\Users\brett\Downloads

Proceed to Part 3...

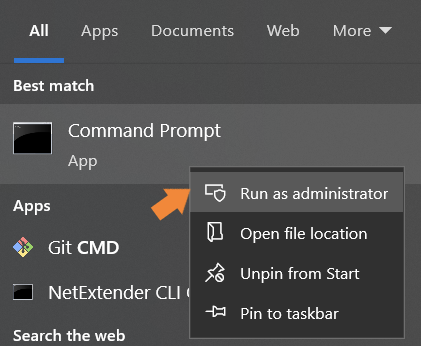
Part 3 - Attempt to set the IP to the device

  1. Obtain the MAC address of the device
    This can be located on a stick on the rear of the device that says AXIA MAC

  1. Prepare the bootps.exe command string

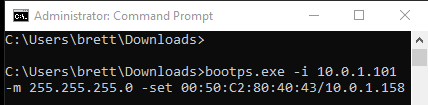
From the last step in Part 2. Compose the command string to use with boot ps

The full command has these parts:

bootps.exe -i <PC-NIC-IP> -m <Netmask-to-set> -set <MAC-of-device>/<IP-to-set>

Below is an example:

The network interface of my PC is on 10.0.1.101

The netmask of my Livewire network (all devices would use the same) is 255.255.255.0

The MAC address of the device from its sticker is 00:50:C2:80:40:43

The IP address I want to set to the device is 10.0.1.158

My bootps command becomes this:

bootps.exe -i 10.0.1.101 -m 255.255.255.0 -set 00:50:C2:80:40:43/10.0.1.158

bootps.exe -i 10.0.1.101 -m 255.255.255.0 -set 00:50:C2:80:40:43/10.0.1.158

  1. Put the device into bootp mode

Power on the device, allow several seconds for it to boot then press the ID button

On the LCD button panel the displays should indicate "IP ADDR CHANGE"

  • For LCD button panels this is a recessed button on the rear of the unit
  • For Legacy GPIO nodes this is a round black ID key on front of the unit

  1. Send the bootps.exe command

Hit the enter key to execute the command string

  1. Allow bootps to communicate on both Private and Public networks

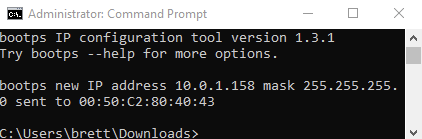
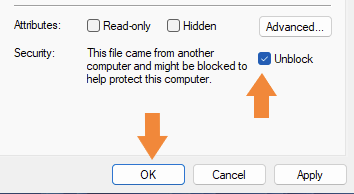
If a Windows Defender Firewall alert appears. Check both boxes and click Allow Access

  1. Attempt to Ping the device at its new IP address

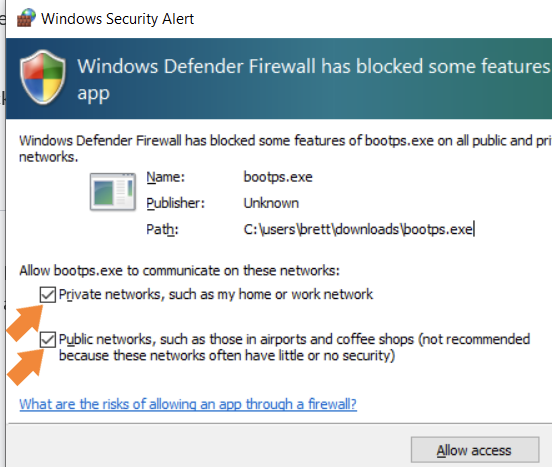
After sending the bootps command, attempt to ping the device using ping command

If this is an LCD button panel, the "IP ADDR CHANGE" text should clear after sending the bootps command

If you get ping responses back you are done. The IP address is saved and the device is ready to use

❌ If you don't get ping responses back, proceed to step 7

  1. If you can't ping the device

It may take several attempts to get the IP address to set.

Power cycle the device, Repeat from Step 2 of Part 3, and try again

If still not successful:

  • Check that ALL the steps in Part 2 were followed
  • Temporally disable Windows Firewall or any 3rd party antivirus/ firewall application
  • Double check that you are using the correct MAC address
  • Double check that your ethernet interface has the static IP address set in the same subnet as the device address
  • Try again on a different PC/Laptop
  • If attempting over a network, try with the direct ethernet connection instead


How did we do?