Creating a simple talkback button in Pathfinder Core Pro panels
 Updated
by
Bryan Jones
Updated
by
Bryan Jones
Scope
This document describes creating a button on a panel that will interrupt a Destination (output) with some other source.
Description
What we are describing here routing. While it can be a way to create a talkback (more accurately, an IFB), it's a brute-force way of doing so. We have a button. We press it down. A route is made. When we let go of the button, a different route is made.
There is a more elegant way of doing this that is described in THIS article, where the button press triggers the real IFB on the console.
The first option (the brute-force way) has no options. It completely interrupts both channels and inserts the chosen audio with no gain adjustment.
The second way can follow the rules set by the console configuration. For example, maybe you only want talkback in one channel, and you want to dim (not mute) the normal program audio. This second way allows the console to control this, which can be different from one console to another.
We'll describe the simpler but more brute-force way in this document.
Configuration
In Pathfinder Core Pro, create a new Panel and add a button or edit an existing one. Here is a link to a YouTube video describing and demonstrating this procedure.
Creating the Button
- In Pathfinder Core Pro, open the Panels link and click the + (plus) sign in the bottom right corner to create a new blank panel. You can also edit an existing one.
- From the HTML components list, drag a new button onto your Panel
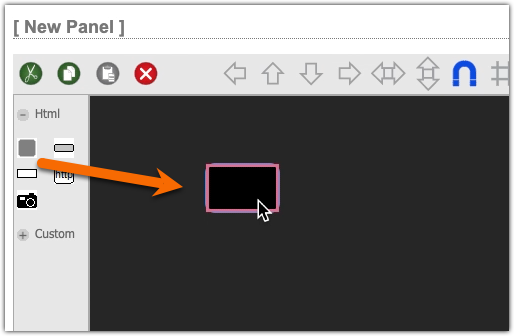
- Click on the new button so that it's selected (pink highlight indicates selected)
- From the Properties view on the right side, expand "event" and click the select box next to the "mousedown" property
- Select the Logic Flow output that appears in the lower right of your screen. This step selects what we want to control when the mouse down is true.

- When the Property Selector appears;
- Expand Routers
- Expand your main Axia Router
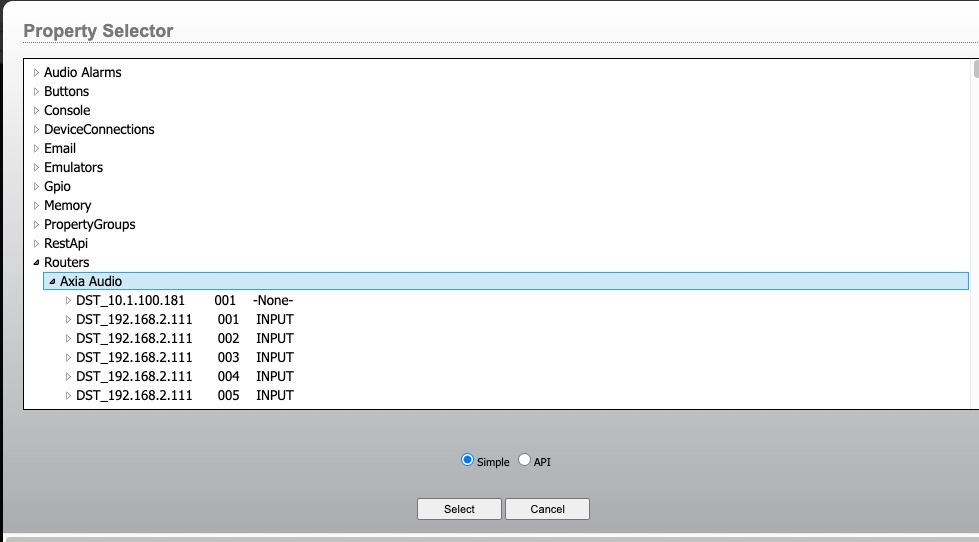
- Scroll down and locate the device you want to control. In our example, a Z/IP One at 192.168.2.31.
- Select CurrentSourcePath
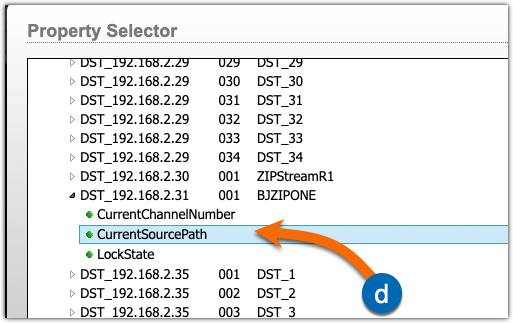
- Click Select.
- When the Translator Properties opens, pick True (for the mousedown property) and select the source to insert into the Z/IP One. In this example, Guest Mic 11407 on the xNode at 192.168.2.114.
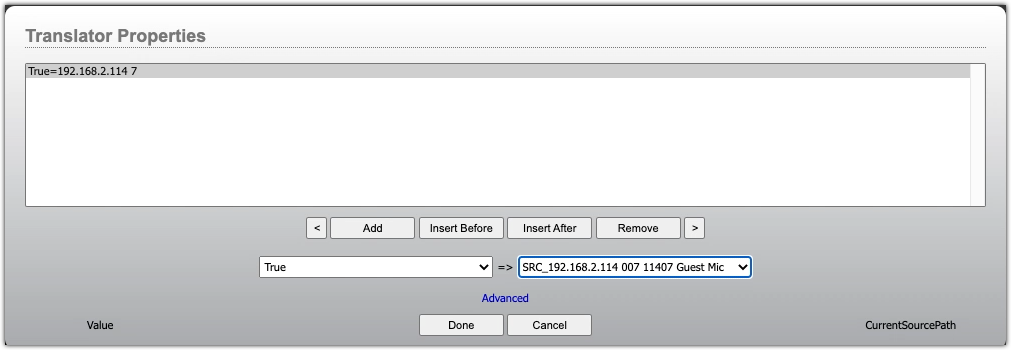
- Click the ADD button to add a second rule.
- Select False (for the mousedown property) and select Previous. PREVIOUS is the third item down from the TOP of the list.
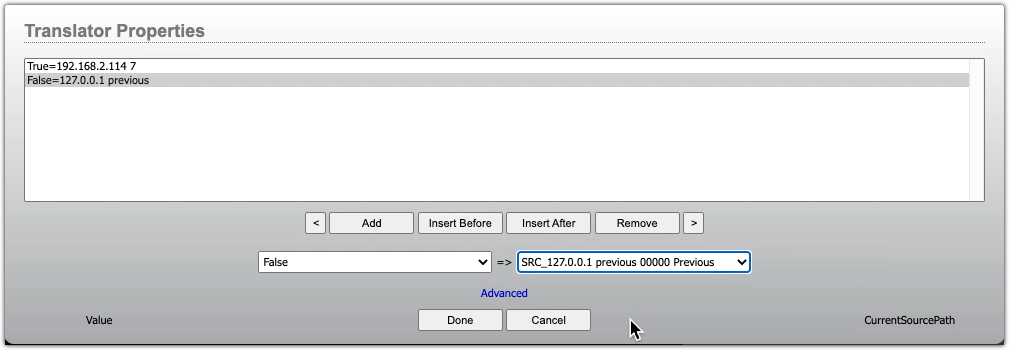
We have just created a rule set that says when the mouse is pressed down on our User button, route chanel 11407 to the input of the Z/IPOne. When we let go of the mouse, the input to the Z/IPOne will return to whatever it was previously. Watch near the end of the video linked above to see this in action.
- Click Done to save the Translator.
Button Status
The next thing to do is make the button lamp (or button Status) give us some indication that the right route was created when we pressed the button. Pathfinder will do this for us. Note that when you pressed done in Step 10 above, you got a question pop up that says;
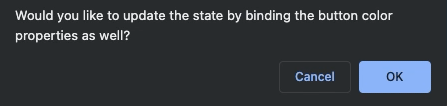
- Click OK on this prompt
Pathfinder will have most of this populated for us. The Translator Properties that show up when you click OK are the Translator properties for the Indicator status. We didn't previously select Indicator as a property we wanted to control, but Pathfinder is assuming we do. And, in fact, we do. So it selected it for us.
- Note that the first item in the list is already correct. The node 192.168.2.114 SRC 7 is the right device for the ON state.
- Click on the second item in the list to select it
- From the left side (for CurrentSourcePath) select the * from the top of the list.
- The right side value (for the Indicator property) should already be set OFF
- Check your Translator to make sure it looks like this; if it does...
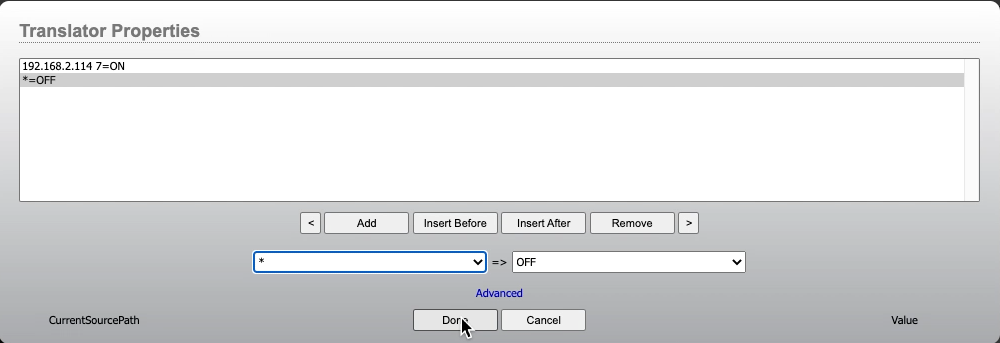
- Click Done
Save your Panel
- Click Save in the top right corner of the Panel editor
- Enter a name for your Panel
- Click OK.
Test your Panel
You can run your panel by clicking View from the panel editor. When we first run the panel, the button is in the OFF State because we only told the button indicator to turn ON when the route to the Z/IPOne changed to our Microphone. If you click the button, the indicator should come on for as long as you hold the button. This indicates that the microphone is the current source to the Z/IPOne. When we let go of the button, the route goes back to what ever it was previously. Again, you can see this in action by watching the end of the video.
Let us know how we can help
If you have further questions on this topic or have ideas about improving this document please contact us