Using the on-board diagnostic mode
 Updated
by
Tim Chimes
Updated
by
Tim Chimes
Scope
The HX1/HX2 hybrids have an ob-board diagnostic mode to help troubleshoot the unit. There are multiple tests to help you determine where your problem might be. We will go over those tests here.
Entering diagnostic mode
To enter the diagnostic mode, press and hold the bottom button (the "call drop" button) for three seconds. You will know if the unit is in it's test mode by looking at the Line Status display, which will show the current step of the test mode you are in.

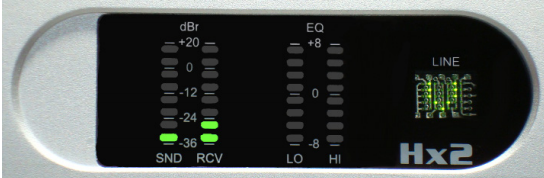
Software version
Upon entering the on-board diagnostic mode, the Line Status display should indicate the letter ‘V’. The major revision number is displayed on the SND LED bargraph, and the minor revision number is displayed on the RCV LED bargraph. Simply count the number of illuminated LEDs in each bargraph for the respective version numbers. In the figure below, one segment is lit on the SND meter, and two segments are lit on the RCV meter. The software revision number shown in this figure is Version 1.2.
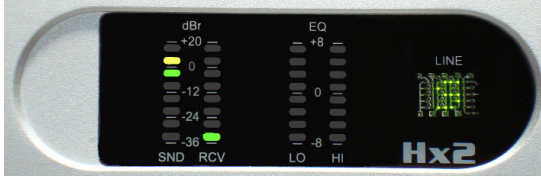
DIP switch status
Press the middle button on the Hybrid (the "Hold" button) to advance to the next diagnostic test. The Line Status display should indicate the letter ‘S’. The SETTINGS bank of DIP switches is displayed on the SND meter bargraph, the OPTIONS bank of DIP switches is displayed on the RCV meter bargraph, and the internal bank of DIP switches is displayed on the EQ LO meter bargraph. For each bank of DIP switches, the status of Bit #1 is shown on the bottom LED segment of the bargraph, while the status of Bit #8 is shown on the top LED segment of the bargraph. If the switch is set to the ON position, the corresponding LED segment will light up. The figure below shows the Factory Default DIP switch settings. (All the bits of the internal DIP switch back are set to the OFF position for Factory Default settings, thus no LEDs are lit on the EQ LO meter).
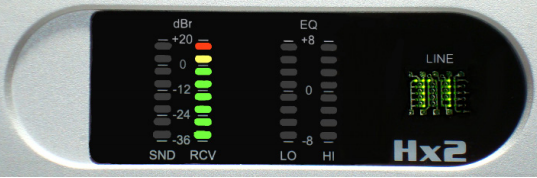
Test 1: test tone generation
Press the middle button on the Hybrid to advance to the next diagnostic test. The Line Status display should indicate ‘T1’. The DSP chip on the motherboard generates a 400 sine wave that is sent to the RCV OUT XLR connector for each hybrid. The output level of the sine wave at the XLR is +20 dBu, and the output level should be displayed on the RCV meter bargraph. (See figure below). The diagnostic test also takes the telephone line off-hook and outputs a –7 dBm, 400 Hz sine wave. A telephone line or line simulator must be plugged into the LINE RJ11 jack to activate the telephone interface circuitry on the hybrid motherboard. The 400 Hz tone will also be audible on the PHONE RJ11 jack, but it will be heard mixed in with the telco’s dial-tone or re-order tone.
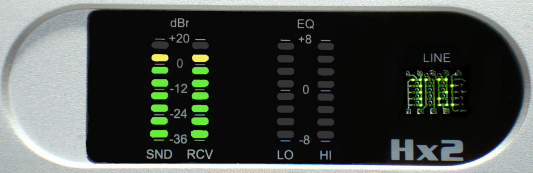
Test 2: studio loopback
Press the middle button on the Hybrid to advance to the next diagnostic test. The Line Status display should indicate ‘T2’. This test simply takes audio present on the SEND IN XLR connector and loops it back to the RCV OUT XLR connector without any processing. The loopback test works with either analog or AES inputs. This diagnostic test can be used to adjust the INPUT LEVEL pot located in the back of the hybrid chassis. Connect a +4 dBu signal and adjust the INPUT LEVEL pot until the yellow LED segment illuminates. (See figure below).
Test 3: feed through test
Press the middle button on the Hybrid to advance to the next diagnostic test. The Line Status display should indicate ‘T3’. This test takes audio present at the SEND IN XLR connector and feeds it to the LINE RJ11 connector without any processing. Likewise, whatever signal is being fed into the LINE RJ11 connector will be routed to the RCV OUT XLR connector. This test enables you to test the studio and telephone input and output levels. If you like, press the button to skip past this diagnostic test.
After the last test in the sequence is complete, the unit will reset itself and return to normal operation.
Let us know how we can help
If you have further questions on this topic or have ideas about improving this document, please contact us.