How to set up a connection over Link
 Updated
by
Tim Chimes
Updated
by
Tim Chimes
Scope
Link allows you to communicate between two Infinity devices over the internet. This could be as simple as communicating from panel to panel, or it can be used to have two different site on the same partyline.
Configuring Link
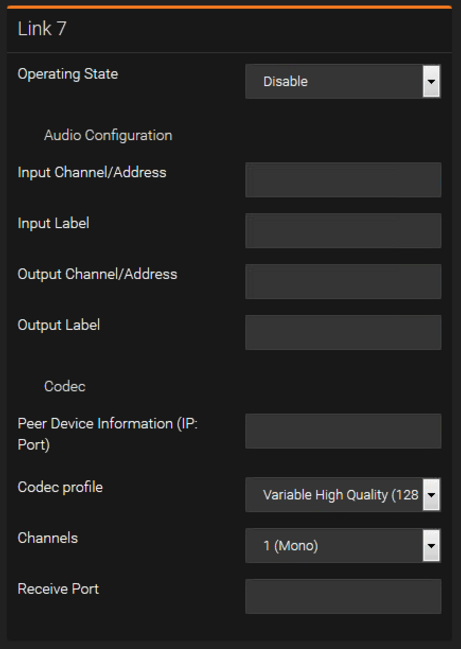
Operating State: enables or disables your Link connection
Input Channel/Address: the multicast address of the stream used to feed audio to the far end. This could also be a Livewire channel number. If you are using Dashboard to configure Link, Dashboard will assign a channel number here for you. For those used to Livewire, think of this as a Destination.
Input Label: this a friendly name. This label also appears in Dashboard in the Output tab.
Output Channel/Address: the multicast address of the stream from the receive audio. This could also be a Livewire channel number. This must always be manually configured (Dashboard will not fill this field in for you). For those used to Livewire, think of this as a Source.
Output Label: this a friendly name. This label also appears in Dashboard in the Input tab.
Peer Device Information: this is the IP address and port of that device that you would like to connect to. This will almost always be a public IP address. The port by chosen by the far end device, and would need to be port forwarded through their firewall.
Codec Profile: the overall audio quality you would like the send stream to be set to. This does not affect the quality of the stream that you are receiving.
Channels: mono or stereo stream. Each instance of Link is mono by default. If you choose stereo, this will use two Link channels. For example, if Link 7 is set to stereo, it will actually use Link 7 for the left channel, and Link 8 for the right channel.
Receive Port: The IP address and port that you would like to receive audio on from the far end. The IP address would be the local IP address of whichever port on your Infinity device is connected to the internet. For the port, you can use whichever number you'd like. If you have a firewall, you will need to port forward this number to the local IP address of the Infinity panel.
Configuration example
Let's set up a key on an Infinity MP-16 that will allow you to talk and listen to a panel at a different utilizing Link. Note that this configuration is only to set up one side of the connection. The far end would also need to be configured similarly to allow for two-way communication.
We will use Dashboard for some of this, but let's start with Link.
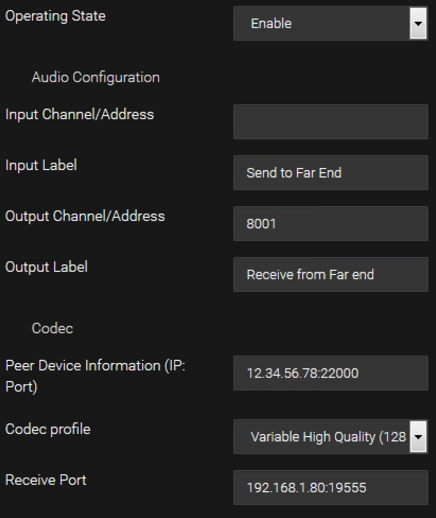
For now, we configure everything in Link except for the Input Channel/Address. We will let Dashboard configure this.
We've given the Input and Output Labels specific names ("Send to" and "Receive from"), as this will help us keep organized when we move over to Dashboard.
We had to manually set the Output Channel/Address field. I chose channel number 8001, but this can be anything you'd like, as long as it is unique to other channel numbers on your network. Remember, this is the same as a Livewire Source.
For Peer Device Information, I'm telling Link to send audio to a device at a public IP address of 12.34.56.78, and a port of 22000. This port would be chosen by the user on the far end, and would need to be port forwarded if a firewall or NAT is in use.
We are going to transmit our audio at the Variable High-Quality setting.
Our Infinity panel showed above is using the Secondary Port to connect over Link, and the local IP address of our Secondary Port is 192.168.1.80. We are also using port 19555 to receive audio from the far end.
Next. go to Dashboard and add a new Virtual Port. The input and the output of the Virtual port will be the output and the input of Link, respectively.
Yes, the Input pf the Virtual Port is the Output of Link, and the Output of the Virtual Port is the Input of Link.
Think of the Virtual Port and Link as their own devices. So we want to feed the output of Link to the input of the Virtual Port, and vice versa.
After assigning the I/O, you can go back to the Link configuration and refresh the page. You should see that Dashboard entered a channel number to the Input Channel/Address field. In our case, it was 29000:

Drag the Virtual Port to a key on your MP-16. You should now be able to talk to the Link device on the far end.
Let us know how we can help
If you have further questions on this topic or have ideas about how we can improve this document, please contact us.