Using the Awrite utility to write images
 Updated
by
Bryan Jones
Updated
by
Bryan Jones
SCOPE
This document describes how to use the awrite.exe utility for writing images to, or creating images from compact flash cards used in Telos, Omnia, and Axia products.
OBTAINING THE AWRITE UTILITY
Click HERE to download this utility and save it to a location on your computer.
COMPATIBILITY
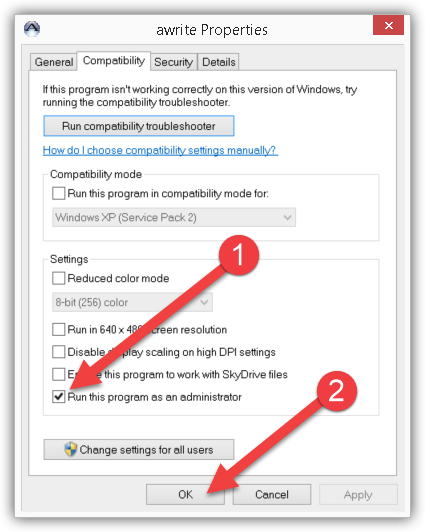
The Awrite utility is compatible with all Windows operating systems from XP and newer. When using on operating systems on Windows 7 and newer, you must run it with administrative rights. To set the program to run with administrative privileges;
- Locate the file you downloaded.
- Right-click on the file and choose Properties.
- Choose the Compatibility tab
- Check the box that says “Run this program as an administrator” and then click OK.
PREPARE TO WRITE YOUR IMAGE
- Locate the card that you will use for this task and insert it into your writer.
If your operating system pops up any messages telling you that you need to format the card, you may dismiss those messages.
RUN THE PROGRAM
Run the program from the location you downloaded it to.
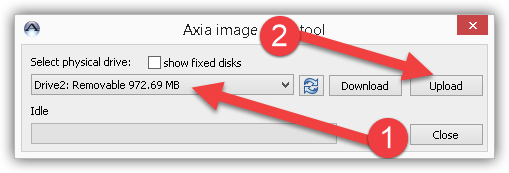
- Select the CompactFlash card from the drop-down list under where it says “Select physical drive:”
- Click the Upload button to choose the image that you want to upload to the card.
Use the upload dialog to browse to the image to write to the card. This image should have been provided to you already, and you should have saved it on this computer. Once you select the image, the writing process will start.
The program will display a green progress bar while writing, and once complete, it will show as though you had just launched the program. There will be no message indicating that the process has completed other than the progress bar will return to saying, "Idle."
USING THE DOWNLOAD BUTTON TO BACK UP A CARD
Use the Download button to create an image of a compact flash card to save as a backup. To use this, click the Download button. When the dialog box appears, select a location to store the file and specify a filename. Once you click OK the program will begin to write the contents of the card to a file on your computer.
USING WINDOWS DISK PART TO CLEAN A CARD
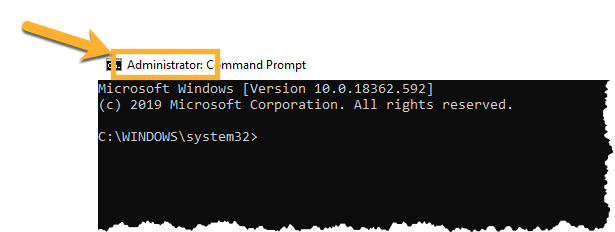
- Open a command prompt on your computer as an administrator.
- Locate your command prompt icon in Windows.
- Right-click and chose "Run as Administrator."
Your command prompt should show "Administrator:" like this.
- Type "diskpart" and press enter.
You should receive a message saying;
Microsoft DiskPart version 10.0.18362.1

Copyright (C) Microsoft Corporation.
On computer: MYWINDOWSPC50

DISKPART>
- Type "list disk" as shown and press enter.
You will see all disks on your system listed here.
DISKPART> list disk

  Disk ###  Status         Size     Free     Dyn  Gpt
  --------  -------------  -------  -------  ---  ---
  Disk 0    Online          100 GB      0 B
  Disk 1    Online         3840 MB  3584 MB

DISKPART>
- Select the disk. In this case, it's Disk 1. Type "select disk 1" and press enter.
Message will display saying "Disk 1 is now the selected disk."
DISKPART> select disk 1

Disk 1 is now the selected disk.

DISKPART>
- Type "clean" and press enter.
DISKPART> clean

DiskPart succeeded in cleaning the disk.

DISKPART>
All partitions have now been removed from this disk and you may proceed with writing your image.