Using UDP to receive GPIO from an XDS satellite receiver
 Updated
by
Bryan Jones
Updated
by
Bryan Jones
Scope
Certain Digital Media Receivers from ATX support the generation of Netcues via UDP. These models include the XDS-PRO4Q, R, and S running software v3.4.12 and higher (© 2019 ATX Networks™). This function is not present on older PRO4 model receivers. While not covered here, older XDS receivers still support Serial port Netcues. You could use a serial to Ethernet converter to accomplish the same things.
Description
The UDP Netcue feature allows you to configure these Netcues to be sent to different IP Addresses and Ports if desired. Alternately, you can point the Netcues from all four ports to a single destination address.
For this example, we will send each of the four ports of the Receiver (A thru D) to Pathfinder Core Pro using a different UDP port. This allows separation of the Netcues by audio port on the Receiver.
Configuration
Pathfinder Core PRO Configuration
For this configuration, we will create four new Generic Emulators. You can find more info on Generic emulators in the complete manual by clicking here.
Device Emulators do not need to be configured on the Livewire network. For this configuration to work, your XDS receiver would need to be on one of the two networks configured in Pathfinder.
Configuring Device Emulators
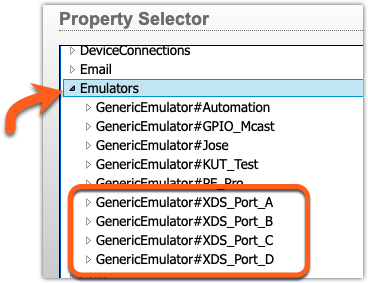
- Determine the number of ports needed for your configuration. If you only use two of the four ports on your receiver, then only configure those two ports. For this example, we will use all four (A - D) ports and the UDP ports used are;
- 9990 - Port A
- 9991 - Port B
- 9992 - Port C
- 9993 - Port D
You can use any open UDP port.
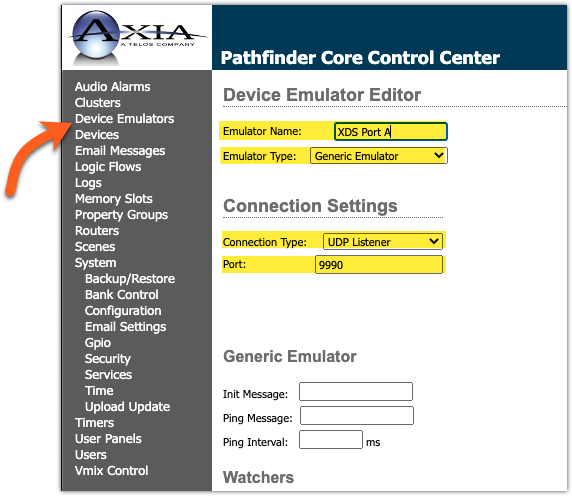
- From the main Pathfinder Core PRO Web Page, click Device Emulators
- Click the plus sign in the bottom right
 to add a new emulator
 - Enter an Emulator Name. In this example, we'll call it XDS Port A.
- For Emulator Type, select Generic Emulator
Under Connection Settings
- For Connection Type, select UDP Listener
- For Port, enter 9990 (our first port set aside in step 1)
- Nothing is required for Init Message, Ping Message, or Ping Interval.
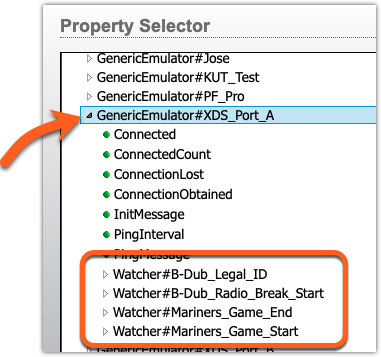
Adding watchers to your Device Emulator
Watchers are also described in the manual but are the actual text strings to "watch" for. For this example, the watchers we need to add are determined by the configuration of your receiver. Every receiver will be different as it's completely dependent on what programming you receive. Netcues used in your system can be found on the Relays tab of your receiver or contact your provider.
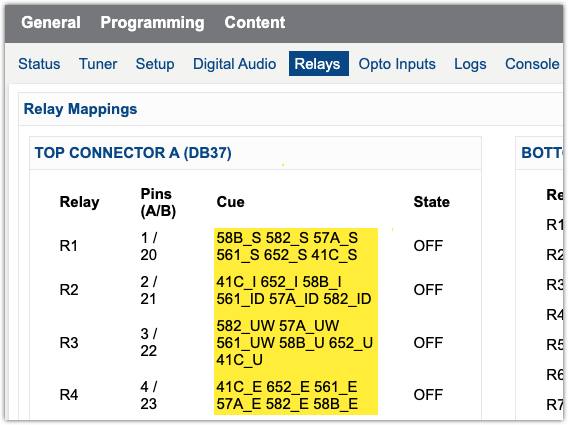
58B_S, 582_S, 57A_S are just three of the Netcues in this example. You may not use ALL of the relays listed in your receiver, but you will create an individual watcher for each one that you need.
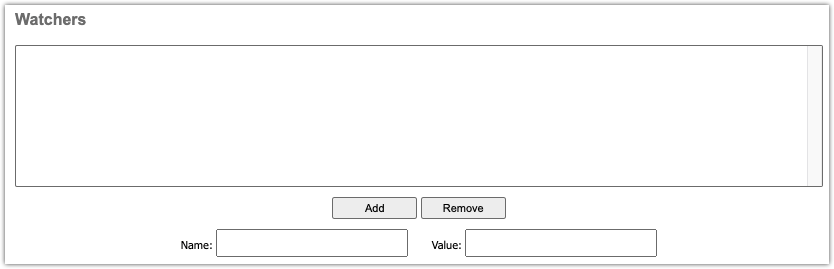
- Click Add to start a new Watcher
- Give your Watcher a Friendly name. These are shown in other places in Pathfinder Core PRO. For example, the 58B_S Netcue will be referred to in the system as Mariners Game Start (more on this later).
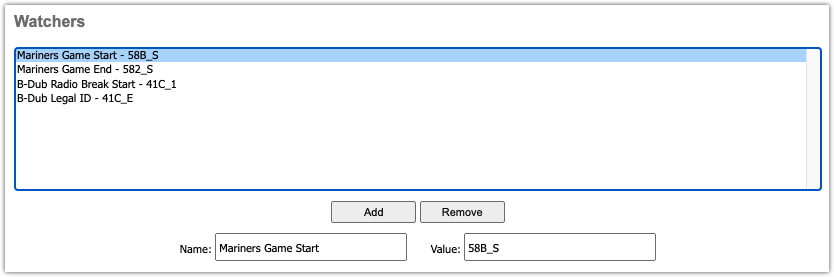
- Click Add to continue adding additional watchers until you have accommodated all needed Netcues as shown above.
- Click Apply when Done
Repeat this entire section for each Port needed from your XDS Receiver. It may be that you can use a single network port for all of this. It ultimately depends on your needs.
Configuring the XDS Receiver
- From the Web Page of your receiver, click on the Console tab.
- Type the command CUE UDP. This will return the current configuration. Sending a new configuration will overwrite the current. Note that all ports, A thru D, show n/a, meaning they are not configured.
Hudson> CUE UDP
A: n/a
B: n/a
C: n/a
D: n/a

Hudson>
- Type the following replacing the IP address shown with the IP Address of your Pathfinder where we just configured the Device Emulators and Watcher.
Hudson> CUE UDP A 192.168.2.10:9990
Hudson>
- Repeat for all four ports (or as many as required for your configuration.
Hudson> CUE UDP B 192.168.2.10:9991
Hudson> CUE UDP C 192.168.2.10:9992
Hudson> CUE UDP D 192.168.2.10:9993
Hudson>
- Check to make sure the ports are correct, send the command CUE UDP
Hudson> CUE UDP
A: 192.168.2.10:9990
B: 192.168.2.10:9991
C: 192.168.2.10:9992
D: 192.168.2.10:9993

Hudson>
If you need to clear one or more ports, use the command;
Hudson> CUE UDP A CLEAR
Using in Pathfinder
Your newly created Watchers will now "trigger" when the Netcue is received from your XDS receiver. You will find the Generic Emulators listed under Emulators.
Expanding individual emulators will show the defined Watchers.
Most often, you will expand the Watcher and selected the Triggered property
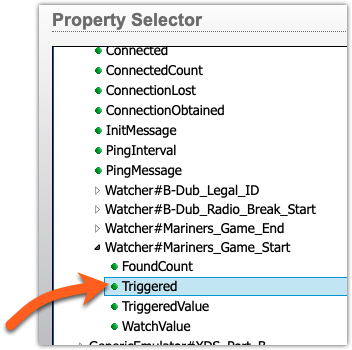
Logic Flows will then use the "TRUE" state of the triggered property to make a route, trip a GPIO, turn a console channel on, etc.
Testing the UDP Sender from XDS
If you want to test (and capture) the data that the XDS receiver is sending, you can use our Metadata Capture tool. While this is intended to capture metadata from an Automation system, it works perfectly well in this scenario too. Download and run the tool according to the instructions. Just remember to set the Connection type to UDP, then change the CUE UDP settings on your XDS to point to the computer where you are running this tool.
Let us know how we can help
If you have further questions on this topic or have ideas about improving this document, please contact us.