Omnia.9 version 3.20.20 Software Install and Release Notes

Scope
This software update applies to ALL variants of the Omnia.9 and is applicable to both original and updated hardware platforms (MKII). Note that some options (including support for Livewire or Kantar) are available only on the MKII platform. If you are interested in updating your Omnia.9 to the MKII platform please contact support or your dealer and ask about the Omnia.9 MKII Hardware Upgrade (PN# 2011-00197-000).
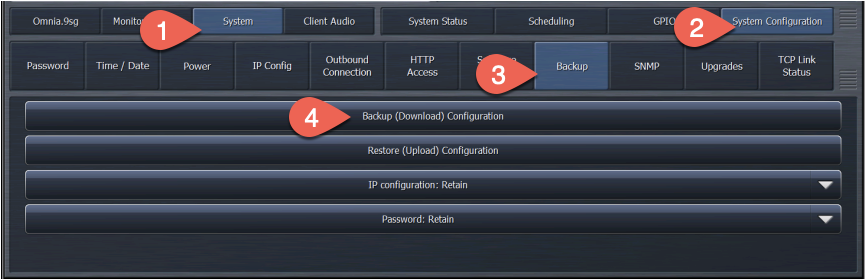
Backup your current settings
- Select System.
- Then chose System Configuration.
- Chose Backup.
- Then choose Backup (Download) Configuration and save this file to a location on your computer.
IMPORTANT NOTES
PLEASE READ BEFORE PROCEEDING WITH THIS UPDATE!
Software Update Procedure
Please download version 3.20.20 from here and save this to a location on the computer you will use to perform the update.
There are two ways to update the software in your unit. One is using the NfRemote software and the other is using a USB flash drive plugged into the front panel USB port.
Updating by USB flash Drive
Copy the update file to the root of the USB flash drive. Make sure there are no other versions of update files present in the root directory.
- Plug the USB flash drive into the USB port on the back of your Omnia.9.
- Using the front panel:
- Navigate to the System menu.
- Then to System Configuration.
- Then to Software Update.
- Select "Update from USB".
- Follow the remaining instructions on the screen.
Using the NfRemote software
- Connect to your Omnia.9 with NfRemote (note the warning above about updating remotely).
- Select System.
- Choose System Configuration.
- Chose Software Update.
- Then click the "Upload Software" button. In the Window that appears, browse to and select the software update file you just downloaded. The file will be uploaded to the Omnia 9 and when complete, it will say "Upload Successful". Below that, it will say "3.20.20 updater ready".
- When ready, click the "Update Software to 3.20.20" button at the bottom of the screen. Confirm that you wish to proceed with the update by clicking "Yes" in the confirmation dialog box that appears:
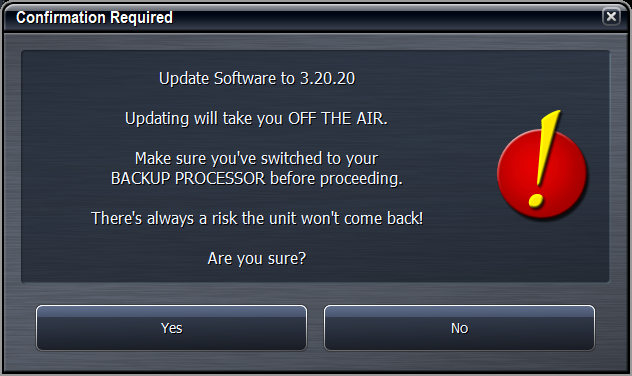
The NfRemote connection will be lost at this point. Once the update is complete, the displayed version will reflect the new version number 3.20.20. You can double-check this in System / System Status / System Information.
Updating the FPGA Firmware
After the Omnia.9 reboots, it’s time to update the FPGA firmware.
- Navigate to System.
- System Configuration.
- Software Update.
If your unit is already running FPGA version 0x90000018 you may skip to step 6. If you are on 0x90000017 or earlier, proceed with the update.
- After you have ensured that the unit will not suffer a power outage, click on “Update FPGA to 0x90000018.
- When the FPGA update is done, disconnect the power cables, wait 30 seconds and then reconnect them.
- Some units may need an Atmel update as well, depending on what software version is running. If the "Update Atmel to 1.5" button is enabled (not grayed out) then you will want to perform this update as well. This also requires a hard power cycle afterwards, separately from the FPGA update. It does not matter whether FPGA or Atmel is updated first. Risks here are similar to the FPGA, so take great care your unit is not rebooted during this update.
CONGRATULATIONS! The update procedure is now completed. You may now return the Omnia.9 to normal service
Change log
Version 3.20.20 - August 2020
- GPO RDS TA option added
- AES67 SDP a=ptime now correct also for 44100 Hz system sample rate
- 19 KHz generator re-implemented
- Watchdog rewritten. 1394 chip will now hard-reset if absent or unresponsive.
- Hardware device presence now probed through HAL and logged.
- Several specific error messages added to replace the generic "Engine Failure".
- Mainboard Reset button added to System - System Config - Power.
- Phase Rotation now works in HD / Streaming too
- Engine failure reboot disabled
- SNMP values added for MPX Power, MPX Power Limit, MPX Output Level
- Backup now includes 10 log files per log type (was 5 previously)
- ASIO log added
- Monitor output follow bug fixed
- Basic System Info now includes MPX/IP keys
Version 3.20.04 - October 28, 2019
- Revised and improved clipper, with cleaner bass
- Kantar version 8.0 integrated
- Kantar Certification granted for this release (for EU countries using Kantar ratings system)
- Kantar module now re-synchronizes its clock every 6 hours
- µMPX Encoder license handling merged under MPX/IP licensing key in /System Config/Upgrades (see note above)
- µMPX bit rate selection streamlined
- µMPX version 3.0 integrated
- Separate source selection per streaming encoder added, including FM Pre-Final and Program Input
- Separate MPX1/2 Output Delay added
- NTP now obeys user-configured server list after software restart
- Primary Input silence alarm GPO option added
- HE-AAC encoder bitstream format changed to ADTS_MP4
- Mono sum input option added for HD/Stream. Hidden option, HTTP server access only.
- Internal Player "Play From" switch added, determines whether to play from the last position or from the beginning of each file.
- RDS library updated. Version number now displayed in user interface.
- PS/RT timeout and default fields added
- RDS encoder updated, AF list stability issue corrected (no longer repeats packets),
- RDS decoder now also supports 44 kHz base sample rate
- UECP feature set extended
- RDS UECP TCP + Text support added
- RDS AF list issue corrected (no longer sends invalid 0 code), RDS AF list now supports 25 frequencies.
- RDX license key created to support extended RDS features
- New Combo FM MPX test tone added. Combines quick sweep with 50 Hz square wave, for easy, at-a-glance transmitter calibration.
- Combo Phase also added, inverts phase every second, to verify DAC, transmitter and modulation monitor LF performance.
- L/R Output Delay now works
- HTTP server status overview page added
- Streaming encoder gain control added (to allow EBU R.128 compliance among other things)
- Optional Aux 2 output added
- HTTP remote update implemented
- Many intermittent stability bugs fixed
- Improved time zone handling - clock drift bugs fixed
- Stream encoders are now 24-bit
- HD cores no longer combined with streaming cores on MkI Dual FM units if streaming cores are disabled