Recording host and callers to separate channels using Vmode
 Updated
by
Tim Chimes
Updated
by
Tim Chimes
Scope
Axia consoles allow for simple ways to record your host and phone calls to separate channels. One method is by configuring a Vmode. This document aims to discuss how to configure your console to achieve this.
Configuration
Navigate to the web interface of your Engine (whether it is a Studio Engine or PowerStation controlling your console), and go to the Vmode page.
When setting this up, you need to make sure that you have a pair of inputs available.

Click on the configure button on the top of the two channels. This is where we will set up the host mic and the output mix of both channels.
First, configure the input:
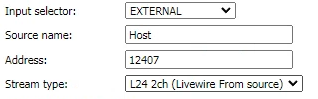
- Input selector should be External. This will allow you to use a Livewire source that is on the network. In this case, we will use the Livewire channel for the hot microphone (pre-console)
- Source name is a friendly name for the source
- Address will be what the Livewire channel number is of your host microphone. This should also be configured someplace, likely on an xNode, or input on a PowerStation. In our example here, our channel number for the host microphone is 12407
- Stream type can be left at the default of L24 2ch (Livewire From source).
After this is done, click the Apply button on the bottom of this section (above the Audio Channel Routing section).
Next, we configure the routing. This is what will take audio from the host mic and caller channels, and output them on a single channel. For this, we want to make sure that we have it set to Combine Left, Left
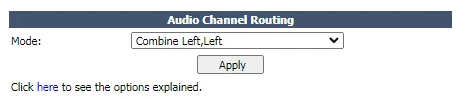
Combine Left, Left will take the left channel audio from the Host mic source and place it on the left channel of the output, while also taking the left channel audio from the Caller source and placing it on the right channel of the output. After this is done, click the Apply button on the bottom of this section (above the Output section).
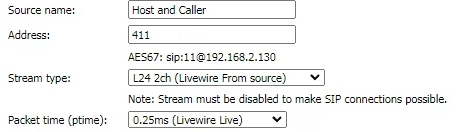
Now we configure the output. All we essentially do here is get the output (which is now a new Livewire source on the network) a friendly name and a channel number. Here we gave it a name of Host and Caller, with a channel number of 411.
After this is done, click the Apply button at the bottom of this section. Then go back to the VMode page.
So far, your Vmode should look like this:

We have only configured the host microphone, the routing, and the output. We still need to set up the caller audio. Click on the second configure button.
We will only be configuring the Input here. We do not need to configure the Audio Routing or the Output on this Vmode channel (because those are taken care of on the first one).
- Input selector should be External. This will allow you to use a Livewire source that is on the network. In this case, we will use the Livewire channel for the hot microphone (pre-console)
- Source name is a friendly name for the source
- Address will be what the Livewire channel number is of your host microphone. This should also be configured someplace, likely on an xNode, or input on a PowerStation. In our example here, our channel number for the host microphone is 14401
- Stream type can be left at default of L24 2ch (Livewire From source).
After this is done, click the Apply button on the bottom of this section (above the Audio Channel Routing section). Go back to your Vmode page, and you should now see something like this:

You can now take your new Livewire source (in the example above, we have it entered as 411) and use it however you would like. This audio will now have your host microphone on the left channel, and the caller audio on the right channel.
Let us know how we can help
If you have further questions on this topic or have ideas about improving this document, please contact us.