Using NodeLogger for logging individual devices
 Updated
by
Bryan Jones
Updated
by
Bryan Jones
First things first
Tip 'o the Hat to Michael Gay from NotABotYet for this clever little utility and sharing it with the community.
Some legal stuff
Telos Alliance supplies NodeLogger with permission from NotABotYet as freeware. This program is distributed hoping that it will be useful, but WITHOUT ANY WARRANTY; without even the implied warranty of MERCHANTABILITY or FITNESS FOR A PARTICULAR PURPOSE. See the GNU General Public License for more details.
Installing NodeLogger
NodeLoger is not an installer. It is just an executable that you can copy onto any Windows computer. You can download NodeLogger by clicking here.
Create a new folder under your Downloads or your Documents folder and copy this executable to this folder. Logs are kept in the same folder that you run the program.
To run the program, just double-click on it.
Here are some examples of how you might use this.
Logging GPIO from a device.
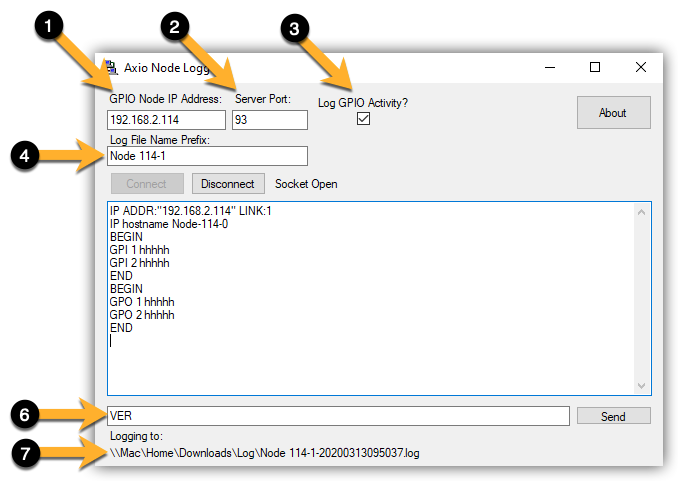
- Enter the IP address of the device to log GPIO from. This could be a Node, a Driver, Z/IP One, iPort, or ANY device that supports Axia GPIO. In this example, we will use an xNode with two GPIO ports.
- Enter the Server Port. All GPIO is on port 93
- Check the "Log GPIO Activity?" box. To log GPIO activity, you must subscribe. Checking this box subscribes to the GPIO Changes.
- Supply a friendly name for the Log File Prefix. This will be used to produce log files with meaningful names.
- Click the Connect button. You will see some initial connection information displayed in the Window.
- At the direction of Axia, you can send commands to the device using the Send option.
- The location and name of the logs being created are displayed here. Note that a new log is created for each day. Logs are just plain text and can be read with any Text editor. NotePad++ or VisualStudioCode are free ones that we like here in Support.
Logging Console messages.
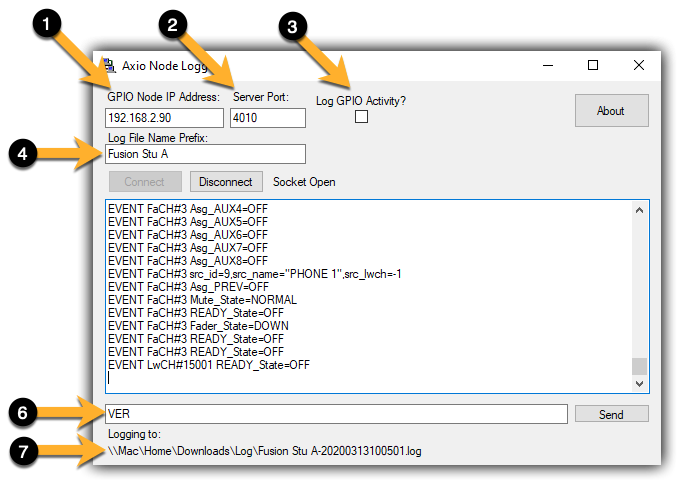
- Enter the IP address of the console.
- Enter the Server Port. All console messages from Quasar, Fusion, and Element are on port 4010.
- Do NOT Check the "Log GPIO Activity?" box. Unlike GPIO, port 4010 requires no subscription.
- Supply a friendly name for the Log File Prefix. This will be used to produce log files with meaningful names.
- Click the Connect button. No initial messages are shown. Any messages from the console will be logged. There is no way to filter messages. All console changes are sent.
- At the direction of Axia, you can send commands to the device using the Send option.
- The location and name of the logs being created are displayed here. Note that a new log is created for each day. Logs are just plain text and can be read with any Text editor. NotePad++ or VisualStudioCode are free ones that we like here in Support.
Let us know how we can help
If you have further questions on this topic or have ideas about how we can improve this document, please contact us.