Omnia.9 version 3.30.79 Software Install and Release Notes

Scope
This software update applies to ALL variants of the Omnia.9 running earlier software versions and applies to both original and updated hardware platforms (MKII). Note that some options (including support for Livewire, Kantar & Nielsen watermarking) are available only on the MKII platform. If you are interested in updating your Omnia.9 to the MKII platform please contact support or your dealer and ask about the Omnia.9 MKII Hardware Upgrade (PN# 2011-00197-000).
A major optional feature addition is the inclusion of Nielsen PPM watermarking. Click the link for details and setup information
Update Procedure
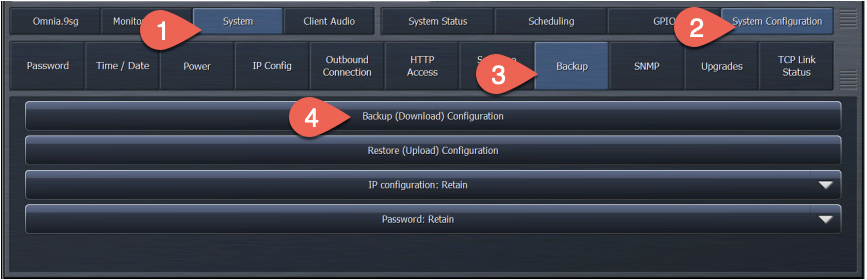
Backup your current settings
- Select System.
- Chose: System Configuration.
- Chose: Backup.
- Then choose Backup (Download) Configuration and save this file to a location on your computer.
Download the Update File
To download version 3.30.79, fill out registration information and follow prompts from here. Once you see the download prompt, save the .pak file to a location on the computer you will use to perform the update.
IMPORTANT NOTES
PLEASE READ BEFORE PROCEEDING WITH THIS UPDATE!
Update Options
There are two ways to update the software in your unit. One is using the NfRemote software and the other is using a USB flash drive containing the update file, plugged into the front panel USB port.
Updating by USB flash Drive
Copy the update file to the root of a USB flash drive. Make sure there are no other versions of update files present in the root directory.
- Plug the USB flash drive into the front or rear USB port on your Omnia.9.
- Using the front panel GUI:
- Navigate to the System menu.
- Select: System Configuration.
- Select: Software Update.
- Select "Update from USB".
- Follow the remaining instructions on the screen.
Updating using the NfRemote Software
- Connect to your Omnia.9 with NfRemote (note the warning above about updating remotely).
- Select: System.
- Choose: System Configuration.
- Chose: Software Update.
- Then click the "Upload Software" button. Browse to and select the software update .PAK file you just downloaded. The file will be uploaded to the Omnia 9 and when complete, it will say "Upload Successful". Below that, it will say "3.30.79 updater ready".
- When ready, click the "Update Software to 3.30.79" button at the bottom of the screen. Confirm that you wish to proceed with the update by clicking "Yes" in the confirmation dialog box that appears:

As the internal software restarts, the NfRemote connection will be lost at this point. Once the update is complete, the display will reflect the new software version number 3.30.79. You can double-check your current version in System / System Status / System Information.
Updating the FPGA Firmware
After the Omnia.9 reboots, it’s time to check whether you need to update the FPGA firmware.
- Navigate to System.
- System Configuration.
- Software Update.
If your unit is already running FPGA version 0x90000018 you may skip to step 6. If you are on 0x90000017 or earlier, proceed with the update.
- After you have ensured that the unit will not suffer a power outage, click on “Update FPGA to 0x90000018.
- When the FPGA update is complete, disconnect the power cables, wait 30 seconds and then reconnect them.
- Some units may need an Atmel update as well, depending on what software version is running. If the "Update Atmel to 1.5" button is enabled (not grayed out) then you will want to perform this update as well. This also requires a hard power cycle afterwards, separately from the FPGA update. It does not matter whether FPGA or Atmel is updated first. Risks due to power interruption are similar to the FPGA, so take great care your unit is not rebooted during this update.
Updating the DICE Driver
The DICE chip is the audio I/O chip on the CN9000 I/O board. We recommend updating this driver on MkII or MkII+ units. Full instructions can be found here.
CONGRATULATIONS! The update procedure is now completed. You may now return the Omnia.9 to normal service
Change log & Errata
Entries below detail changes made in INTERIM updates, and are rolled into the main 3.30.79 final release. Note that release 3.20.31 was issued as a factory release for new machines, but was not issued as a field release as other software changes were pending.
Errata:
A "Livewire Clock Missing" indication may appear in System / System Configuration / LW after certain AoIP network adjustments have been made. Even you if have corrected your clocking conditions, this message may not reset. If you have valid Livewire audio, you may be able to make this message go away by toggling "Clock Mode:" to "PTP" clock, then back again to "Livewire" in System / I/O Options / Livewire Outputs / Clock.
Changes:
3.30.79
New DICE firmware version is incompatible with MkI units, now only made available on MkII units.
3.30.73
MkI SNMP issue fixed
Livewire output failure when receiving livestream fixed
New DICE firmware version installable from main user interface
3.30.69
uMPX 4.0 implemented
RDS External Input phase issue fixed
IEEE-1588 PTP clock synchronization improved
Rewritten Livewire engine
SNMP reworked & improved. New SNMP MIB, now auto-generated
3.20.38
Streaming metadata works again (broken in 3.20.33)
3.20.33
Nielsen production license added
Hyperthreading warning disabled for MK II+ hardware (not necessary)
3.20.32
Dice Firmware version displayed under Hardware Info
3.20.31
Support for MK II+ hardware
3.20.29
AM TX out can now be selected for Digital Out
3.20.28
Nielsen CBET new eval license
3.20.27
Nielsen CBET stepAside function bug fixed
3.20.26
RDS encoder UTF-8 translation implemented
3.20.25
Nielsen CBET ratings encoder option implemented
3.20.23
RDS encoder letters É, È translation bug fixed
3.20.22
RDS encoder letter á translation bug fixed
Let us know how we can help
If you have further questions on this topic or have ideas about improving this document, please contact us.