Creating SSH Tunnels with PuTTY or Mac Terminal programs
 Updated
by
Bryan Jones
Updated
by
Bryan Jones
Scope
While not officially supported by Telos, this document will show you how to create SSH tunnels using PuTTY in Windows or Terminal on a Mac.
Description
You may find that you have a dual-network device and need to communicate with devices on the other side. For example, you have a network connection to the WAN side but need to configure devices on the LAN side
If the device you are connected to supports SSH and know the SSH credentials, you can create secure tunnels to the other side.
Using PuTTY
PuTTY is an SSH and telnet client. PuTTY is open-source software available with source code and is developed and supported by a group of volunteers.
You can download PuTTY here.
- Download and run PuTTY on your Windows Computer.
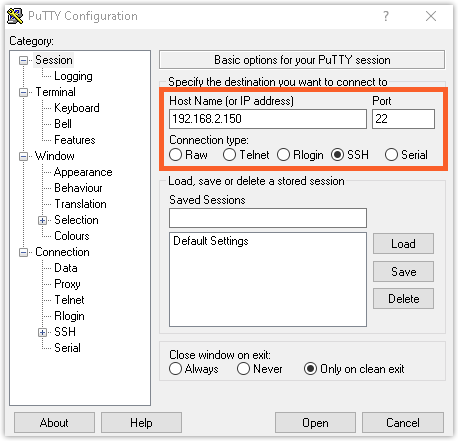
- Configure an SSH connection to the device that hosts both connections.
- Supply the hostname or IP address
- Port 22
- Select connection type SSH
Do not click Open yet.
- Under the Connection heading, expand the SSH options, then click Tunnels
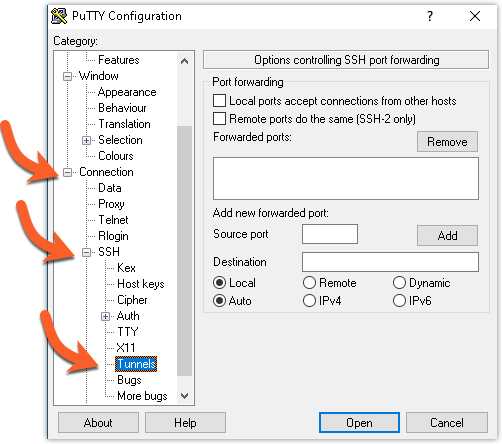
The next two steps require some explanation.
- The Source Port is the "local" port. This will be the port you connect to when running your Web Browser on this same computer as PuTTY.
- The Destination is the address:port of the device you want to connect to on the other side of this connection.
- Specify a Source Port. (in this exampleS we'll use 8081)
- specify a Destination and port number separated by a colon. (in this example, we'll use 10.1.100.1:80)
- Click Add.
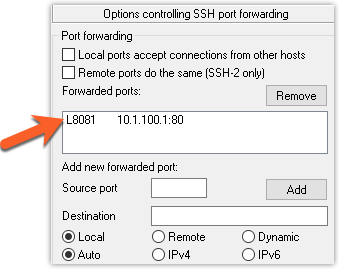
You will see the new addition in the list of forwarded ports. Repeat this for any other devices using a unique source port for each one. For example, the next device you add would need to use Source Port 8082.
- Click Open. (you will need to say Yes to acceptance of the SSH key from the host)
- In the terminal window, specify the user name.
- Supply the password.
Using Terminal on a Mac
- Launch Terminal on your Mac.
- Select Preferences.
- Pick your favorite theme (mine is Homebrew) and create copy of that Profile and give it a name.
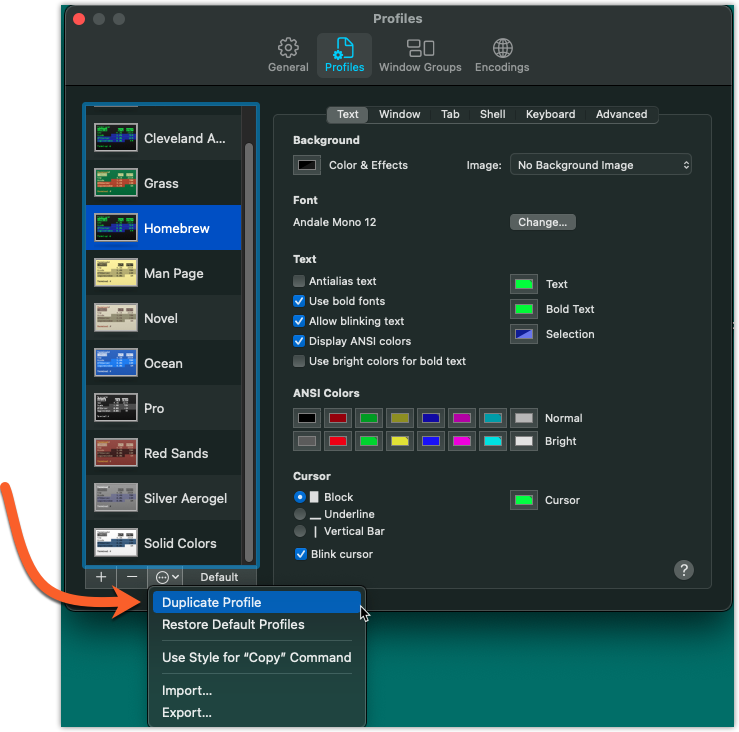
- Select your new Profile from the list.
- Click on the Shell tab.
- Check the box for Run command and enter text similar to his.
ssh -p 22 username@192.168.2.150 -L 8081:10.1.100.1:80
This string is defined as follows;
ssh- Make an SSH connection-p 22- the "-p" is for port and instructs terminal to use port 22 (in this case, port 22 is the default SSH port so it could be omitted)username@192.168.2.150- This is the IP address to connect to and the username that is passed along with the connection. If the log in user name was Fred, you would send fred@192.168.2.150.-L- specifies the mapping of the local port. the format is<localport>:<remoteaddress>:<remoteport>. In this example we're saying map local port 8081 to the web port (port 80) on the device at 10.1.100.1.
- Double click the new profile to open the connection and supply the password.
Opening the webpage
Once you have successfully connected using either method;
- Open a Web Browser and use the address
http://localhost:8081to connect to your remote device. - Login as you normally would.
Let us know how we can help
If you have further questions on this topic or have ideas about improving this document, please contact us.