Quasar Module Firmware - Update version 0.37
 Updated
by
Bryan Jones
Updated
by
Bryan Jones

Scope
This document applies to the Axia Quasar line of audio consoles and details the steps required to update module firmware.
Description
Quasar FW version 0.37 has just been released as an important field update to address a rare yet serious issue that can cause random lockups of the button keys on one of the Quasar surface modules. Please follow these steps to update the firmware of each of your Quasar Modules. Performing this update will ensure correct operation and maximum reliability.
Please download the firmware file 1621-00180-004-QUASAR-MAIN-MCU-v-0.37.bin from this link and save it to a location on your computer.
Updating the Firmware on the MTS-MON (Master Touch Screen Monitor Module)
- Connect a PC to your console network.
- Open the MTS-MON Control Center web page at the unit's base IP address (standard HTTP port 80).
- In the browser address bar, type: http://<IP address>/debug/mcu.
You will be presented with this page:
- Click on “Choose File,” navigate to the location where you saved the update file, and select it.
- Press the "Update MCU Firmware" button. The new version will be applied to the current firmware bank and overwrite its contents.
- IMPORTANT: After the update is applied, this web page will give no confirmation that the new firmware has been uploaded and will return to its initial state, as shown in the picture above. The LEDs in the rings and buttons on your surface will momentarily go off and then come back on.
- Click on the Module Information link at the bottom left of your Web UI menu.
You will be presented with this page:
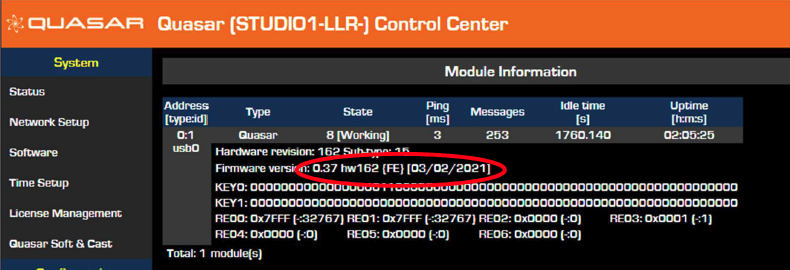
Please check that the new firmware version, 0.37, is correctly loaded, as displayed in the image above. This will confirm your firmware is uploaded successfully.
In case the version number should be lower, please double-check you downloaded the correct file version and repeat this procedure from Step 4.
Updating the Firmware on the XR-4FAD (Four Fader) Module
- Connect a PC to your console network.
- Open the XR-4FAD Control Center web page at the unit's base IP address (standard HTTP port 80).
- In the browser address bar, type: http://<IP address>/debug/mcu, again using the actual IP address of your first 4-Fader module.
You will be presented with this page:
- Click on “Choose File,” and navigate to the location where you saved the update file and select it.
- Click the "Update MCU Firmware" button. The new version will be applied to the current firmware bank and overwrite its content.
- IMPORTANT: After the update is applied, this web page will give no confirmation that the new firmware has been uploaded and will return to its initial state, as shown in the picture above. The LEDs in the rings and buttons on your surface will momentarily go off and then come back on. The faders will go down.
- Now click on the Module Information link at the bottom left of your Web UI menu.
You will be presented with this page:
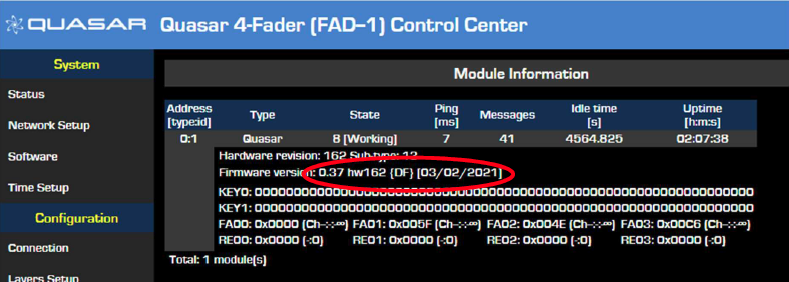
Please check that the new firmware version, 0.37. is correctly loaded, as displayed in the image above. This will confirm your firmware is uploaded successfully.
In case the version number should be lower, please double-check you downloaded the correct file version and repeat this procedure from Step 4.
Let us know how we can help
If you have further questions on this topic or have ideas about how we can improve this document, please contact us. Your contribution is vital for us.